Scott B's 93 Ranger XLT V8 | Page 2 | Ford Explorer Forums - Serious Explorations

  • Register Today It's free!

Scott B's 93 Ranger XLT V8

How is it having the compressor in the cab?


The only time I run it I am airing up my tires, so the noise isn't a problem!

It is a hassle to hook up the air hose, though.


Join the Elite Explorers for $20 each year.
Elite Explorer members see no advertisements, no banner ads, no double underlined links,.
Add an avatar, upload photo attachments, and more!
.


Repainted Grille

Along with the serious preparations I am making for the upcoming trip to Colorado, I took some time for a cosmetic improvement.

I painted the grille and bumper trim strip - the fender flares are next.

Here are the before shots:
 

Attachments

  • Grille before 2 small.JPG
    Grille before 2 small.JPG
    80.2 KB · Views: 2,676
  • No grille 2 small.JPG
    No grille 2 small.JPG
    87.5 KB · Views: 2,617
  • Grille before paint small.JPG
    Grille before paint small.JPG
    118.5 KB · Views: 2,636


And the result:
 

Attachments

  • Black Grille small.JPG
    Black Grille small.JPG
    67.8 KB · Views: 4,074


Looks great! Still one of my favourite rangers on the web :)


Thanks -

Stay tuned - more to come!


...It's amazing what a little paint can do to the looks...:biggthump

...I'm now squinting to find the spare axle that is mounted...:dunno:


...It's amazing what a little paint can do to the looks...

Hmmmm... I got the idea from you!

...I'm now squinting to find the spare axle that is mounted...:dunno:

I think Gregg mistook my shovel mount for an axle (next to the spare tire.)

He'll get a closer look in Colorado.


...Awww, got ya...

...:scratch:...But that might not be a bad idea...Spare ttb axle shafts mounted somewhere...


Whoops!

Think i still had sleepy's in my eye's when I read this:

Custom mounts in truck bed
- full-size spare
- 60" Hi-Lift jack
- shovel, axe, pick holder

Short 1 letter! Lol..!!


Suspension Tweaking

As part of my preparation for the upcoming expedition to Colorado, I wanted to make some changes in the suspension to compensate for the sagging, aging springs. The truck was almost an inch low in the rear - empty! I also needed an alignment - either toe or spring sag (or both) has caused excess wear on the insides of the front tires.

The Plan

Raise the rear. Originally, there were 1" blocks under the spring (which were put in to account for spring sag several years ago.) These will be replaced with the factory 2" blocks.

Raise the front. I have 1/4" coil spacers (with the hex opening) that were used years ago with different front springs. Currently, there are 2 spacers under the coil - I will add the third, and hopefully get the truck sitting close to level.

The Process

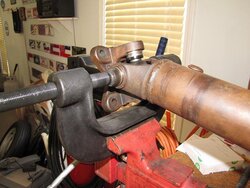
Raise the rear. The u-bolts took some work, and finally broke free. (I soaked them with Kroil for several days before this - ended up using PB Blaster, too.) An alignment pin from one of the blocks got stuck in the spring perches on the axle. One came out easily, the other had to be cut/ground (see picture.) After all that, everything went back together, the new u-bolts from Michigan Truck Spring fit perfectly. Torqued to 100 ft-lbs, then 120 ft-lbs, all is well.

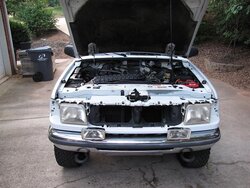
Raise the front. I have pulled the front end of this truck apart so many times I could do it in my sleep. Needless to say, everything came right apart, and went right back together.

Pictures of the rear work:
 

Attachments

  • End Result.JPG
    End Result.JPG
    64.7 KB · Views: 2,148
  • Torquing.JPG
    Torquing.JPG
    49.6 KB · Views: 2,165
  • Grinding.JPG
    Grinding.JPG
    81.8 KB · Views: 2,184
  • Original.JPG
    Original.JPG
    78.5 KB · Views: 2,181


Pictures of the front work:
 

Attachments

  • Remove Coil.JPG
    Remove Coil.JPG
    65.8 KB · Views: 2,177
  • Cleaning Coil.JPG
    Cleaning Coil.JPG
    81.3 KB · Views: 2,190


Here is a picture after all the work. As you can see, the rear is slightly higher than the front. This should allow the truck to sit level once it is loaded with all my junk.
 

Attachments

  • Truck after Tweak 2 small.JPG
    Truck after Tweak 2 small.JPG
    77.6 KB · Views: 5,260


Sneak Preview

A quick peak at what is in the works...
 

Attachments

  • Seat Covers small.JPG
    Seat Covers small.JPG
    81.2 KB · Views: 2,214


Camera/Binocular Holder

I usually carry a camera and pair of binoculars when I am out in my truck. They are usually stored behind the seat - in amongst jackets, hats and all the other "important items" that end up behind the seat (aren't Xtra cabs wonderful?!)

One small problem - no matter where I put the camera (or binocs) it ends up at the bottom of the pile, in a hard to find place. Never fails.

One day I got this idea - mount them in an accessible yet out of the way place.

In the Gen II Rangers (not sure about Gen I, definitely not in the Gen IIIs) the panel under the rear window is steel (vs. plastic.) Thinking the steel would make a strong enough mounting point, I decided to mount the camera there.

I laid out the binoculars and camera bag, and got a piece of stiff webbing long enough to pass behind both. I mounted the binocular case to the webbing with snaps, used the belt loop of the camera bag, and, using more snaps, attached the strap to the truck panel. (Sounds confusing - see the pictures.)

The pictures show the snaps on the interior panel, the empty strap, the full strap.

It works great! Easy to grab the camera, quick to put away, and I don't really have to worry about it getting banged up.

One suggestion if anyone does this - put a dab of silicone sealer under the snap half mounted to the interior panel. This will keep them from rattling.
 

Attachments

  • Snaps small.JPG
    Snaps small.JPG
    67 KB · Views: 2,279
  • Strap small.JPG
    Strap small.JPG
    68 KB · Views: 2,257
  • Full small.JPG
    Full small.JPG
    79.9 KB · Views: 2,247


More Trip Prep

I replaced my u-joints and carrier bearing this weekend. I also cleaned the underside of the truck.

The joints I replaced were greaseable ones - they worked fine, but tended to sling grease. I replaced them with the newest, latest and greatest from Spicer. I sourced a Timken carrier bearing from RockAuto.
 

Attachments

  • Drive shaft 1 small.JPG
    Drive shaft 1 small.JPG
    67.3 KB · Views: 2,056
  • U-joint press 1 small.JPG
    U-joint press 1 small.JPG
    73.2 KB · Views: 2,076
  • U-joint parts 1 small.JPG
    U-joint parts 1 small.JPG
    102.3 KB · Views: 2,099


I rigged up temporary mounts for both a 20L (5 gallon) gas can and 3 gallon water jug. I say temporary, because I have plans on redoing the truckbed interior next year sometime.

These mounts are nothing fancy - they aren't even attached to the truck. All they do is support the cans (keep them from rocking and shifting.) I used fairly heavy bungee cord, so I think they will be fine for this trip.

I also added a drain plug to my transmission pan (as can be seen from the before picture.) I need to get an after picture. I installed the plug where the black dot is in the lower left corner of the pan.
 

Attachments

  • Gas can mount small.JPG
    Gas can mount small.JPG
    89.5 KB · Views: 2,707
  • Water jug mount small.JPG
    Water jug mount small.JPG
    63.5 KB · Views: 2,228
  • Tranny drain plug small.JPG
    Tranny drain plug small.JPG
    99.1 KB · Views: 2,102


New seats!

This project has been a long time coming. I finally got my Explorer seats re-upholstered and installed.

I have a lot of pictures of the process, and will do a write-up when I get the chance.

In the meantime, here is a picture of the completed seats installed in the truck. What a difference!
 

Attachments

  • Seats installed small.JPG
    Seats installed small.JPG
    53.8 KB · Views: 2,756


Join the Elite Explorers for $20 each year.
Elite Explorer members see no advertisements, no banner ads, no double underlined links,.
Add an avatar, upload photo attachments, and more!
.


That looks way to clean! I mean the door jambs are spotless! Very nice!

I have been thinking of a way to transport fuel safely, but i haven't yet. I also have a 3 gal water can, need to strap it down inside, not worried about it like a jerry can in the back of the EX.

How much for the spicer joints? I am getting a spare set b4 we meet in Ouray.


Back
Top