-
Performance Upgrades - Maintenance - Modifications - Problem Solving - Off-Road - Street Trucks.
Covering the Explorer, ST, Sport, Lincoln Aviator, Sport Trac,
Mercury Mountaineer, Mazda Navajo, Ford Ranger, Mazda Pickups, and the Aerostar.
Featuring H.I. - Human Intelligence.
Register Today It's free!
- Forums
- Ford Ranger - Mazda B-Series Forum
- Ford Ranger - Mazda B-Series Forum
- Ranger / Mazda Registry
You are using an out of date browser. It may not display this or other websites correctly.
You should upgrade or use an alternative browser.
You should upgrade or use an alternative browser.
Scott B's 93 Ranger XLT V8
- Thread starter Scott B.
- Start date
Elite Explorer members see no advertisements, no banner ads, no double underlined links,.
Add an avatar, upload photo attachments, and more!.
Scott B.
Explorer Addict
- Joined
- February 15, 1999
- Messages
- 2,822
- Reaction score
- 28
- City, State
- GA
- Year, Model & Trim Level
- '93 Ranger XLT
Rear Bumper / Tire Carrier
Today, I bought the steel for a new bumper/tire carrier. I will order the hinge and shackle tabs this week.
The plan is to start it next weekend! Can't wait!
Today, I bought the steel for a new bumper/tire carrier. I will order the hinge and shackle tabs this week.
The plan is to start it next weekend! Can't wait!
Scott B.
Explorer Addict
- Joined
- February 15, 1999
- Messages
- 2,822
- Reaction score
- 28
- City, State
- GA
- Year, Model & Trim Level
- '93 Ranger XLT
Karl only has a right-side knuckle. And, it's the same price as Wagner parts.
Tomorrow, I'm going to try to hit the JY at lunch, and hopefully get some splined thrust washers...
Tomorrow, I'm going to try to hit the JY at lunch, and hopefully get some splined thrust washers...
Scott B.
Explorer Addict
- Joined
- February 15, 1999
- Messages
- 2,822
- Reaction score
- 28
- City, State
- GA
- Year, Model & Trim Level
- '93 Ranger XLT
Ordered '95 knuckles from a JY in Pennsylvania today. Should be here by the end of next week.
Bumper project starts tomorrow. Pictures to follow...
It's hard to believe that it's been a year since the Colorado trip.
Bumper project starts tomorrow. Pictures to follow...
It's hard to believe that it's been a year since the Colorado trip.
Brian1
Elite Explorer
- Joined
- February 2, 2000
- Messages
- 5,387
- Reaction score
- 643
- City, State
- Albuquerque, NM
- Year, Model & Trim Level
- 1991 XLT
- Callsign
- KG5BAQ
It's hard to believe that it's been a year since the Colorado trip.
Guess where I am right now
Whats even harder to believe is that it was 10 years ago I first met you in CO!
Looking forward to seeing what you come up with for a bumper!
Scott B.
Explorer Addict
- Joined
- February 15, 1999
- Messages
- 2,822
- Reaction score
- 28
- City, State
- GA
- Year, Model & Trim Level
- '93 Ranger XLT
Guess where I am right now
Whats even harder to believe is that it was 10 years ago I first met you in CO!
Looking forward to seeing what you come up with for a bumper!
10 years - time sure does fly.
Today, the weather here is much, much cooler than it has been - reminds me of Colorado! It's 60 outside now - should be a good day for working on the truck.
What will it look like? Probably a lot like yours!
- Joined
- August 1, 2008
- Messages
- 11,764
- Reaction score
- 2,135
- City, State
- MO MO
- Year, Model & Trim Level
- 94 & 95 XLT's
Watching for the build pics
Will it have a hitch receiver tube as well?
I awoke to 48* here, talk about a shocker! Windows open, fans blowing, and some teeth chattering..lol
Will it have a hitch receiver tube as well?
I awoke to 48* here, talk about a shocker! Windows open, fans blowing, and some teeth chattering..lol
Scott B.
Explorer Addict
- Joined
- February 15, 1999
- Messages
- 2,822
- Reaction score
- 28
- City, State
- GA
- Year, Model & Trim Level
- '93 Ranger XLT
Bumper Build
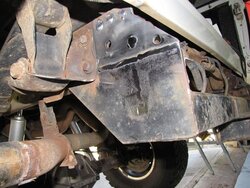
Yesterday, we started building my new rear bumper with tire carrier. Thanks to Brian1 for the design ideas/inspiration.
As you can see from the pictures, my Class III hitch is welded to the frame. (It's an aftermarket hitch.) It fit nice and tight under the factory bumper, but might be a little low with this bumper - we shall see.
The first thing we did was build side plates, and weld them to the frame/hitch. There wasn't much frame area to grab behind the spring hangers, so this plate in combination with the hitch mount makes a good bumper mount.
The factory bumper mounts had been welded to hitch also, so they were cut.
Finally, you can see the parts I purchased from Comp4x4 - through-bumper tow points and a spindle/sleeve carrier hinge.
Attachments


Scott B.
Explorer Addict
- Joined
- February 15, 1999
- Messages
- 2,822
- Reaction score
- 28
- City, State
- GA
- Year, Model & Trim Level
- '93 Ranger XLT


Scott B.
Explorer Addict
- Joined
- February 15, 1999
- Messages
- 2,822
- Reaction score
- 28
- City, State
- GA
- Year, Model & Trim Level
- '93 Ranger XLT


Scott B.
Explorer Addict
- Joined
- February 15, 1999
- Messages
- 2,822
- Reaction score
- 28
- City, State
- GA
- Year, Model & Trim Level
- '93 Ranger XLT
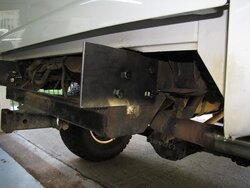
Setting up the bumper, and the completed welding.
To the bumper, we need to install the sleeve for the spindle, cut the ends to length and contour, cap the ends, add Hi-Lift holes, and decide if I am going to keep my current hitch or remove it and add a receiver to the bumper.
To the bumper, we need to install the sleeve for the spindle, cut the ends to length and contour, cap the ends, add Hi-Lift holes, and decide if I am going to keep my current hitch or remove it and add a receiver to the bumper.
Attachments


- Joined
- August 1, 2008
- Messages
- 11,764
- Reaction score
- 2,135
- City, State
- MO MO
- Year, Model & Trim Level
- 94 & 95 XLT's
Wow, look at those dimes all in a row! Sweet welds Scott.
Your welded on hitch is giving the rear a lot of extra strength, that is a good reason to leave it on. You seen what happened to my rear frame...lol
How about just removing the receiver tube and leaving the cross member, then weld the tube thru the new bumper and bolt it(so the bumper can be removed) to the top of the cross member? That will give you some more clearance I think.
- Joined
- March 4, 2007
- Messages
- 26,320
- Reaction score
- 122
- City, State
- anaheim hills,california
- Year, Model & Trim Level
- 95 ranger 4x4/ 91 X 4x4
...:scratch:...I wonder if my Ranger would fit in that garage..
...I second relocating the receiver into the new bumper while keeping the old cross member as a skid protector..I picked up a receiver for about $10 new at the local steel yard..
...and I like your selection of extra strength jack stand supports..:

...I second relocating the receiver into the new bumper while keeping the old cross member as a skid protector..I picked up a receiver for about $10 new at the local steel yard..
...and I like your selection of extra strength jack stand supports..
:Scott B.
Explorer Addict
- Joined
- February 15, 1999
- Messages
- 2,822
- Reaction score
- 28
- City, State
- GA
- Year, Model & Trim Level
- '93 Ranger XLT
Wow, look at those dimes all in a row! Sweet welds Scott.
Not my welds... A wheeling buddy of mine has his garage set up as a nice shop - and has been welding for many, many years (learned from his Dad). He "volunteered" to help me with my bumper.
I have a wood shop in my basement. I'll be building the new interior in the back of the truck.

Scott B.
Explorer Addict
- Joined
- February 15, 1999
- Messages
- 2,822
- Reaction score
- 28
- City, State
- GA
- Year, Model & Trim Level
- '93 Ranger XLT
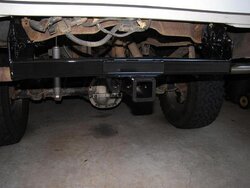
For the moment, I have decided not to raise/remove the hitch. It makes a very strong crossmember (even though it hangs a little low.)
So, today I wire brushed the rust/corrosion/old paint - took it all down to bare metal. Then, a coat of primer and 3 coats of paint. It came out pretty good - some splatters out of the spray can, but most of them flowed out. I know, it's going to get scratched while wheeling, so no big deal.
So, today I wire brushed the rust/corrosion/old paint - took it all down to bare metal. Then, a coat of primer and 3 coats of paint. It came out pretty good - some splatters out of the spray can, but most of them flowed out. I know, it's going to get scratched while wheeling, so no big deal.
Attachments

Elite Explorer members see no advertisements, no banner ads, no double underlined links,.
Add an avatar, upload photo attachments, and more!.
Featured images


Featured images
Similar Threads
- Replies
- 12
- Views
- 9,128
- Replies
- 137
- Views
- 87,426