Smoked Tail Light Tint | Ford Explorer Forums - Serious Explorations

  • Register Today It's free!

Smoked Tail Light Tint

I decided to make my own smoked tail light tint. It is static-cling window film in 20% limo black from Wal-Mart, or i have seen it other places also. Then cut to fit. The tint is a thin static cling vinyl unlike real tint, so you can use and reuse them as many times as you want. The tint comes in a roll. It cost me $10.19, and hour of my time.

38688zz111.jpg


I made the templates by cutting a hole in a sheet of paper, taping it to the light and tracing the shape to the paper. Then I cut the shape and transferred it to the tinting.

38688zz10.jpg


This is a pic of the cut outs and the stock tail light. Make sure it is clean..

38688zz1.jpg


The tint is the vinyl, static type, but you still apply it like the regular window tint. You can use baby shampoo and bottled water to help you apply it. This is with the first one on the top..

38688zz2.jpg


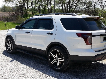
This is it all done !

38688zz3.jpg


After several high pressure car washes, and high speed driving, mine is still sticking. Once the moisture is gone, they are not coming off until YOU take it off.


Join the Elite Explorers for $20 each year.
Elite Explorer members see no advertisements, no banner ads, no double underlined links,.
Add an avatar, upload photo attachments, and more!
.


Thank's for submitting the article. You've just earned 2 months worth of Elite Explorer privledges :thumbsup:


good idea think i might try this for my headlights also..


yep it would work...


I'd just be worried about the durability, since window tint isn't really meant to hold up against the elements.


its not window tint , it is a lot heavier than window tint . and it goes on the out side ,not inside....


looks good maby ill try that


do they sell that stuff anywhere online?


Go to wally world, Kmart and even some auto parts stores carry this type of tint. If you look at it in the store it feels more like rubber than plastic.


Hartman said:
I'd just be worried about the durability, since window tint isn't really meant to hold up against the elements.


i like to think about it this way... when you buy window tint you get a big roll of it... enough to do two or so windows of your truck.. so when/if your tail light tint starts to bubble or peel.. just peel it off.. clean and remove all glue, and put a new layer on it!


great idea man, i just did this with mine, except i used 5% because thats all they had.


well, i must have done something wrong, b/c when i got to school today i looked behind my truck and the tint was gone. I'm assuming it's b/c it was cold when i put them on, but the seemed to be on there pretty well...


must have been the cold, the only time i lost mine was in a car wash at full blast. and its been like 6 or more months with them on...


go out and look at your lights when they're lit. see how the entire thing lights up? after my tint only the center section lit, but it was still VERY visible, even in daylight.


I have not done this myself, but over on the Contour Enthusiasts Group, the tinted tail lights are being accomplished with spray-on RC car window tint... It's about $5 a can and the small can can do several sets of tail lights.

DSCF3066.jpg


DSCF3067.jpg


After a few very thin coats...

DSCF3071.jpg


The advice I have seen is to use several VERY thin coats because the product will run when wet if applied too thick.

ymmv ;)


Some more examples

These are my tails that I did this weekend. I used the same RC paint as SoundQ SVT. It only took one can, and I coated them 3 times then 1 coat of clear. I also let them dry for about 48 hours to the paint allow the paint to dry as much as possible. I have to say they came out awesome! They look brand new and like they came from the factory that way.:D I bought a few extra cans if anything is instrested.

P.S. - Don't mind the dirty truck! It snowed the day before I started working on the truck. In APRIL, I know!:mad:

Without further ado....

This is before the clear coat.
painting.jpg


Back of the truck.
backend.jpg


Close up of driver side tail.
driver.jpg


Close up of passenger side tail.
passenger.jpg


wow- those looks very good- very dark


Tygrr, how do those look lit up? Bright enough? Any night pictures?


Join the Elite Explorers for $20 each year.
Elite Explorer members see no advertisements, no banner ads, no double underlined links,.
Add an avatar, upload photo attachments, and more!
.


buckshotmudder
Thanks! :D

Paraphoe
At night their you can see them just fine. I check the 50ft distance you need to be legal and no problems there. During the day might be a different story. I've notice sometimes when I'm stopped at a light with my turn signal on the person behind me either doesn't know or isn't smart enough to go around before the light turns green. But either way I'll have to test them soon and see if there are any problems. I'll get some pics up for day and night shots soon.

I might be putting in some LED lights to solve the problem. Finding or making them is going to be the hardest part.

Okay, I took some pics today. (Is there a picture limit??)

Daylight Pictures


This is with the running lights on

Close up:
closeup.jpg


At a distance(~25ft or more):
distance.jpg


Side closeup:
side.jpg


This is with the break lights


Close up:
closeup.jpg


At a distance(~25ft or more):
distance.jpg


Side closeup:
side.jpg


And a few more

Distance shot(well over 50ft):
distance.jpg


Night shot:
nightshot.jpg


I only took one night shot because you can seem them better at night then during the day, and its enough to show proof that you can see them. I also, have some video of the hazards on if you want to see them blinking. One last test I'd have to do would be during mid day when the sun is really bright.

Anyone know how to take off the third break light?


Back
Top