The 4.0 Swap was chump change compared to this - Look inside... | Page 3 | Ford Explorer Forums - Serious Explorations

  • Register Today It's free!

The 4.0 Swap was chump change compared to this - Look inside...

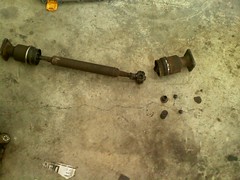
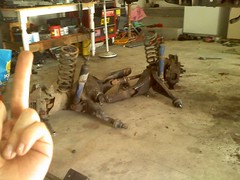
Is that for balance or is there some other reason you do that when you shorten it? it obv makes sense just curios. I need to clean up a few odds and ends but when thats done i can start on building my doubler, this is more the kind of stuff i was looking forward to doing but i knew the 4.0 swap was project number one on this thing, that 2.9l had the stalling out prob on me, there was no way i could wheel it like that.


Join the Elite Explorers for $20 each year.
Elite Explorer members see no advertisements, no banner ads, no double underlined links,.
Add an avatar, upload photo attachments, and more!
.


I went out and pulled the 8.8 out of the donor explorer, the only other thing i need to get out of it is the speedo cable bk the bII one is to short, and its on its way to a scrapper. I think the money out of scrapping the ex will go to a set of weld on beadlocks, I know a guy that can get me a screamin deal on them. I shortened my rear dshaft but then found out the 7.5 has a small flange, like 2.5" flange and the driveshaft I have for the ex that i shortened has a 3" flange, so I couldn't put it in, oh well I guess its the BII's way of telling me its time for a sas and a rear 8.8. I guess ill just have to indulge it


shortened the stock bII shaft today and put it in, it was broken immediately after shifting to low range, and not where i welded it funnily enough, but i broke one of the cv's.

on the 8.8 front i welded the spiders and started cleaning off the housing, its pretty darn rusty and id like to paint it before it goes in the rig. i think tomorrow ill go out and get the bII on jackstands and start pulling the rear end, its about time for this sucker to get some tougher parts.


On those spider gears make sure you really lay the welds on heavy with good penetration at the four corners that they engage, I also welded the edges of the spiders to the carrier. I have done this while the carrier is still in the housing and also done when the carrier is on welding table. When on table it is just so much easier to do and can do a better job. It's extremely important to get this welded right or it can be catastrophic, especially with larger tires and increased HP. Also make sure that the C-clips can still be removed and installed.
Also when doing the corners, sometimes the gears are not positioned to get the arc down in the valley. In this case I just start at the top of the highest point and melt it down and let it flow down into the valley. Of course I have the welder cranked up.
What welder are you using?


I'm leaving for a week, and may not be able to have internet access so good luck.


i have a lincoln 140 mig, i rotated the gear assembly until the 4 edges just about matched, then I welded the 4 corners, 3 good beads, one in each valley, and 2 more on top of that. then i welded the teeth next to each corner, and finally welded the gears to the carrier, turn the diff and repeat on the other side, i have a sneaking suspicion that its not going anywhere haha.


I got 3 of these bad boys for 75 bucks,

5855518426_2157ce4fb7_m.jpg


thats the start of my 3 link, i went out to the garage and cut the spring perches off the 8.8, just tryin to get closer to getting it under the Bronco. always fun times when the brown santa comes to your door, they are delivering my new spring perches and weld in bungs tomorrow.


Hey, tomorrow has long been gone? :popcorn:
$75 :eek: nice to have friends in high places


yeah its pretty sweet to get discounts, they are normally 37 each so that worked out really well, the perches are from trailgear as well and they are a frogshair from fitting on the 8.8. My buddy at the offroad shop left for alaska for 2 weeks but he left me a JK to finish the body armor on, man thats a pain in the ass but its pretty cool to get payed to work on 4x4's. the downside is it hasn't left me much time or inclination to wrench on my own crap, but it will be done tomorrow so hopefully i can get back to the bII


busted the first attempt at shortening a driveshaft, but it broke the cv, not my weld haha, i think i may have made it to short and stressed the cv joint to failure
5910221031_1b36554d67_m.jpg


this is the type of wheelin we do here in Idaho, lots of lava rock to be found,

5910221157_c77b3048c1_m.jpg


That's to bad. Seems that if it was too short that it would have slipped out of the telescoping end when flexing.
If your angles permit it how about running Spicer 1350 joints at both ends. Will have to change some flanges. Was the 8.8 rear in when this happened?
If your tanny is running more or less parallel to th ground and the rear pinion is pointing more or less straight up at the transfer then you'll most likely have to run a double joint at transfer and a standard u-joint at rear.
Now lets, say the both pinion and transfer are pointing up and down around the same angle then I'd go with the single u-joint at both ends. This is the way my rear DS is and have never broke, knock on wood. And both are 1350 joints. Thinking of even going to the next level joint in the future when I go to larger tires.
Example, the pinion is pointing up at 9 deg. and the transfer pointing down around 9 deg. But to get those angles the same is a fairy tale sometimes. But as long as there within a few deg. it will work just fine. It's when there way off is when you'll get vibration at higher speeds. Remember that the 4 bearings at each end are not a constant speed like a CV (constant velocity) joint. So it's important to get the angles right if your going to use standard joints at both ends.
And if your going to weld those spiders then there will even be more strain on those joints when turning.
How about the guy with the 4x4 shop, can he help in designing a DS with the good stuff? Or at least come up with some parts?
http://www.dennysdriveshaft.com/frequently_asked_questions.html


haha yeah Eric told me that im not allowed to mess w the driveshaft anymore, i have the explorer driveshaft that i shortened and is ready to go but it has a 2.5" flange on the tcase end and a 3" flange on the axle end, but my 7.5 has a 2.5" so i can't use it until i put the 8.8 in.
I actually have a driveshaft out of my fullsize bronco that i grabbed before i scrapped it that is about 5 in shorter and has a double cardon joint on the tcase side that i would like to use when i build my doubler, bk it will be the right length. my concern is the flange on my 1354, its a 2.5" flange, i just don't know where i can get a 3" flange that fits on a 1354 tcase. Ive been wondering if a flange off a 1356 would fit, if so i wish i would have pulled it off that bronco before i scrapped it haha.
I actually got the bII on jackstands and cleaned the garage in anticipation of tearing out the front suspension, I decided i needed to do the front suspension and get the ride height figured out there first, then duplicate the rear.


this surprisingly didnt' take very long to remove,

5920908312_5fcb443aa7_m.jpg


and of course the obligatory i hate ttb shot, not such a tradition here but over at fullsizebronco.com its a must when doing a sas
5920906980_06612f22f7_m.jpg


I wasn't going to post this bk its a little poserish but it kinda shows what im going for, the rig would basically sit this height with the coils i have if i just used the stock coil buckets and mounting location. I think however im going to move the buckets up about 2", i want it to sit a little lower, and then have a sawzall and plasma cutter night at my house with a few of my closest friends haha

5920909516_0490e1bb3a_m.jpg


this surprisingly didnt' take very long to remove,

5920908312_5fcb443aa7_m.jpg


and of course the obligatory i hate ttb shot, not such a tradition here but over at fullsizebronco.com its a must when doing a sas
5920906980_06612f22f7_m.jpg

My sentiments exactly :thumbsup:


i have 2 more rivets to grind off and then all the ttb brackets will be out, the next step after that will be to remove the coil buckets so i can mod them and move them forward, i think i can get them 4-5 inches forward and 2 in higher without much trouble, my only concern is how the frame wows out where the steering box bolts are, ill have to work around that i guess


ok so all the rest of the ttb brackets are off and I started cleaning up around the coil buckets so i could measure. my main prob is going to be that the frame wows out about 3/4 of an inch right in front of the current coil bucket mounting location. even so i think i can go 5" forward and 2" up from my current coil bucket location.

My buddy Eric who owns the 4x4 shop gets back tomorrow night so he can give me input on it too, i wasn't really going to make those kind of changes without his opinion (and plasma cutter) anyway. I was going to post up a pic but i couldn't get a good one with my phone and i guess everyone gets the idea


Was there a rust problem behind the buckets when you removed them? The pass. side on mine was really bad which required me to weld a plate over it so I could mount my coilover bracket to it.


i wasn't really going to make those kind of changes without his opinion (and plasma cutter) anyway.
I like your way of thinking.

Might have to shim one coil bucket further out to match other side so that both track in front of the rear wheels no matter what the frame does.

| |
Top view

| |

When I did my front solid axle I temporarily had the axle sticking out further about an inch on one side until I had to fix some other problems. Ran it like this for a week or two and really never noticed any bad things until I fixed the other problems and centered it.


i haven't removed the buckets yet but i had a pretty stout oil leak with the 2.9, the whole thing is covered in grunge so im thinking they may not be that rusty. hopefully i get to the bII this weekend im excited to get things moving forward with it


Join the Elite Explorers for $20 each year.
Elite Explorer members see no advertisements, no banner ads, no double underlined links,.
Add an avatar, upload photo attachments, and more!
.


i found that the bulge in the frame for the steering box will put the coil bucket about 3/4" out from its previous location, thats actually good because the jeep coil mounts are abou2" wider than the coil buckets right now, so i can move the coil buckets out just a little bit and get the springs centered top and bottom


Back
Top