argroft
New Member
- Joined
- October 16, 2015
- Messages
- 3
- Reaction score
- 3
- City, State
- Hanover, PA
- Year, Model & Trim Level
- '03 Mountaineer
I figured I'd post my latest project here for anyone interested. Recently I read this thread about removing the third row seat and adding extra storage. There was a comment by scdix50 in particular that caught my interest. Essentially, he had removed the third row and built a platform with flip open doors to provide added storage. I thought "That's a great idea! I should try that", so I did. I figured being 21 and without kids that I'd likely never use the third row seating in my 2003 Mountaineer, so I might as well make good use of the space instead.

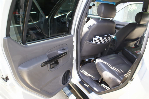
This is the inner framework of the entire setup. I wanted a little extra depth, so I built it up about 3" above the previous level. The frame is attached to the studs that were previously used to fasten the seat. The front mounting ended up being fairly simple as I used the same method as scdix50, which was to use turnbuckles to fasten to the child safety hooks behind the second row.

This is a shot of the completed setup. I couldn't get a hold of a perfect matching carpet, but it's close enough that I don't think it's an issue. For the doors, I used "slam latches" which were marketed for marine use. These were the only recessed latches/handles that I could find that didn't cost $50 a piece.

Here's an image of the farthest back compartment. I used full overlay euro-style hinges to attach each panel so that I couldn't see the hinges when it was closed up. Each compartment is wired with LED lighting so I can always see what I'm doing. There is a normally closed switch mounted in the right corner under each lid to control the lighting.


This compartment is my favorite. I wanted to have an easily accessible space to store any tools that I may put in down the road, so I came up with this "lift up" tray. Using the handle on the front edge, if you pull the tray up and toward you, it pulls right out. When pulled out, it just barely floats above the surface, that way it can't mark up the carpet, but also so if something were to break, nothing can fall and damage anything (or anyone). It makes it a lot easier to gain access to the tray's storage, especially if I need to use it for extended periods of time. The LED lighting is included here as well, except I took an extra step to guard them a bit so I can't easily knock something into them and break them.
So far I am pretty pleased with the results and will probably work on some kind of organizer(s) for the tool tray and/or other compartments.
This is the inner framework of the entire setup. I wanted a little extra depth, so I built it up about 3" above the previous level. The frame is attached to the studs that were previously used to fasten the seat. The front mounting ended up being fairly simple as I used the same method as scdix50, which was to use turnbuckles to fasten to the child safety hooks behind the second row.
This is a shot of the completed setup. I couldn't get a hold of a perfect matching carpet, but it's close enough that I don't think it's an issue. For the doors, I used "slam latches" which were marketed for marine use. These were the only recessed latches/handles that I could find that didn't cost $50 a piece.
Here's an image of the farthest back compartment. I used full overlay euro-style hinges to attach each panel so that I couldn't see the hinges when it was closed up. Each compartment is wired with LED lighting so I can always see what I'm doing. There is a normally closed switch mounted in the right corner under each lid to control the lighting.
This compartment is my favorite. I wanted to have an easily accessible space to store any tools that I may put in down the road, so I came up with this "lift up" tray. Using the handle on the front edge, if you pull the tray up and toward you, it pulls right out. When pulled out, it just barely floats above the surface, that way it can't mark up the carpet, but also so if something were to break, nothing can fall and damage anything (or anyone). It makes it a lot easier to gain access to the tray's storage, especially if I need to use it for extended periods of time. The LED lighting is included here as well, except I took an extra step to guard them a bit so I can't easily knock something into them and break them.
So far I am pretty pleased with the results and will probably work on some kind of organizer(s) for the tool tray and/or other compartments.