What did YOU do to your Explorer today? | Page 13 | Ford Explorer Forums - Serious Explorations

  • Register Today It's free!

What did YOU do to your Explorer today?

A couple days ago my truck ate my 3/8 ratchet and socket :eek:. I was tightening the trans fluid tube and dropped it. it went down the Chinese pinball machine and I spent a whole day looking for it. Its gone. All I can assume is that it ate it. I have looked everyplace on that motor/frame/cross members. Now I need a new trouble light cause its in a thousand pieces.
As a side question. When that trouble light falls from were you tried to stick it up in the motor, what law is it that causes it to always fall with the light shining right in your damn face?

Similar thing happened to me too. When I got around to dropping my front end to replace bushings, ujoints, balljoints and tie rods etc., I found two sockets and a short extension wedged in places I could never see with everything in place.

Amazing how that happens!!!!


Join the Elite Explorers for $20 each year.
Elite Explorer members see no advertisements, no banner ads, no double underlined links,.
Add an avatar, upload photo attachments, and more!
.


Had a fuel pump/sending unit replaced in the tank after about 10 years of it not working. This is the fourth pump/sender in my 94. Bought one from LMC Truck on sale before the holidays and my mechanic installed it for $237.50. I figure that's a reasonable price considering what the dealership wanted to fix it. $550+.

Nice not having to calculate gallons of fuel left using the trip odometer!


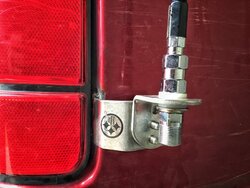
Not quite as exciting as a locker install or engine rebuild, but I got the new antenna mounted.

I cut a small strip of sheet metal from behind the passenger light assembly, drilled some holes, put a bad weld on, and covered it back up.

Will throw some paint on it to ward off rust after I decide on how to run the coax. cable.
 

Attachments

  • antena mount bad weld.jpg
    antena mount bad weld.jpg
    89.8 KB · Views: 315
  • antenna mount.jpg
    antenna mount.jpg
    74 KB · Views: 285


You can take it right back behind the tailight, theres a boot back there that will run it in behind the quarter panel. From there you can run under the trim at the top or bottom all the way to the front. Just be sure to silicone up the hole you have to make for the coax real good.


didn't happen today but I picked up my 92 xlt in December and it didn't take me long to find out why it was so cheap...
new tires
new air and fuel filters
new plugs and wires
all new steel and rubber brake lines
flush brake system
new rear brake shoes, drums, spring kits
new pads and rotors up front
new wheel bearings
new outer tie rod ends new drag link and inner tie rod
new upper and lower ball joints
new front axle u-joints
new window motor bushings
fix power mirror switch
fix passenger inner front door lock switch
fix driver rear outer door handle
replace trans cooler lines
new trans filter and gasket
still waiting for the power steering lines to let go and need to change out the coolant but I think I'm catching up.


Traced the clunk in the front end to a broken sway bar link. Replaced both sides and checked the brake linings and rotors.


Replaced the OEM style radiator with the 3 row all aluminum type on our '92 XLT. Had to cut off part of the lower outlet tube (as mentioned in other posts) to clear the steering box and used a hose clamp between to prevent wear. Still have to finish the 'burping' (blew a bit of coolant out the cap) but at least I got rid of those plastic end pieces with the failure-prone crimps.


I got new tires today. Oil change tomorrow. New ac compressor next week!


New tires here also. Michelin LTX M/S2's all the way around. Nice tire.


I removed rear wheels from my JP project... threw them in my truck for tomorrow. Picking up a $300 parts truck.


Beautiful day here in the mid 60's. Started troubleshooting passenger-side door power window that no longer works.

Couldn't see any broken wires in driver door jamb. Pretty sure it's the motor so I'll be drilling out some rivets by the looks of things.
Don't drill any rivets out if it's the motor. Two bolts are accessible and a third you must drill out the dimple in the steel door. Easy fix if you look at other posts; http://www.explorerforum.com/forums...-window-bushing-replacement-with-pics.233353/


Oh, the smell of new leather! Had the front seats re-upholstered at a shop using Katzkins leather kit and a new headliner which was ripping out when touched. http://katzkin.com/interiors Kits were very close to original. You can see one before and after pictures. Lumbar and Bolster still work as well as all seat functions. I had to go back into the side panel and reconnect the pump line from the switch on the passenger side. But good job otherwise. Pricey but hey, I like the vehicle even more now.
IMG_7659.JPG

IMG_7692.JPG
IMG_7693.JPG
IMG_7697.JPG
IMG_7698.JPG


That looks really nice.:chug:
I've been wanting to recover the seats in my Ram with Katzkin, but too many maintenance things have been getting in the way :(


Very nice, I'm gonna have to save that one. I used 2nd gen NOS leathers i found on eBay. I ordered the seat cushions from Ford, as they still were available and rebuilt the seats using my first gen seat frames. Worked pretty well all in all.

That looks really good, it makes the vehicle so much more appealing. I wish I could afford to redo my limited's interior.


Did you get the headliner from them as well?


Thier website only lists for a 94 mustang.. I love it when the websites include all product listings.. did you have any issues ordering your leathers?


I had the work done at Auto Interiors and Tops in Raleigh, NC. http://www.autointeriorsandtops.com. Initially they were going to custom re-upholster the front seat bottoms for $500 each. Tommy of AIAT contacted a rep. at Katzkin to see if the explorer pattern was still available and they confirmed they could make the entire seat pattern. (I also saw on the site they didn't list the explorer.) AIAT charged me $1300 for the front seats using Katzkin kits and $300 for the headliner. We ordered the seat kits well over a month ago. AIAT matched the headliner to the best of their ability from their stock fabric. It is slightly off color from the original but it looks fine to me. The passenger side lumbar support bladder bag had to be replaced when they got into the seats for an extra $80. The seat bottoms ended up a little large and had to be custom fitted after all after AIAT contacted Katzkin for advice. They had the vehicle for a week. Everything works great and the seats sit very comfortably with renewed support. This was an expensive project I figured I'd take a gamble on. It paid off for me, as long as the explorer keeps on ticking. Next I'm going to get the exterior black mirrors and panels repainted along with new pin striping instead of the stick on stripe that is coming off.


The Katskin kit also came with an arm rest cover to match. Unfortunately, I just had the armrest done a few months back. Saving it for when I wear out the new armrest.


Oh, the smell of new leather! Had the front seats re-upholstered at a shop using Katzkins leather kit and a new headliner which was ripping out when touched. http://katzkin.com/interiors

Nice truck and kudos on you for the preservation.
I have been looking into doing the same interior work and your post came just in time. I appreciate the link!

I did notice that your center console armrest is sagging a bit. They are notorious for breaking off. I have gone through two, and they are not easy to find. So when the last one broke, I took advice from a member in here to repair it with a fiberglass repair kit. If yours ever breaks, I highly recommend using this technique.


Join the Elite Explorers for $20 each year.
Elite Explorer members see no advertisements, no banner ads, no double underlined links,.
Add an avatar, upload photo attachments, and more!
.


Beautiful day here in the mid 60's. Started troubleshooting passenger-side door power window that no longer works.

Couldn't see any broken wires in driver door jamb. Pretty sure it's the motor so I'll be drilling out some rivets by the looks of things.
Could be the gears. You can buy a rebuild kit and replace the gears.


Back
Top