What tools to change upper manifold and valve cover gaskets? | Page 2 | Ford Explorer Forums - Serious Explorations

  • Register Today It's free!

What tools to change upper manifold and valve cover gaskets?

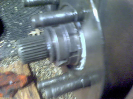
Thanks Foo, I am right in the thick of it at the moment, it's been a total of 5 hours and I have managed to get the intake manifold off, get the MAF and Throttle cleaned. The intake was a pain in the royal arse for me, one of the bolts was absolutely rusted out due to coolant leak I had a while ago and the one in the back got some choice words out of me for the Ford engineers. Three cuts so far and no blood drawn and two T30 bits destroyed. I need to look up ways to clean the inlet ports (there is a lot of oil residue all the way in that I can see) or should I just worry about gasket mating surfaces and seafoam the system at some time? I am afraid to put something in there, intentional or otherwise.


Join the Elite Explorers for $20 each year.
Elite Explorer members see no advertisements, no banner ads, no double underlined links,.
Add an avatar, upload photo attachments, and more!
.


Foo, on the intake ports... BRAKE CLEANER.. Car cleaner is worthless. just take the intake out in the grass, hose down the ports with Brake cleaner. On the heads, just take a Blue Scott shop towel, AWAY FROM the truck, spray brake cleaner on the towel, with your finger wipe as far as you can. then with another soaked towel, just stuff it in the port and twist as much as you can. Most of the contamination will be in the intake.

Gasket surfaces: wipe either with brake clean or acetone on a towel, then instal the new rubber /reusable gasket.

Seafoam: YES

Rob


Thank you, I ended up using the engine degreaser while I had it upside down and then brake cleaner. Will do as suggested on the ports.

As for the gaskets, I forgot to use the grommets that came with the FelPro gasket but checked to make sure that the old grommets were spongy so didn't bother. I am concerned that I might have put the gasket backwards. They seem to be the same (for both left and right) and the holes only lined up for both gaskets on my driver's side cover with the flatter side (it has indentation every 1/4 inch or so) in the grooves on the valve cover. I used RTV but not as liberally as suggested (it wasn't oozing out) but it was a single bead when I put it in. If my gasket is put in wrong then I guess I have to go through re-cleaning the cured silicone now.

Once I put the cover on, I realized I should have done the bloody spark plugs. Oh well, there's still plenty of room to maneauver, so that happens tomorrow. It's too dark for me to do anything else.

Please keep your help coming. I am getting scared that I have to put that intake back in with those 8 bolts. Oh well, another day tomorrow.

Edit: Leaving the gasket the way it is...I confirmed it was done right.


Driver side spark plugs changed, two were seized up pretty good...five out of 6 bolts out on the passerver valve cover...I can't get one, it's totally stripped and I have used up 1/2 can of penetrating oil, brake cleaner...etc. I have hammered the bolt, wiggled the valve cover to get the oil in there but to no avail. Now my bit just turns. So, thinking to take the dremmel tool and cut a horizontal line at the top to see if I can use a straight screwdriver to it somehow. Other than that, i am stuck. Please help.

Edit: Ok, bad idea on the dremmel...there will be sparks everywhere and it's right near the fuel rail not to mention rubs against it or other things when it will spin so not going there...back to square 1

Edit 2: Thinking to just put the valve covers back together and give up on the passenger side (unless I buy a new valve cover by breaking it off but still worried that screw will not come off and cause more problems). It wasn't leaking anyway. If I put it back, the grommets are going to be on the outside now and I wonder if that is going to pose a problem?

Sorry all these questions have piled up.


I am offering a play by play as I run into problems and solve them, hope this helps someone in the future.

Got the stripped bolt out using time (at least 24 hours while spraying it every 8 hours), liquid wrench and finally I am sold on Irwin 8mm tool, came out no problem. The passenger side valve cover was an PITA with the chain, fuel line, EGR Valve, everything in the way. I ended up stripping a bit of the valve cover on the chain in the process so be careful here. I used some RTV in that area when I put it back. For now the stripped bolt is in there, time to get a new bolt from the dealer or wherever. And for whomever that said to bend the EGR valve, I thought you meant silightly but I literally had to bed it about 5 inches to the left and away from the valve cover, was afraid that I was going to have another project on my hands. If you have bent copper tubing before, you know what you can get away with, if you haven't, be careful here.

Also, spark plugs are done, coil done, wires done. I had gaps of around .030 to .080 on existing while the new Motorcraft plugs showed up at .040 so I fixed them to .054. The old ones still looked ok after 75,000 miles but seized up pretty bad. Nice and steady I used the socket to hand tighten almost 80% of the way with anti seize on the threads and tightened them further till snug. I hope I put them in the right order, think I did based on notes I had taken.

Getting close, intake manifold goes back next time I am working on that car, maybe tomorrow because I want to just get it done, this took longer than I anticipated. So far, I am in it about 18 hours but I work slow and first time.


Thanks to everyone posting their tips.

I have one tip I think might help the next one to attempt the removal of the intake.
I worked for an hour trying to get that last bolt on the back drivers side of the manifold. Frustrated, I had to find another way.
I removed the driver side wiper and plastic cover.
Then I drilled a 1 inch hole over the #8 bolt.
Went straight down with a T30 to remove last bolt.
Installed and torqued the same way.
When done, covered hole with large "trim panel retainer" and a fender washer underneath.

Hope this helps someone else.
 

Attachments

  • IMG_0429.jpg
    IMG_0429.jpg
    42.7 KB · Views: 347
  • IMG_0431.jpg
    IMG_0431.jpg
    54.1 KB · Views: 350


The second different 02 explorer that I have removed the famous rear bolt. New twist on making it harder, this had a tie wrap holding the wire harness to the upper manifold. Had to remove the back bolt and pull twist to get at the tie wrap.
Could not figure out why it would not come out when I knew I had all the bolts out.

I had the same problem.. Everything tie wrapped to the intake manifold.
I moved all the wiring harnesses and hoses to the firewall attachments where they are supposed to be. I had two empty bolts on the firewall where nothing was attached even though the wiring harness had plastic attachment rings.


We picked this one up at about 34k miles. I'm thinking the ties get put on when the transmission gets pulled just to keep the wires up out of the way.


Hey guys (and ladies if there are any) I am planning on replacing the drivers side valve cover and the upper intake manifold gaskets due to some leaking.

2003 4.0 SOHC Flex V6

Are there any specialty tools I need such as Torx bits?

Also are there any How-To's anywhere? I searched and could not come up with any.
Just a tip to try before replacing your valve cover gaskets. I also had a small leak coming from the outside back of the drivers side valve cover on my ‘02 Mountaineer 4.0 V6. It was leaking onto the exhaust manifold and creating a burnt oil smell. I was also getting dime size drip puddles on the garage floor. First I made sure that the valve cover bolts were snug. Then I drained the oil and oil filter. I refilled the oil with 4 qts of conventional high mileage 5w30 motor oil and 1 qt bottle of Lucas Oil Stop Leak (regular, not synthetic). After driving 100 miles or so the leak stopped. The Lucas product really worked. I do the same oil change with Lucas every 5000 miles. If I go much longer (say 6K miles) it starts leaking again. I guess the additives eventually break down. My daughter also had a engine seal leak in her ‘08 Escape, it was also leaking on the exhaust manifold. Lucas solved that problem also.
Keep in mind that motor oil leaking on a hot exhaust manifold will burn and smell but it will not ignite so don’t fear a fire from a small oil leak.


Keep in mind that motor oil leaking on a hot exhaust manifold will burn and smell but it will not ignite so don’t fear a fire from a small oil leak.
Good to know, as I have what is likely a similar oil leak onto the exhaust manifold. Haven't driven the Explorer since discovering the problem but will have to drive it 11 miles to the mechanic near work on Friday to get my new radiator and hoses installed and the valve cover gaskets replaced. Was hoping today would be the day, but one of the Motorcraft hoses I ordered was the wrong one (D'oh!) so waiting for delivery of the correct one.


Back
Top