Window regulator replacement | Page 2 | Ford Explorer Forums - Serious Explorations

  • Register Today It's free!

Window regulator replacement

Thanks man, that did help.

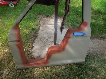
hey some of my window mechanisim is messed up.
this black piece that the silver piece is going into is broken off the wire, in multiple places... it looks liek that atleast
http://foxfieldco.us/images/Auto/Explorer/Drawing10S.jpg

and I think thats all thats wrong, the wire was hanging loosely, is it supposed to be?
The regulator still moves the wire up and down


Join the Elite Explorers for $20 each year.
Elite Explorer members see no advertisements, no banner ads, no double underlined links,.
Add an avatar, upload photo attachments, and more!
.


Dr_Z, the pics are gone. Can you please put them back up? Thanks - Rondo


Sorry about that! Pix back up... :D

Thanks man. :thumbsup: I have this thread saved for reference when I have to do this to my Ex. I also refer a bunch of people to this thread. It is a great resource. Thanks again. :biggthump


Rear window regulators

REAR WINDOW REGULATORS
Thank you for you post and pictures. I had to replace my two rear regulators on my 2002 Explorer which were slightly different but this post really helped. THANK YOU!!

Both rear windows stopped working within a year of each other. So I finally couldn’t take it anymore. The problem was with mine was the plastic piece that connects from the cable to the metal that is riveted to the window. Yes rivets! So I had no choice but to remove the rivets and replace with a bolt. I removed the glass, drilled out the rivet, found a bolt that fit, put the glass back in the door, and replaced everything as instructed above. The new regulators look like they have improved the plastic slider on the cable so hopefully these will last longer!

I had searched everywhere and I could not find any deals on rear regulators. The front can be purchased after market and without the motor. I was only able to find the rear with the motor and at a much higher price. I finally decided to go to the Ford Dealer and purchase with cash. I was able to get a discount for buying two. I also took out all the old parts and brought in and that saved $60 up front core charge.

I am a chick  , very determined and thankfully have a greaser hubby with lots of tools. This was my first real car project that I have done all by myself.

Thanks again, BEST to all!


Windown Won't Slide Up

Hello,

Great guide, I found it searching when I ran into some problems with my own trouble shooting and I had a question. My window is actually stuck down and I can't slide it up to take it off the sliders to to take the assembly out. Because of this I can't actually get very far with diagnosing my problems.

I know it is a motor/regulator problem because my handy, dandy, multimeter shows that the motor is getting power when the switch is pressed. Positive for up, negative for down (Obviously, being that it is a DC motor).

I think something is jammed up with the cables and/or pulleys. the only thing I can think to do is to cut the cables and slide the window with them totally free. I really want to avoid doing that incase the problem isn't is the cables, slides, or motor.

Any suggestions. Any help is much appreciated and I thank you in advance.


Thanks so much!!!

I want to thank you. The motor went on my passenger window. Even though I have the XLT edition he helped my man and I take out the old one and replace it. The details and picture really helped, thanks again. Great POST!!


does anyone know if you can get the black clip that connects the cables together and attaches to the window tab? This broke on my right rear and the dealer wants 180. for the hole reg, but all I need is the 1.00 clip. Thanks!


does anyone know if you can get the black clip that connects the cables together and attaches to the window tab? This broke on my right rear and the dealer wants 180. for the hole reg, but all I need is the 1.00 clip. Thanks!

A junk yard is your best bet to find a little piece part.


How about the white plastic alignment clip that attaches the cable sheath to the metal tab, by the top pulley?


I haven't started project on wife's 2003. Tool0loot - how did you finally get metal plate off under water shield??
Thanks,
Dennis


Quick question: When doing the repair does one purchase a new regulator or a regulator / motor combo? I see both listed on RockAuto.com

Thanks for the excellent write-up.


Phil, as I mentioned in the other, related thread, thanks for the link.

For future reference and benefit of others.....

I purchased a regulator w/ motor made by Dorman. Cost was $59 with free overnight delivery. I couldn't find a better price / delivery combo anywhere.

Vendor ishttp://www.autopartstomorrow.com.


Thanks for doing this, I am going to have to replace mine. At least mine has failed in the up position.


Did the job on Saturday. Saved quite a bit of time thanks to this post.

Observations:

When facing the open driver's side door the top nut/stud, for the left hand regulator arm/bracket, did indeed spin in place when attempting to remove. Instead of removing the rubber window glass squeegee/channel, I put a large screwdriver through the top of the door and wedged it between the plastic pulley and the stud head. With a couple of whacks from a hammer I was able to keep the stud from spinning. thus allowing the nut to be removed. This piece is discarded so I wasn't shy using this approach.

Since I wasn't going to drill the rivets out of the original window glass regulator "keys", I had to remove the ones which were installed on the new regulator. Simple enough to do. But, I noticed when removing that the new keys didn't have the three fingers as the originals. Not to worry. You can still use the original keys and attach to the new regulator the same way as originally done....by inserting and folding the center finger down. (Hope this makes sense)

I had to unscrew the motor on the old regulator in order to access the left hand regulator key. I had to do the same in order to reattach the the key to the new regulator. However, I needed a very short stubby phillips head as the new motor was screwed in from the rear as opposed to the original, which was attached via three screws at the front.

Removal of the speaker made access much easier.


th_DSCN2601.jpg


Wife's 2002 Explorer - Left Rear Window. Broke the plastic retainer on the end with the pulley. I machined a new one, but I can't get enough slack in the cable to re-assemble the thing. The picture shows the new retainer and the broken one. It does not have the eccentric style guide that is shown in the OP.

Does anyone know how to get another half inch of cable out of the drive? I can fully compress both springs at the drive, and I am still coming up short.

Any help would be greatly appreciated. I don't want to spend $170 if I don't have to.


Finally got it. I had to take the drive apart. One of the cables had slipped out of the helical groove in the spool and was bound up. Once I fixed that, I had enough cable, but just barely.

Hope it holds up for a while.


Glad you got it fixed. :biggthump Thanks for the update. :thumbsup:


Join the Elite Explorers for $20 each year.
Elite Explorer members see no advertisements, no banner ads, no double underlined links,.
Add an avatar, upload photo attachments, and more!
.


ABSOLUTELY DEAD ON!

On a side note I was able to use the new regulator with no modification; the exisiting arms (as Dr. Z refers to them in Fig. 6 & 7) fit into the new regulator part; allowing me to bypass fig 11-13 (i think those were the steps... where Dr-Z explains how to remove new piece/guide on the cable and replace w/old/existing piece...) The arms that come on the regulator that i purchased from O'Reilly had arms already on them for a 'bolt-on' assemly. The arms can be slid out of the new regulator and the existing arms that are riveted on will slide into the new regulator.

Works like a charm!! and it saved me around $400.

EXCELLENT POST! Thank You Dr. Z!
CHEERS
jc


Back
Top