Completed Project - Brandon's mild 4.0 OHV build | Page 19 | Ford Explorer Forums - Serious Explorations

  • Register Today It's free!

Completed Project Brandon's mild 4.0 OHV build

Use this prefix for completed projects that are not "How to" articles or threads asking for help.
So, as of 5 hours ago Ronin8002, or James' built OHV block became mine; and with the stea.. I mean deal I got and all the extra goodies he threw in, he seemed a little too happy to get rid of this thing :shifty_ey... lol! But WOW this thing is in good shape! As a christmas gift from my parents, I've been given the opportunity to really dig into an engine like I've always wanted to do. I've watched and assisted a couple chevy 350 builds over the past few months but have never done anything by myself.. so here goes nothin!

The Meat (James' Block):
- 1995 block bored .030 over and torque honed
- Keith Black Hypereutectic 1995 Style Pistons (staying around 9:1)
- Total Seal piston rings
- Clevite bearings
- Stock Water pump/timing cover (awesome shape!)
- Stock Fuel Rail
- SOHC Oil pump/pan - to strengthen up the bottom end
-- Possible port/polish on the lower intake, we'll see when I get there

The Goodies:
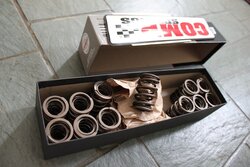
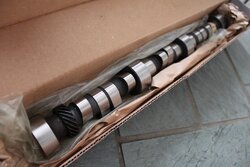
- Comp Cams 49-422-8 Cam
- Comp Cams 988-12 dual valve springs
- 95tm heads with minor porting/polishing

(on the way, supposedly 11/28/10)
- SI sev2027 and sev2028 valves
- Delta Cam rockers
and pushrods will come later down the road when properly measured

I'm going to keep a diary as things progress on the motor, once I get all the parts in it really should start coming together quickly. I'm down for any type of constructive criticism you have, if you don't like the way I'm doing something PLEASE let me know, as this will be my true first solo go at an engine! JD4242 has really given me a lot of direction when it comes to the 4.0, by reading through his posts in the forums I'm still baffled by the amount of knowledge he has of these things. So, many thanks to you JD!

First order of business, I need help tracking down a full gasket kit, reasonably priced as the budget is dwindling down, I hear an ebay seller has them for around $130??, as well as new head stud/bolts. I'm not feeling ARP's $400 set of head bolts/studs. Does anyone have any suggestions or leads on either?

Thanks for lookin! Here's a couple of teaser pics! Pics of the motor when I get it all unpackaged and on a stand.

-Brandon
 

Attachments

  • IMG_0007.JPG
    IMG_0007.JPG
    91.8 KB · Views: 6,271
  • IMG_0009.JPG
    IMG_0009.JPG
    76.1 KB · Views: 6,673


Join the Elite Explorers for $20 each year.
Elite Explorer members see no advertisements, no banner ads, no double underlined links,.
Add an avatar, upload photo attachments, and more!
.


@JD4242, yeah I plan to, at least for the first couple of weeks to start it up and let it fully warm up before I drive it around. And I'm only going to turn it off when I know I'll give it enough time to drop down to the temp outside at the time. As for the tranny.. I just had to push it up and off of me while my brother sat there and basically laughed cause he thought I was kidding.. ouch.

@NICE59, I plan on this thing blowing plooms of smoke screens out the tailpipe, I've got enough assembly lube in it to fill up the oil pan!! :p:


Join the Elite Explorers for $20 each year.
Elite Explorer members see no advertisements, no banner ads, no double underlined links,.
Add an avatar, upload photo attachments, and more!
.


Also bud, glad to hear you didnt die...dying is not fun...and is sort of an inconvience:dead:

But yes, the exhaust headers will smoke if you painted them, and i dont know if you have them installed yet or not, but if you dont, slather copper sealant on both sides of the header flange gaskets and save yourself the trouble of tracking exhaust leaks later. It will smell horrible at first as residual copper sealant burns off, but it wont leak :cool:


i mean the very first times you fire it up allow to heat all the way up and cool all the way down


I'm sure I'm going to be super particular about the engine, and am going to have to baby it for a few weeks.. hahah


ITS IN ITS IN ITS IN!!!! :D

Pics update LATE tonight when im done piecing it together...


Yeaaaaaa good job!!


okay well, another update;

I started off tonight moping around not really wanting to get to work, but eventually got under the truck and began messing with a wiggling the motor/trans to try and get it to fall into place. To give you an idea of what I was dealing with, the motor was sitting on the driver's side motor mount studs, but was ****ed slightly towards the driver's side so that the passenger side motor mount was about 3/4" forward of the studs. I had the two bottom bolts in the trans/motor, but for some reason the transmission was being torqued towards the driver's side just like the motor. Also, since the bottom bolts were in, there was about 1/4" gap at the bottom of the two, but the top there was more like a 1-1/2" gap that would only open up if I were to lift the front of the engine up, or jack the back of the trans up, WTF :dunno:

After another hour or so of trying different things, lifting the motor/lifting the trans, torquing them both blah blahh blah I eventually was able to knock the motor down into the passenger studs. After checking a hundred different things that could be holding this thing up, I finally got the idea that the torque converter bolts may not be lined up correctly and causing the gap at the top to not close. I crawled up under the truck (note: I've been in and out from under the truck for about 2 hours at this point.) again to check out the flywheel to converter bolts. Every one of them checked out just fine.. I was PISSED, partly because that wasn't it, and the other half because I was fresh out of ideas. So I'll admit it, I lost my temper and kicked the crap out of the bellhousing on the transmission. OUCH, my stomach started burning from where it had fallen on me yesterday. Just about the same time I began to think that was a bad idea; BANG the ENTIRE driveline jumped about an inch but what seemed like a foot towards the rear of the truck. So much so that one of the overload springs on the back axle vibrated like one of those springy doorstops.

I looked up to see that the motor and trans had finally dropped in to one another. It ended up being the flexplate. Some how one of the little guide ears on the motor was hanging up on it and was not able to go into the transmission, and finally it just gave way and chipped a piece off the flexplate and banged in. MAN was I a happy sonofagun. After getting it all hooked up and bolted up I turned over to realize I forgot the lay the starter in. I then had to drop the freakin front diff so I could wiggle the starter up beside the block to bolt it in.. that was reeaal fun.

I called it a night and picked up the camera to take some pictures.. aaand of course it was dead. I started to take a couple pictures until it turned off, but was able to turn it back on and get a quick picture of the motor. So for what it's worth here they are..

1 - picture of the old dog that came out
2 - thats of my workshop
3 - someone said my garage was nice and heated, I think it was xeek? Well yeah it's heated, kinda.. :p: doesn't have one trace of insulation on it though..
4 - the new motor in!
 

Attachments

  • IMG_1344.JPG
    IMG_1344.JPG
    136.1 KB · Views: 630
  • IMG_1345.JPG
    IMG_1345.JPG
    106.6 KB · Views: 575
  • IMG_1346.JPG
    IMG_1346.JPG
    81.2 KB · Views: 614
  • IMG_1347.JPG
    IMG_1347.JPG
    109.5 KB · Views: 621


lol, so if you cant get the motor on the other mount, kick the tranny from underneath and scare the **** out of you as it goes in? lolol
thats looking so good, hurry up and finish!

yes that was me, atleast youre inside with the door shut so the heater can do something


Brandon, before you start it the first time, I suggest you disconnect the ignition and let the starter spin the motor to get some oil in the top of the motor.


OKAY, as of this afternoon, the Truck sits in the driveway at my brother's house, the entire bottom end hooked up and ready to go. It's awaiting the Pushrods, which are supposed to be here tomorrow around 5pm and a few fuel rail studs from Mark which are supposed to be here by 3pm. I'll be sure to post up some pics, hopefully the weather holds out! However I feel if it's not raining too bad I'll still be out in it :p:

Brandon, before you start it the first time, I suggest you disconnect the ignition and let the starter spin the motor to get some oil in the top of the motor.

That's a good idea I think I'll do it.
Hey did you still want the engine stand? $40 and it's yours. That's $10 off what I bought it for (Probably cheapest one your going to find around at Harbor Freight) already assembled and it's only been used once :thumbsup:. I can bring it by your place when I trailer all the other parts back from Mechanicsville, err Atlee to be more precise to Henrico.


A few questions for you guys, I'm open to all opinions within reason

I've calculated my compression ration like this, please check behind me! I still need to find out the dished piston cc!!

Cylinder Bore Size : 3.981 (I'm bored .030 out)
Piston Stroke Length : 3.320
Head Gasket Bore Diameter : 4.110
Compressed Head Gasket Thickness : 0.055
Combustion Chamber Volume In CC's : 47.000
Piston Dome Volume In CC's (dished '-') : -17.5 ((that's 1st gen, I need to find the cc for 2nd Gen))
Piston Deck Clearance Negative If ABOVE Deck : -0.012

With that set up, I come to 10.1:1 compression, I know mine will be less due to the dish on the pistons. I just can't find the info.

So my questions are;

1. Should I change my spark gap?
2. Should I run a different weight oil at first (other than 5w-30)?
3. If I'm at about 9.6-9.7:1 Compression, what octane gas should I run?

Anything else I should know?


You might be at a slightly higher static compression than stock due to the overbore, but like you said the dish on the 95 block you have is larger than the 91-94 style pistons. So I think you'll be fine with 89 octane gas at the most. You could also try running 87 and if you get spark knock just add octane booster till the end of the tank, then refill with 89.

I would use the regular recommended weight of oil also.

Run the same spark plug gap that stock specs recommend. If you have issues even after getting the fuel octane figured out, you can look there next.


If you are coming up with 10:1 with 1st gen piston then you should be at 9:1 with 2nd gen.your be fine with all stock stuff.just a fun fact the new 2011 ex runs at 10.8:1


Just as I'm getting impatient and not more than 2 minutes after I threaten to go track down the FedEx truck with my pushrods to Russell on Facebook, my doorbell rings. FedEx guy with my pushrods in hand.. :rolleyes:

I'm off to my brother's house to reassemble the top end! I'll give picture updates as the afternoon goes on.. It's supposed to rain at midnight so hopefully I'll have this thing done by then.
 

Attachments

  • IMG_1348.JPG
    IMG_1348.JPG
    76.9 KB · Views: 553


I'm so excited I can't hold it in..


IT'S IN!!!


better yet..


AND IT RUNS!


A couple pictures and video as soon as I can get it on my computer, then upload it to YouTube.. I'm going to hop a shower and then upload.. may take an hour or so!


Whooooooooowwwwwwooo hahah


Join the Elite Explorers for $20 each year.
Elite Explorer members see no advertisements, no banner ads, no double underlined links,.
Add an avatar, upload photo attachments, and more!
.


Back
Top