aldive
Elite In Memoriam
- Joined
- January 17, 2001
- Messages
- 24,667
- Reaction score
- 28
- Year, Model & Trim Level
- 1999 XLT
In preparation for the dyno testing/tuning of my truck at Doug’s ( Bama Chips ), Ronnie ( BBQ_HotDogs ) let me borrow his Mac Intake ( http://www.macperformance.com ) and his Pro-M ( http://pro-flow.com/Ford/Ford.htm ) MAF for the testing.
After carefully looking at the Mac intake that Ronnie sent me, I decided I just had to have one of my own ( I inquired about buying Ronnie’s but his is already promised to someone else ), consequently I ordered one Proficient Performance ( http://www.proficientperformance.com/ ) for $139,00. I would not recommend this company due to their lack of customer service ( no response to e mail inquiries about order, providing an invalid tracking number [ the invoice said they were shipping Fed Ex and the package cane UPS ], slow shipping ). Doug and I will still be testing Ronnie’s Pro-M MAF.
I wanted to get some gas mileage data using the Mac Intake with the stock Ford as well as with the Pro-M MAF prior to the trip to Alabama.
The installation of the Mac Intake is simple and straightforward; even easier since I had a KKM intake instead of the stock airbox. First, the stock air tube needs to be removed from the TB, the crankcase vent hose and hard plastic tube are then removed from the air tube. With the stock air tube out of the way, the MAF and the KKM filter can easily be removed after loosing the mounting bracket
The first phase of the test will be with the stock Ford MAF and the Mac intake.
The installation is straightforward, yet the instructions provided by Mac are next to worthless and might make the install difficult for some.
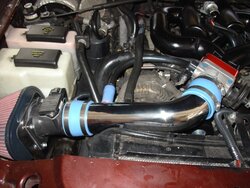
The negative cable from the battery is removed, To install the Mac, the steel ( mine is chrome, the one Ronnie loaned me was black and much more substantial ) mounting bracket is attacked to the location of the former stock airbox ( see picture ). Next attach the chrome air tube assembly to the TB with the blue “rubber” sleeve and hose clamps. Now attach the MAF to the mounting bracket with 4 bolts provided with the kit. This is followed by attaching the chrome air tube to the MAF with a blue “rubber” sleeve and hose clamps. The Mac air filter is now attached to the mounting bracket with a hose clamp. All that is left to do is attach the crankcase vent hose ( the port provided by Mac for this was totally inadequate; I had to engineer a way for the hose fitting to work ) and the plastic tube ( this goes into a rubber adapter ). The chrome air tube that Ronnie loaned me had an additional port for an external ( from the MAF ) IAT sensor ( only used when the MAF is a 4 pin model, the stock MAF ( on my ’99 ) uses a 6 pin connector with a built in IAT; Ronnie’s must have had an external IAT since his Pro-M MAF is a 4 pin model ). The negative battery cable is now reattached.
The Mac Intake is unquestionably an attractive addition to the engine bay. The installation took about 15 minutes.
The truck was started and all connections checked. Observations after quick drive through the neighborhood revealed that the sound of the intake is very similar to the KKM that I replaced it with; I noticed no difference in drivability. The only apparent difference was in the bling-bling; this Mac just looks good.
A road trip in now in order to appraise mileage and general subjective observations ( seat of the britches power, sound, etc. ). The mileage will be evaluated using one of Doug’s computer tunes ( 89 performance tune ). Report to follow in a few days.
After carefully looking at the Mac intake that Ronnie sent me, I decided I just had to have one of my own ( I inquired about buying Ronnie’s but his is already promised to someone else ), consequently I ordered one Proficient Performance ( http://www.proficientperformance.com/ ) for $139,00. I would not recommend this company due to their lack of customer service ( no response to e mail inquiries about order, providing an invalid tracking number [ the invoice said they were shipping Fed Ex and the package cane UPS ], slow shipping ). Doug and I will still be testing Ronnie’s Pro-M MAF.
I wanted to get some gas mileage data using the Mac Intake with the stock Ford as well as with the Pro-M MAF prior to the trip to Alabama.
The installation of the Mac Intake is simple and straightforward; even easier since I had a KKM intake instead of the stock airbox. First, the stock air tube needs to be removed from the TB, the crankcase vent hose and hard plastic tube are then removed from the air tube. With the stock air tube out of the way, the MAF and the KKM filter can easily be removed after loosing the mounting bracket
The first phase of the test will be with the stock Ford MAF and the Mac intake.
The installation is straightforward, yet the instructions provided by Mac are next to worthless and might make the install difficult for some.
The negative cable from the battery is removed, To install the Mac, the steel ( mine is chrome, the one Ronnie loaned me was black and much more substantial ) mounting bracket is attacked to the location of the former stock airbox ( see picture ). Next attach the chrome air tube assembly to the TB with the blue “rubber” sleeve and hose clamps. Now attach the MAF to the mounting bracket with 4 bolts provided with the kit. This is followed by attaching the chrome air tube to the MAF with a blue “rubber” sleeve and hose clamps. The Mac air filter is now attached to the mounting bracket with a hose clamp. All that is left to do is attach the crankcase vent hose ( the port provided by Mac for this was totally inadequate; I had to engineer a way for the hose fitting to work ) and the plastic tube ( this goes into a rubber adapter ). The chrome air tube that Ronnie loaned me had an additional port for an external ( from the MAF ) IAT sensor ( only used when the MAF is a 4 pin model, the stock MAF ( on my ’99 ) uses a 6 pin connector with a built in IAT; Ronnie’s must have had an external IAT since his Pro-M MAF is a 4 pin model ). The negative battery cable is now reattached.
The Mac Intake is unquestionably an attractive addition to the engine bay. The installation took about 15 minutes.
The truck was started and all connections checked. Observations after quick drive through the neighborhood revealed that the sound of the intake is very similar to the KKM that I replaced it with; I noticed no difference in drivability. The only apparent difference was in the bling-bling; this Mac just looks good.
A road trip in now in order to appraise mileage and general subjective observations ( seat of the britches power, sound, etc. ). The mileage will be evaluated using one of Doug’s computer tunes ( 89 performance tune ). Report to follow in a few days.