aldive
Elite In Memoriam
- Joined
- January 17, 2001
- Messages
- 24,667
- Reaction score
- 28
- Year, Model & Trim Level
- 1999 XLT
I have had a Flex A Lite VSC fan controller (http://www.flex-a-lite.com/auto/html/vsc.html ) installed on ’99 SOHC since June of ‘06 (http://www.explorerforum.com/forums/showthread.php?t=161482&highlight=vsc ). It has performed ok. Nonetheless, I wanted a superior fan controller that will provide more consistent cooling and be reliable.
My prior concern about not having manual control of the fan has proved to be unsubstantiated. I have not once used manual control with my current controller and don’t anticipate its use in the future.
Consequently I decided to resolve the issue by ordering a fan controller from Delta Current Control (http://www.dccontrol.com/index.htm ). Since my Flex A Lite Black Magic Xtreme 180 fan (http://www.explorerforum.com/forums/showthread.php?t=140251&highlight=electric+fan ) does not exceed 35 amp draw ( it draws only 18 amps ), I chose their FK35 controller. The warranty is a 30 days return for any reason and 90 days for parts and labor
This controller has a very positive review by well respected member, Gimp ( http://www.explorerforum.com/forums/showthread.php?t=143701 ). Also, several of my friends are using this controller on various applications.
Prior to ordering, I e-mailed Brian Baskin, owner of Delta Current Control, several times to discuss my application and my options. He was easy to deal with; concise and prompt replies. Sorry to say his replies and his shipping weren’t; amazingly, it took 26 days for the goodies to arrive at my door, yes, 26 days; absolutely unacceptable to me. However, after repeated e mailing about the shipping, he did overnight ship the kit at his cost.
Due to their dreadfully slow shipping, and the fact that my VSC controller finally crapped out, I had to purchase another fan controller to get me up and running; I got an inexpensive controller from Jegs ( https://www.jegs.com/webapp/wcs/sto...lgy/l fYckk6ErXA3ax8ReHA==&ddkey=OrderItemAdd ) to hold me over. Its installation can be seen at http://www.explorerforum.com/forums/showthread.php?t=180534&highlight=fan+controller .
In addition to the controller, I also ordered their intelligent indicator light ( that changes from yellowish green to amber to red depending on current draw ) as well as their adjustable controller ( for setting the fan’s turn on temperature ).
The FK35 kit cost $109.00, the indicator light ( L-101 ) $9.95 and the remote temperature control ( TADJ22 ) $14.95; with shipping it was $144.85 to my door.
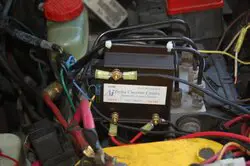
The most difficult part of the installation was finding a suitable location to mount the 3 3/8 x 4 ½” controller. I mounted mine to the tubing on the antilock brake Hydraulic Control Assembly as shown in the photo.
The quality of this kit is first rate. Everything one needs to install is included. The wires are high quality and already fitted with all necessary connections.
Before beginning the installation I disconnected the negative battery cable and removed the Jeg’s controller assembly.
Then, using the supplied wiring, I attached the end of the red wire with the ring connector to the output terminal of the controller using the supplied star washer and brass 6-32 hex nut and the other end of the wire to the wire from the positive fan terminal.
After that, I placed the end of the other red wire with the ring connector on the input terminal of the controller and secured it with another supplied star washer and nut and then attached the other end of the fusible link which was in turn secured to the positive battery terminal.
Next I attached the end of the black wire with the ring connector to the GND terminal of the controller and this other end of the wire was attached to the wire from negative fan terminal. Then the end of the remaining black wire with the ring connector was attached to the GND terminal of the controller and both wires were secured with a star washer and nut. The other end of this wire was then attached to the negative battery terminal.
The next step was to attach the temperature probe to the radiator ( by inserting into the fins on the motor side of the radiator ) and plug the temperature sensor wire connector into pins 1 and 2 on the controller.
In light of the fact that I wanted continued cooling ( for several minutes ) after the engine was turned off, I connected the yellow ignition input wire of the harness to the unit and to an always hot 12 V source. Nevertheless, if one desires an immediate fan turn off, connect the yellow ignition input wire from the controller to an ignition switched 12 V source.
The blue AC input wire from the controller was connected to the positive wire of the AC clutch. This turns the fan on ( 50% level ) when the truck starts.
This technologically advanced controller even has a provision for using underdrive pulleys. I have not seen this feature on other controllers. Accordingly, since UDPs (http://www.explorerforum.com/forums/showthread.php?t=151951&highlight=underdrive and http://www.explorerforum.com/forums/showthread.php?t=153779&highlight=underdrive ) are installed on my truck, an included jumper could be installed (on pins 13 and 14 ) to provide 10% minimum current to the fan whenever the ignition is switched on ( 100% with both ignition and AC switched on ) ; however, since I have had no cooling issues, I opted not to use this feature, but its good to know I have the option if the need ever arises. I may experiment with this at a future date.
All wires were secured and enclosed in spiral wrap and the battery ground was reconnected.
I used my Auto X Ray OBDII scanner ( http://www.autoxray.com/ ) to precisely monitor coolant temperature in order to set the turn on temperature with the optional internally regulated remote temperature controller ( TADJ22 ). I set it to turn on at 198 F. Even though one can mount this adjuster in the dash, I decided to mount it under the hood ( not like I will be using this after setting the temperatures ) as shown in the picture. For +/- 22 F of control, I connected the black wire to pin 5, the green wire to pin 7 and the red wire to pin 9 with the handy connector provided with the kit. I am not happy with this controller and therefore decided to use the simple jumpers to adjust the turn on temperature. Note: the pins and jumpers are very small; care must be taken by those with large hands when installing them.
The indicator light ( L-101 ) was mounted in a 5/16 inch hole drilled in the radio bezel of my truck in clear view of the driver and wired by running the three wire bundle through the firewall and hooking up the black wire to the controller output terminal and the blue wire to ground and the yellow wire to a fused 12 V ignition switched source.
The installation only took about 45 minutes at an unhurried pace.
The Delta Current Control controller performed flawlessly during a one hour “in town” as well as on a 140 mile I75 ( to Ft Myers to have supper with a friend and to visit the Bass Pro store [ http://www.basspro.com/servlet/catalog.CFPage?appID=94&storeID=30&cmid=featStoreNAME_FTMYERS ]) road test. Follow up reports on the durability and function of this controller will be provided.
If ordering from this firm, please be forewarned about the shipping issues and lack of response to e mail. In spite of that, I wholeheartedly recommend this controller for anyone with an electric cooling fan. I have used several controllers and this one is by far the best.
My prior concern about not having manual control of the fan has proved to be unsubstantiated. I have not once used manual control with my current controller and don’t anticipate its use in the future.
Consequently I decided to resolve the issue by ordering a fan controller from Delta Current Control (http://www.dccontrol.com/index.htm ). Since my Flex A Lite Black Magic Xtreme 180 fan (http://www.explorerforum.com/forums/showthread.php?t=140251&highlight=electric+fan ) does not exceed 35 amp draw ( it draws only 18 amps ), I chose their FK35 controller. The warranty is a 30 days return for any reason and 90 days for parts and labor
This controller has a very positive review by well respected member, Gimp ( http://www.explorerforum.com/forums/showthread.php?t=143701 ). Also, several of my friends are using this controller on various applications.
Prior to ordering, I e-mailed Brian Baskin, owner of Delta Current Control, several times to discuss my application and my options. He was easy to deal with; concise and prompt replies. Sorry to say his replies and his shipping weren’t; amazingly, it took 26 days for the goodies to arrive at my door, yes, 26 days; absolutely unacceptable to me. However, after repeated e mailing about the shipping, he did overnight ship the kit at his cost.
Due to their dreadfully slow shipping, and the fact that my VSC controller finally crapped out, I had to purchase another fan controller to get me up and running; I got an inexpensive controller from Jegs ( https://www.jegs.com/webapp/wcs/sto...lgy/l fYckk6ErXA3ax8ReHA==&ddkey=OrderItemAdd ) to hold me over. Its installation can be seen at http://www.explorerforum.com/forums/showthread.php?t=180534&highlight=fan+controller .
In addition to the controller, I also ordered their intelligent indicator light ( that changes from yellowish green to amber to red depending on current draw ) as well as their adjustable controller ( for setting the fan’s turn on temperature ).
The FK35 kit cost $109.00, the indicator light ( L-101 ) $9.95 and the remote temperature control ( TADJ22 ) $14.95; with shipping it was $144.85 to my door.
The most difficult part of the installation was finding a suitable location to mount the 3 3/8 x 4 ½” controller. I mounted mine to the tubing on the antilock brake Hydraulic Control Assembly as shown in the photo.
The quality of this kit is first rate. Everything one needs to install is included. The wires are high quality and already fitted with all necessary connections.
Before beginning the installation I disconnected the negative battery cable and removed the Jeg’s controller assembly.
Then, using the supplied wiring, I attached the end of the red wire with the ring connector to the output terminal of the controller using the supplied star washer and brass 6-32 hex nut and the other end of the wire to the wire from the positive fan terminal.
After that, I placed the end of the other red wire with the ring connector on the input terminal of the controller and secured it with another supplied star washer and nut and then attached the other end of the fusible link which was in turn secured to the positive battery terminal.
Next I attached the end of the black wire with the ring connector to the GND terminal of the controller and this other end of the wire was attached to the wire from negative fan terminal. Then the end of the remaining black wire with the ring connector was attached to the GND terminal of the controller and both wires were secured with a star washer and nut. The other end of this wire was then attached to the negative battery terminal.
The next step was to attach the temperature probe to the radiator ( by inserting into the fins on the motor side of the radiator ) and plug the temperature sensor wire connector into pins 1 and 2 on the controller.
In light of the fact that I wanted continued cooling ( for several minutes ) after the engine was turned off, I connected the yellow ignition input wire of the harness to the unit and to an always hot 12 V source. Nevertheless, if one desires an immediate fan turn off, connect the yellow ignition input wire from the controller to an ignition switched 12 V source.
The blue AC input wire from the controller was connected to the positive wire of the AC clutch. This turns the fan on ( 50% level ) when the truck starts.
This technologically advanced controller even has a provision for using underdrive pulleys. I have not seen this feature on other controllers. Accordingly, since UDPs (http://www.explorerforum.com/forums/showthread.php?t=151951&highlight=underdrive and http://www.explorerforum.com/forums/showthread.php?t=153779&highlight=underdrive ) are installed on my truck, an included jumper could be installed (on pins 13 and 14 ) to provide 10% minimum current to the fan whenever the ignition is switched on ( 100% with both ignition and AC switched on ) ; however, since I have had no cooling issues, I opted not to use this feature, but its good to know I have the option if the need ever arises. I may experiment with this at a future date.
All wires were secured and enclosed in spiral wrap and the battery ground was reconnected.
I used my Auto X Ray OBDII scanner ( http://www.autoxray.com/ ) to precisely monitor coolant temperature in order to set the turn on temperature with the optional internally regulated remote temperature controller ( TADJ22 ). I set it to turn on at 198 F. Even though one can mount this adjuster in the dash, I decided to mount it under the hood ( not like I will be using this after setting the temperatures ) as shown in the picture. For +/- 22 F of control, I connected the black wire to pin 5, the green wire to pin 7 and the red wire to pin 9 with the handy connector provided with the kit. I am not happy with this controller and therefore decided to use the simple jumpers to adjust the turn on temperature. Note: the pins and jumpers are very small; care must be taken by those with large hands when installing them.
The indicator light ( L-101 ) was mounted in a 5/16 inch hole drilled in the radio bezel of my truck in clear view of the driver and wired by running the three wire bundle through the firewall and hooking up the black wire to the controller output terminal and the blue wire to ground and the yellow wire to a fused 12 V ignition switched source.
The installation only took about 45 minutes at an unhurried pace.
The Delta Current Control controller performed flawlessly during a one hour “in town” as well as on a 140 mile I75 ( to Ft Myers to have supper with a friend and to visit the Bass Pro store [ http://www.basspro.com/servlet/catalog.CFPage?appID=94&storeID=30&cmid=featStoreNAME_FTMYERS ]) road test. Follow up reports on the durability and function of this controller will be provided.
If ordering from this firm, please be forewarned about the shipping issues and lack of response to e mail. In spite of that, I wholeheartedly recommend this controller for anyone with an electric cooling fan. I have used several controllers and this one is by far the best.