- Joined
- March 4, 2007
- Messages
- 26,320
- Reaction score
- 122
- City, State
- anaheim hills,california
- Year, Model & Trim Level
- 95 ranger 4x4/ 91 X 4x4
...For those who go offroading and have a Dana 35 front axle, this is probably the best mod you can do for yourself...:biggthump ...This can turn a day of dis-assembling your vehicle into a 1-2 hour quick replacement of a broken passenger side shaft...
Edit:..Just for fun I R&R'd the passenger shaft using nothing but hand tools...It took 32 minutes total and that was dealing with the ABS sensor bolt on this truck...
...This was done at the same time I did the Hybrid Dana 35 VS. True Dana 35 swap
http://www.explorerforum.com/forums/showthread.php?t=256656
_____________________________________________________________________________________________
...The driver's side does not have a C-clip, only the passenger side does...
...I had read a couple threads on this back when I put the Aussie in the front of my X...Some required welding, custom ordered springs, and I couldn't find a quick solution so my X did not get this upgrade...After suffering a broken shaft myself in my Ranger, it was time to re-read those threads and I again came to the conclusion that I couldn't find the parts or I would need some special tools and some welding...:thumbdwn:

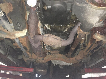
...This picture shows the location of the C-clip still attached to the broken end of the passenger side axle shaft...It takes hours to get both axles and pumpkin out and get to this point in order to pull this C-clip, just to r&r the shafts...

...These were the 2 most popular threads I have read and they have great ideas on "How To" do this in several variations...I chose the second thread as it had a common spring to buy, but where to get it was a mystery...:scratch:
http://www.explorerforum.com/forums/showthread.php?t=220849&highlight=eliminator
http://www.explorerforum.com/forums/showthread.php?t=224988&highlight=eliminator
...While browsing on another Forum I found the same exact thread but it listed a manuf. and PN# so this got me excited to think I could do this...It comes off a piece of lawn equipment and can be found thru lawnmower shops...
http://www.echo-usa.com/advantage.asp?transaction=search&template=map_search
Echo Part #:69621655730
...Then in one of the threads a guy added a 2 piece shaft collar and
knurled his shaft down so it would fit...After a little searching for the spring, (and a stop with my axle shaft in hand) to my local Industrial hardware store, I had the parts to do this...
...I found this 1 3/8 inch 2 piece collar and it was a perfect fit...

..I then took a screwdriver, stuck it in a spline on the shaft as a stop for the spring, and then took a pair of needle nose pliers and turned the spring counter clockwise...This made the spring open up enough to get it started over the shaft without having to distort it's shape permanently...


...After getting the spring most of the way on, I used a wider screwdriver to move each section of the spring onto the shaft...It takes a little more persuasion to get the end of the spring on but keep moving the other sections forward and it will move the end right onto the shaft...

...I took and placed the the 2 piece collar over the notch on the shaft (see previous pics) and added red loctite to the screws so they wouldn't back out...I then slid the colar all the way over to the tapered edge and tightened the screws...It was a perfect fit...:biggthump


...In this picture you can see the final working position of the spring and collar...(I used a bad boot as it helped show everything in position and also made a great cut away view)...You can also see with the spring compressed how it climbs onto the shaft and how the collar stops this from happening...


...and here is a front and rear view of it installed...:biggthump


...The parts cost for this was including tax:
2 piece collar = $5
Echo Spring = $2.50
Total cost = $7.50
...Labor will take 20-30 minutes to install..
...The only other thing you might want to do on this project is go to a muffler shop or your buddies house, and have him put on a couple tack welds to the collar...Just in case you are worried about the collar spinning on the shaft...
Edit:..Just for fun I R&R'd the passenger shaft using nothing but hand tools...It took 32 minutes total and that was dealing with the ABS sensor bolt on this truck...
...This was done at the same time I did the Hybrid Dana 35 VS. True Dana 35 swap
http://www.explorerforum.com/forums/showthread.php?t=256656
_____________________________________________________________________________________________
...The driver's side does not have a C-clip, only the passenger side does...
...I had read a couple threads on this back when I put the Aussie in the front of my X...Some required welding, custom ordered springs, and I couldn't find a quick solution so my X did not get this upgrade...After suffering a broken shaft myself in my Ranger, it was time to re-read those threads and I again came to the conclusion that I couldn't find the parts or I would need some special tools and some welding...:thumbdwn:
...This picture shows the location of the C-clip still attached to the broken end of the passenger side axle shaft...It takes hours to get both axles and pumpkin out and get to this point in order to pull this C-clip, just to r&r the shafts...
...These were the 2 most popular threads I have read and they have great ideas on "How To" do this in several variations...I chose the second thread as it had a common spring to buy, but where to get it was a mystery...:scratch:
http://www.explorerforum.com/forums/showthread.php?t=220849&highlight=eliminator
http://www.explorerforum.com/forums/showthread.php?t=224988&highlight=eliminator
...While browsing on another Forum I found the same exact thread but it listed a manuf. and PN# so this got me excited to think I could do this...It comes off a piece of lawn equipment and can be found thru lawnmower shops...
http://www.echo-usa.com/advantage.asp?transaction=search&template=map_search
Echo Part #:69621655730
...Then in one of the threads a guy added a 2 piece shaft collar and
knurled his shaft down so it would fit...After a little searching for the spring, (and a stop with my axle shaft in hand) to my local Industrial hardware store, I had the parts to do this...
...I found this 1 3/8 inch 2 piece collar and it was a perfect fit...
..I then took a screwdriver, stuck it in a spline on the shaft as a stop for the spring, and then took a pair of needle nose pliers and turned the spring counter clockwise...This made the spring open up enough to get it started over the shaft without having to distort it's shape permanently...
...After getting the spring most of the way on, I used a wider screwdriver to move each section of the spring onto the shaft...It takes a little more persuasion to get the end of the spring on but keep moving the other sections forward and it will move the end right onto the shaft...
...I took and placed the the 2 piece collar over the notch on the shaft (see previous pics) and added red loctite to the screws so they wouldn't back out...I then slid the colar all the way over to the tapered edge and tightened the screws...It was a perfect fit...:biggthump
...In this picture you can see the final working position of the spring and collar...(I used a bad boot as it helped show everything in position and also made a great cut away view)...You can also see with the spring compressed how it climbs onto the shaft and how the collar stops this from happening...
...and here is a front and rear view of it installed...:biggthump
...The parts cost for this was including tax:
2 piece collar = $5
Echo Spring = $2.50
Total cost = $7.50
...Labor will take 20-30 minutes to install..
...The only other thing you might want to do on this project is go to a muffler shop or your buddies house, and have him put on a couple tack welds to the collar...Just in case you are worried about the collar spinning on the shaft...