IZwack
Moderator Emeritus
- Joined
- February 5, 2003
- Messages
- 21,675
- Reaction score
- 49
- City, State
- Germantown, MD
- Year, Model & Trim Level
- 1998 Ford Explorer
ive been asked a few questions about what i did to fit a borg-warner 1350 shift linkage to a borg-warner 1354 transfer case taking into consideration i'm pushing a 2nd generation explorer (1998) with a full length center console and also a 3" body lift, so here are we go..
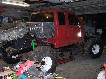
first lets have a quick look at how an original 1350 shift linkage sits on a 2nd generation's 5r55e transmission and then briefly go over a few questions commonly asked.

as mentioned in other threads, the 1350's two mounting hole do not line up properly to the 5r55e. so when creating the new mounting holes, new measurements from the transmission had to be made.
Why I went with a 1350 shift linkage instead of a 1354
Because I couldnt find a 1354 shift linkage for cheap and the local junk yard had a few Bronco II's with 1350s and of course the 1350 shift linkage.
Why I have 3-inch body lift
cauz im a newb and was/am too poor to buy a suspension lift. and because of the body lift, the stock shifter would barely protrude out of the transmission hump. this in turn, means I had to vertically offset the shift linkage to compensate for the 3-inch body lift.
Why I decided to keep my full length center console
cauz im a newb and need some place to rest my right arm during the long drives to the ski slopes. and because of the center console, i had to offset the shifter to the left (towards the driver's side) to sit on this little itty bitty space (about 2") between the center console and the edge of the transmission hump.
okay so with that out of the way, lets look at an implementation pic.

in the image above, the shifter is in the "2HI" position. At the other end of the shift travel is of course "4LO". At "4LO", the shifter is approximately vertical. the image above, however, is a lie. the shift knob is actually there just for show. normally, I run without a shift knob because it rubs up against the center console. Below is what the setup looks like without the knob.
 whether or not you put the knob on is up to you. you might want to put it on because the knob does have the shift pattern printed on top of it.
the shift boot is not the original 1350's shift boot as the original one is way too wide to fit in the 2-inches of space between the center console and the edge of the tranmsission hump. after days of searching, i found the perfect shift boot (on E-bay) with dimensions close enough to what I needed. the shift boot came from a military jeep called the M151 "MUTT" :

obviously there had to be a hole through the transmission hump for the shifter to go through. unfortunately though, this hole ended up being at the very edge of the transmission plate cover and the hump - so both of these had to be cut. a piece of galvanized sheet of steel (had an old computer case laying around so i cut that up and used it) was then cut and sandwhiches (via sheet metal screws) the shift boot to the transmission hump to ensure a water tight system.
okay so now that we've looked at the shifter from inside the explorer, lets look at the entire shift linkage. here are a few diagrams of the linkage. note that from here on out, you will no longer see the shifter because there really was no modifications done it. oh and before i forget, the shifter was removed by grinding off the top of the back part of the original bracket (phew) - as indicated in the 2nd image below. why was the shifter removed? just so that i can work and clean the entire thing a little easier (rust = bleh).


the part thats labelled "riser bracket" is just a small piece of 4x4 angle iron ("L" shaped) with one part of the "L" cut down. the "riser bracket", as its quite obvious, raises the entire shifting mechanism vertically (to compensate for the body lift) and off to the left to ensure that the shifter doesnt protrude out of the center console. you'll also notice that there is a nut welded onto the hole where the original large mounting bolt goes into. this obviously allowed me to keep the original pivot point while the entire shifting mechanism was raised by the "riser bracket".
the part thats labelled "shift tab" is a small piece of 1/8" steel that bolts to the original shift tab that sits on the transfer case. the original shift tab however does this odd Z bend and I cut that tab at the first bend and drilled a hole so that i can bolt my tab to the original tab. i guess you could just flatten the original shift tab and drill it and you should be good to go. i could not just bolt the shift tab i made to the transfer case w/o using the origial tab because the original tab has flat spots that obviosly shifts the transfer case. you'll notice that the shift tab i made has two drilled holes on top, this allowed me to play around with the geometry of the entire shift linkage.
the next part of the shift linkage is the pivoting arm's lower half. originally, this does another Z bend (look at the first image of the linkage mounted on the 5r55e). this arm was cut at the first bend and a new straight (no bend) lower arm was welded into place. i had to do this because i moved the entire shift mechanism left towards the driver's side and if i had kept the original Z bend, the original arm would be way too far to the left relative to the transfer case. below highlights the new piece added.
 when removing the pivoting arm, pay close attention to the thin parts that it uses as bushings/bearings - they are very fragile and i doubt the Ford dealer would stock such parts.
now lets briefly look over the unit that connects the lower arm to the shift tab. heim joints are located at both ends of the unit and both are 3/8-inch fine thread commonly used in the go-kart world for steering. i went with heim joints because 1) i wasnt sure how much latteral offset there was going to be 2) heim joints are a lot better than just a hole drilled to a piece of steel 3) the heim joints i went with have chrome molly "eyes" and the bodies are plated to protect them from rusting 4) heim joints allows for fine adjustments. these heim joints are connected via two bolts who's heads have been cut off and then sleeved over by a short piece of steel tubing. the entire thing is then welded together.

the geometry is of course the most difficult part of the system and im you'll figure out an approximate geometry once you start taking measurements and angles. when i made the lower half of the pivot arm and the "shift tab", i tried to stay with the original arm lengths. as for the angle, when the pivot arm is all the way back, the shifter is pushed all the way forward (in 2HI) and the shift tab is all the way back (just past the vertical). the opposite is of course true, when the pivot arm is all the way forward, the shifter is all the way pulled back (in 4LO), and the shift tab is all the way forward (near complete horizontal). just make sure you have a few "adjustment points" so you can fine tune the linkage. examples include more holes at the shift tab, and the use of heim joints.
first lets have a quick look at how an original 1350 shift linkage sits on a 2nd generation's 5r55e transmission and then briefly go over a few questions commonly asked.
as mentioned in other threads, the 1350's two mounting hole do not line up properly to the 5r55e. so when creating the new mounting holes, new measurements from the transmission had to be made.
Why I went with a 1350 shift linkage instead of a 1354
Because I couldnt find a 1354 shift linkage for cheap and the local junk yard had a few Bronco II's with 1350s and of course the 1350 shift linkage.
Why I have 3-inch body lift
cauz im a newb and was/am too poor to buy a suspension lift. and because of the body lift, the stock shifter would barely protrude out of the transmission hump. this in turn, means I had to vertically offset the shift linkage to compensate for the 3-inch body lift.
Why I decided to keep my full length center console
cauz im a newb and need some place to rest my right arm during the long drives to the ski slopes. and because of the center console, i had to offset the shifter to the left (towards the driver's side) to sit on this little itty bitty space (about 2") between the center console and the edge of the transmission hump.
okay so with that out of the way, lets look at an implementation pic.
the shift boot is not the original 1350's shift boot as the original one is way too wide to fit in the 2-inches of space between the center console and the edge of the tranmsission hump. after days of searching, i found the perfect shift boot (on E-bay) with dimensions close enough to what I needed. the shift boot came from a military jeep called the M151 "MUTT" :
obviously there had to be a hole through the transmission hump for the shifter to go through. unfortunately though, this hole ended up being at the very edge of the transmission plate cover and the hump - so both of these had to be cut. a piece of galvanized sheet of steel (had an old computer case laying around so i cut that up and used it) was then cut and sandwhiches (via sheet metal screws) the shift boot to the transmission hump to ensure a water tight system.
okay so now that we've looked at the shifter from inside the explorer, lets look at the entire shift linkage. here are a few diagrams of the linkage. note that from here on out, you will no longer see the shifter because there really was no modifications done it. oh and before i forget, the shifter was removed by grinding off the top of the back part of the original bracket (phew) - as indicated in the 2nd image below. why was the shifter removed? just so that i can work and clean the entire thing a little easier (rust = bleh).
the part thats labelled "riser bracket" is just a small piece of 4x4 angle iron ("L" shaped) with one part of the "L" cut down. the "riser bracket", as its quite obvious, raises the entire shifting mechanism vertically (to compensate for the body lift) and off to the left to ensure that the shifter doesnt protrude out of the center console. you'll also notice that there is a nut welded onto the hole where the original large mounting bolt goes into. this obviously allowed me to keep the original pivot point while the entire shifting mechanism was raised by the "riser bracket".
the part thats labelled "shift tab" is a small piece of 1/8" steel that bolts to the original shift tab that sits on the transfer case. the original shift tab however does this odd Z bend and I cut that tab at the first bend and drilled a hole so that i can bolt my tab to the original tab. i guess you could just flatten the original shift tab and drill it and you should be good to go. i could not just bolt the shift tab i made to the transfer case w/o using the origial tab because the original tab has flat spots that obviosly shifts the transfer case. you'll notice that the shift tab i made has two drilled holes on top, this allowed me to play around with the geometry of the entire shift linkage.
the next part of the shift linkage is the pivoting arm's lower half. originally, this does another Z bend (look at the first image of the linkage mounted on the 5r55e). this arm was cut at the first bend and a new straight (no bend) lower arm was welded into place. i had to do this because i moved the entire shift mechanism left towards the driver's side and if i had kept the original Z bend, the original arm would be way too far to the left relative to the transfer case. below highlights the new piece added.
now lets briefly look over the unit that connects the lower arm to the shift tab. heim joints are located at both ends of the unit and both are 3/8-inch fine thread commonly used in the go-kart world for steering. i went with heim joints because 1) i wasnt sure how much latteral offset there was going to be 2) heim joints are a lot better than just a hole drilled to a piece of steel 3) the heim joints i went with have chrome molly "eyes" and the bodies are plated to protect them from rusting 4) heim joints allows for fine adjustments. these heim joints are connected via two bolts who's heads have been cut off and then sleeved over by a short piece of steel tubing. the entire thing is then welded together.
the geometry is of course the most difficult part of the system and im you'll figure out an approximate geometry once you start taking measurements and angles. when i made the lower half of the pivot arm and the "shift tab", i tried to stay with the original arm lengths. as for the angle, when the pivot arm is all the way back, the shifter is pushed all the way forward (in 2HI) and the shift tab is all the way back (just past the vertical). the opposite is of course true, when the pivot arm is all the way forward, the shifter is all the way pulled back (in 4LO), and the shift tab is all the way forward (near complete horizontal). just make sure you have a few "adjustment points" so you can fine tune the linkage. examples include more holes at the shift tab, and the use of heim joints.

 once you thnk you have the shifter moving in sync with the transfer case, try it out - climb something steep in 4LO and if you hear a bang and then a grinding noise slowly winding down after you let go of the gas, then the transfer case popped out of 4LO
 ")