2001 5.0 Eddie Bauer Vacuum Diagram is Unobtanium! | Page 2 | Ford Explorer Forums - Serious Explorations

  • Register Today It's free!

2001 5.0 Eddie Bauer Vacuum Diagram is Unobtanium!

The trip to the salvage yard was informative and successful. The connector I needed goes to the evap service port (little green cap thing I've never seen used), and to a port under the engine which should go to the vapor canister and the fuel tank. The '01 5.0 has the same vacuum harness and FVMV as the '99 2 door and another '01 both with 4.0 liter engines. I uninstalled 2, picked the better of the two and grabbed up some extra vacuum lines.

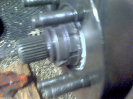
Cleaned up the replacement harness, used some McGuire's rubber and vinyl conditioner to hopefully give some extra life to the o-rings, and installed. Snap, snap - good to go. The evap service port had a different mount clip, no hook and push tree that hooked to the radiator, it now lives in that hole in the front clip by the battery (had to tighten the mount clip as it went to a thick plastic flange on its donor vehicle, and is now on sheet metal. The first pic is looking up from underneath, the connector is nice and straight, and you can see the line to the service port running up to the hole in the next pic.

Starts up good, seems to have good power, though highway mileage is still in the mid-teens. Hopefully that will improve - maybe its related to a tired timing chain. At this point I think all the vacuum problems are fixed.

looking-up-at-FVMV.jpg


new-evap-svc-port-home.jpg


Join the Elite Explorers for $20 each year.
Elite Explorer members see no advertisements, no banner ads, no double underlined links,.
Add an avatar, upload photo attachments, and more!
.


Excellent work, well done.


Update! Turns out the vacuum line to the heater control valve was broken off just at the connector and not visible without close inspection; broke off the end pulled the end from the connector and shoved in the next bit (new connector on the list for replacement). Replaced the valve as it broke off at the rear hose connection. Trust nothing. OBTW, Autozone doesn't stock this part, Advance does but it is CarQuest and in the process of changing part numbers, I got the older premium, there's a complaint about the new part being upside down somehow based on markings. Still chasing this 'lean mixture' fault, Going to replace the fuel pump assembly as the fuel pressure is low -between 20-30 psi. which would cause the hard starting and lean mixture problem.
Water-cut-off-valve.jpg


Very good, you are getting closer. Buy a good brand name of fuel pump, avoid the stuff you never heard of. Bosch is a choice many go with, and on eBay those often run about $45.


And now for some humor...I'm I the only one who thinks of Marvin the Martian when I'm fiddling down near the vacuum canister? ...they're like twins...

vauum-reservior.jpg


images.png


I remember that cartoon character, but I forgot his name.


Update! Replaced the fuel assembly over the weekend. Pressure test on the existing pump (Airtex c. 2016) was between 22 and 28 psi. Dropped the tank, pulled the old unit and the original receipt from the online purchase at Advance Auto and went to the store. I called the week before and they said no problem with a warrantee exchange for a Carquest version of the same (Airtex no longer carried). I get there, the young guy refunds the money by mistake, in the midst of the confusion with upset managers and several phone calls (warantee for an online purchase always throws them for some reason), I pointed out that the Adelphi unit (most expensive) was the closest equivalent. The young guy said sure... knocked about $75 off to match the price of the original that was refunded, and I made the purchase. Cool beans. Anyway, flushed and painted the tank while it was out (ospho the rust, then Rustoleum Rusty Metal Primer and gloss grey topcoat), let it dry, then installed the new assembly and put the tank back in (serious rain all day made for a messy crawl under the vehicle late in the day, and several mosquito bites). Bled the fuel supply line with my pressure test set; new pump pushing 58 psi. The Exploder started up on the first tray and is back to 20-22 mpg highway. :D Its interesting, the mileage has been slowly deteriorating the last 4 years or so, to about 15 mpg hwy. Now I can trace each drop to a specific leak and failing fuel pump (I think it was the integrated fuel pressure regulator in the assembly that gave up the ghost). Pretty sure I can claim victory at this point. :chug: Bring me the U238 Space Modulator! :D

Exploder-gas-tank.jpg


Great news! ....and the best part:
"Bring me the U238 Space Modulator!"


Thanks guys! Car isn't new to me, have done plenty of work on it, but honestly it's run great with regular changes to the plugs and wires. I had to replace the EGR differential pressure sensor, and repair the line going to the EGR itself. I did put a hand vacuum pump with a gauge on at the hot water cut off valve vacuum connection, didn't hold a vacuum. Same for the line coming off the manifold headed to the right side of the engine, will not hold a vacuum (same section I believe). The vents in the dash are not getting any vacuum as they have defaulted to DEF. I picked up 10' of 5/32 vacuum line, a bunch of connectors and T's. Going to replace each line one by one and generate a good diagram I'll post. Another diagram I found best represents what I have, at least for the area it covers.
View attachment 331909
What is 4 the vacuum source and where does it go into?


The #4 line in the diagram provides vacuum to the canister, it comes out from under the right fender, runs across the top of the engine behind the ignition coils to the left side of the intake manifold. Its a black line that connects to a 90 deg boot with a second white line, the large end of the boot connects to a 1/4 in tube that drops down from the manifold near the front. The other line runs down to the FVMV gizmo in post #21. The first pic attached is the junction that connects the line from the canister to the vac harness that goes to the manifold, the second is the other end of that same line at the manifold connection, where the black vac line and the white vac line connect to the boot. Thanks for asking, this reminded me to finish the comprehensive vacuum diagram I started for posting here. Merry Christmas!

Vac-Junction-Plenum-to-Manifold.jpg Vac-Manifold-connection.jpg


The #4 line in the diagram provides vacuum to the canister, it comes out from under the right fender, runs across the top of the engine behind the ignition coils to the left side of the intake manifold. Its a black line that connects to a 90 deg boot with a second white line, the large end of the boot connects to a 1/4 in tube that drops down from the manifold near the front. The other line runs down to the FVMV gizmo in post #21. The first pic attached is the junction that connects the line from the canister to the vac harness that goes to the manifold, the second is the other end of that same line at the manifold connection, where the black vac line and the white vac line connect to the boot. Thanks for asking, this reminded me to finish the comprehensive vacuum diagram I started for posting here. Merry Christmas!

View attachment 424902 View attachment 424903
Nice fix. My question is, how does low fuel pressure result in low gas mileage?


Nice fix. My question is, how does low fuel pressure result in low gas mileage?
The ECU fuel management depends upon design pressure at the injectors to meter the appropriate amount of fuel, if pressure is down, the incorrect amount of fuel is being dispensed by the injectors affecting the air/fuel mixture. Atomization out of the injector can also suffer, all of this impacts performance, efficiency, milage. The O2 sensors will detect incorrect air/fuel mixture and the ECU will attempt to compensate.


This is the vacuum diagram I have come up with, including various notes - it is in comparison to the engine, some of the other diagrams, and pictures. Please validate if able, would like to correct any innaccuracies that may exist. Also, happy to include additional info if it will improve the diagram. Dig the disclaimer... :cool:
 

Attachments

  • 2001-Ford-Explorer-5.0-Vacuum-Diagram.pdf
    45.7 KB · Views: 119


Saved my arse here, this thread!


Back
Top