JonathanExp
Elite Explorer
- Joined
- August 26, 2018
- Messages
- 36
- Reaction score
- 23
- City, State
- USA living in AUS
- Year, Model & Trim Level
- 2002 explorer limited
I removed my dash last year to replace the HVAC recirculating/fresh air door (1L2Z-18B259-AC), the heater blend door actuators (Dorman 604-207), and to install a filter (WIX 24784) in the recirculating box (thanks to Hitchhikingmike's Sept 2011 post). I am not going to provide a step by step here as I found my Haynes manual to be fine with the instructions. (I have the electronic, dual HVAC controls, fwiw) I think it took me around 4 hours to remove the dash but I am guessing as it was so long ago. Just sharing the photos in case anyone else is curious what things look like behind the dash and what they could be getting into with such a job. I would offer that if I needed to work on those HVAC components again I would absolutely removed the dash as it is not that hard but just takes time and makes working on the HVAC components much easier. And if you were going to remove the dash you might as well replace these components all at once since they are not that expensive and seem cause folks the most trouble. Just remember to put your bolts in plastic bags and label each bag where they came from and your life will be much easier! Enjoy.


Top of the dash

There are a couple of bolts in the engine bay that connect to HVAC system. I believe I needed to loosen some of them to get the blower loose to get the bolts on the back of the recirculating door box off.

There are some bolts on the back of the recirculating box that need to come out. Little bit of a pain but some extensions and angled extensions helped.


Worth a quick vacuum when you get everything out.

Driver's side heater blend door actuator.


Test fitting the WIX filter in the recirculating box.

Having the recirculating box out allowed me to easily cut out the flap/filter door so that it hinges up. The front plastic filter "door" is hinged at the top, meaning I never cut it and I just bend the plastic at the crease. (doubtful the crease could handle a hundred opening cycles but good enough for the occasional filter change.) I cut along the vertical sides to free the flap. When changing filters I remove the front screws and the along the front side so that I can push the box up slightly to free the flap to open (it sits in a ridge I believe). Kind of a pain but better than tape, for me.

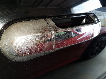
Comparison after about 5,000 miles.
Top of the dash
There are a couple of bolts in the engine bay that connect to HVAC system. I believe I needed to loosen some of them to get the blower loose to get the bolts on the back of the recirculating door box off.
There are some bolts on the back of the recirculating box that need to come out. Little bit of a pain but some extensions and angled extensions helped.
Worth a quick vacuum when you get everything out.
Driver's side heater blend door actuator.
Test fitting the WIX filter in the recirculating box.
Having the recirculating box out allowed me to easily cut out the flap/filter door so that it hinges up. The front plastic filter "door" is hinged at the top, meaning I never cut it and I just bend the plastic at the crease. (doubtful the crease could handle a hundred opening cycles but good enough for the occasional filter change.) I cut along the vertical sides to free the flap. When changing filters I remove the front screws and the along the front side so that I can push the box up slightly to free the flap to open (it sits in a ridge I believe). Kind of a pain but better than tape, for me.
Comparison after about 5,000 miles.