How to: - 4R70W Transmission Rebuild Diary | Page 3 | Ford Explorer Forums - Serious Explorations

  • Register Today It's free!

How to: 4R70W Transmission Rebuild Diary

Prefix for threads which are instructional.
Status
Not open for further replies.
Chris, that is the bushing in AOD's that needs to be checked in every build. Early building of AOD's had shops throwing the case away, if that bushing was too worn. It evidently is very tough to change. Regards,


Join the Elite Explorers for $20 each year.
Elite Explorer members see no advertisements, no banner ads, no double underlined links,.
Add an avatar, upload photo attachments, and more!
.


Well folks, lightning struck. I FOUND the PERFECT tool for that bushing. First some background.

The rear bushing was clean but well worn... suggesting this is a common wear point. I also found that the removal was not easy. If I had an expanding collet the right size maybe.... but no such luck. FORD uses an expanding collet you hook up with a puller... $90 list. Reinstall also uses a slide hammer puller, but I had that tool. I was not enamoured of a slide hammer in this situation... just too difficult to hold the case as you slide the puller in my opinion.

Anyway ....I found a perfect aftermarket tool MADE for this purpose!!! An expanding collet and a driver to use with a plain hammer for removal, and a screw pull in tool to replace with it's own bushing holder The hitherto impossible race popped right out in under 3 minutes. I am sure it will go in easily...

So, I am out of town til the 16th, but then... I have ALL the parts and upgrades for the High performance 4R70W rebuild and will start it in 10 days or two weeks from now. Lots of great finds, including this tool, which I will freely loan. Oh, cost? In case you want your own... $60. Stay tuned.


Nearing the last post in this thread! Case almost ready.

I will try and finish this thread with the last of the case pics....I keep thinking of things to add. But... I will start a new thread for the assembly of the 4R70W. and multiple threads for discussion about the parts inside the transmission and preparation of them for the assembly. I am excited about this build... for several reasons. First of all the 4R70W has a lot of aftermarket upgrades....second, I managed to find more or less all NEW parts for the rebuild.... and third, this is new territory.... not A4LD or 4R55 or 5R55 but 4R70W and into the BIG iron!

I honestly think this build will be as good as your 4R70W can get on a rebuild - in fact I'll put this one against anyone's. All upgrades, NEW internals, and my own TLC along the way. By the way, once it is done it is for sale. Remember, for all intents and purposes this tranny is BRAND new. ALL new parts. Price that, WITH upgrades and mods. It simply is not out there.

Anyway... I said I found a way to remove and replace the case rear bushing.... here's the tool (apologies for the pics, I had a monitor problem so they are a little blown out brightness and contrast-wise)


DSCN6587.JPG


it consists of a collet and a shaped driver that expands the collet in place to push out the bushing (works like a champ) and also an installer that allows you to pull in the new one by tightening a nut. This is the collet, expanded on a bushing to show you how it works

DSCN6579.JPG


Here are the component parts if the remover... apart

DSCN6581.JPG


and now fully together with a bushing... notice how the shoulder of the tool is even with the side of the bushing? Clever design.

DSCN65801.JPG


The replacer puts the bushing on a sleeve...

DSCN6577.JPG


DSCN6578.JPG


Which installs into the bore,

DSCN6582.JPG


and the bolt goes through the rear of the case, which has a centering piece that centers into the rear case hole.... and the screw comes down onto that...

DSCN65831.JPG


add a wrench and with a dozen or so turns the wrench will no longer turn and the bushing is installed! (notice the trademark hand photo here)

DSCN6584.JPG


I admire this tool's design.

Oh, one other thing this tranny is getting.... a BIG cast aluminum pan!

drool over this:

DSCN6585.JPG


DSCN6586.JPG


This is drilled for a drain plug. I plan to add a boss for a temp sender. It adds 3 quarts to capacity.

for comparison here is a 2WD pan installed (you may need to turn your head)

DSCN6588.JPG


We will start assembly at the back of the case. I'll try and detail each component and what upgrades were applied and where I got them and the cost of each. My collection effort and research has taken me months, but paid off handsomely. While this Diary may have a dozen or more threads, it should be easier to navigate when you are interested in one particular part.

Part 2 continues here:
http://www.explorerforum.com/forums/showthread.php?t=157283


one note on the direct clutch drum. I rebuilt my 4r70w about a year ago. The direct clutch was burnt up. One of the rebuild sites that I had looked at told me to look closely at the inner splines on the direct clutch drum for wear right at the tips. this allows the stub shaft to slip and causes wear as well as allowing the clutch to slip. Also when I was doing my research for my rebuild I believe the cast drum was the older inferior part. my truck was built in 12/96 but has all of the 97 updates. I also heard that in 98 they updated the friction material used in some of the clutch packs. If I remember correctly the 1-2 accumulator piston bore or the overdrive bore was also prone to wear from the O-ring wearing out and metal on metal contact of the aluminum piston. Seeing the rest of the overly worn parts I figured this would be good thing to check. My tranny is still running strong 50k miles after I fixed it and I spent less than 200 bucks but basically just fixed what was wrong and put new seals in it.

good luck. I am subscribing to this to see what i missed/could have done differently.


Thanks for the post.

The direct Drum is covered in Thread #5 (link below).

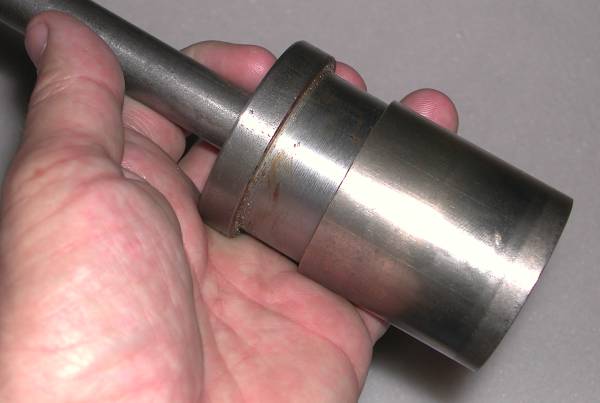
I have decided to stop the rebuild until I can get and install the solid teflon O-rings on the output shaft where it enters the direct drum.... (Accomplished)this is apparently a source of trouble... the direct drum not holding due to lack of pressure - or more appropriately leaks. Today I found a source for solid seals and the tool to install them. So I have them on order.

Also, I have been fretting privately about the "governor" bore (end case bore) on the case. This is where the steel rings on the output shaft seal ride, and between those rings the direct piston gets its feed. A leak there could result in a less than fully positive lockup in that clutch - and that clutch is a weak link in many failures. I decided to go ahead buy the tool to sleeve the end bore in steel.

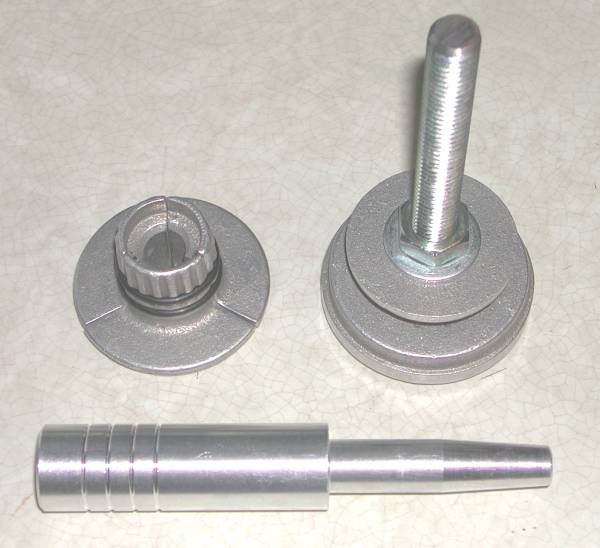
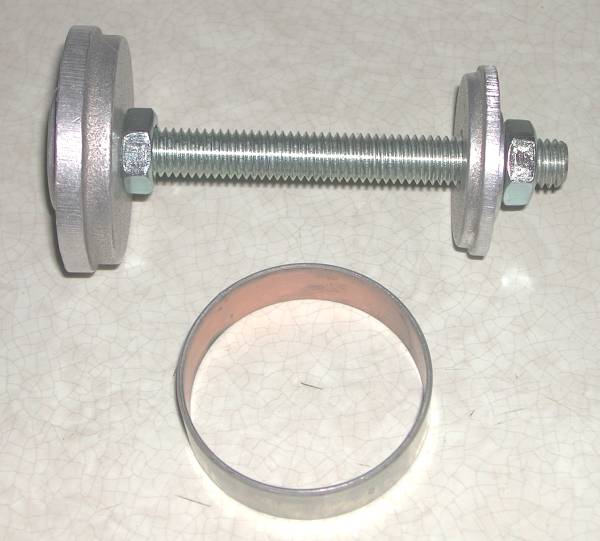
Well to jump ahead in time the tool arrived. It is a spitting image of the same tool I used in the rear case of the A4LD. Here is what i bought off of E-bay... $475 retail I paid a fraction of that:

DSCN6757.JPG


This enlarges the rear case bore to accept this steel sleeve

DSCN6759.JPG


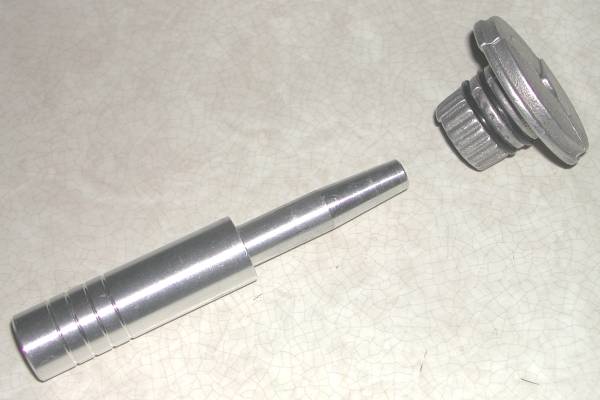
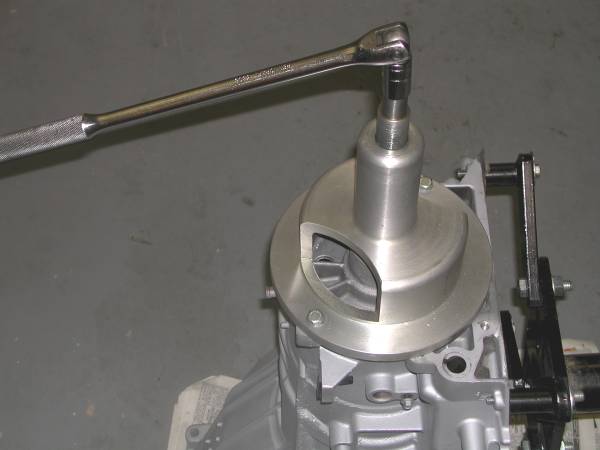
Which is either driven or pressed into place using this tool (shown with the sleeve on it)

DSCN6760.JPG


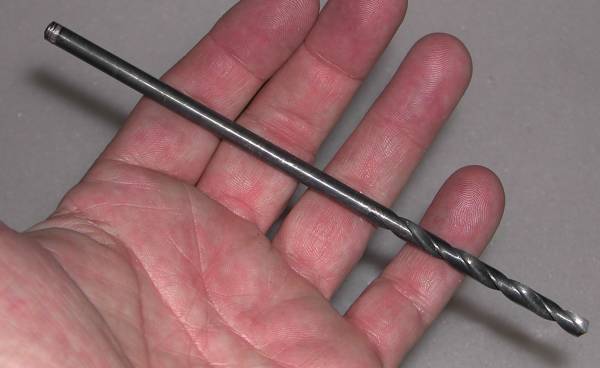
and the oil feed hole is renewed using this long drill bit up through the new bushing

DSCN6761.JPG


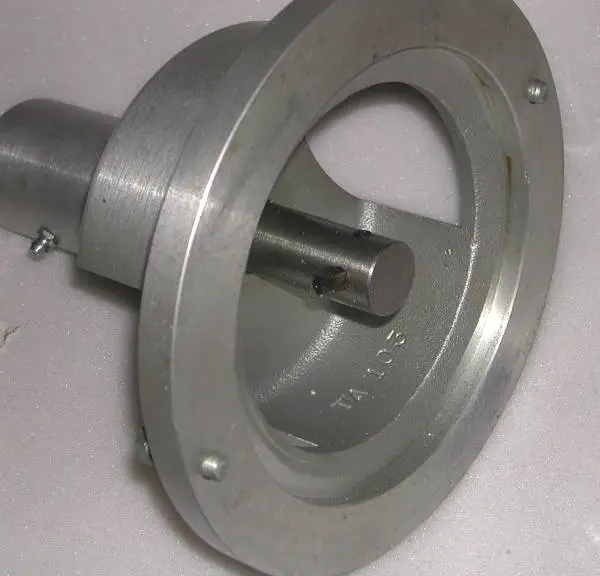
another look at the "business" end of this boring tool

DSCN6762.JPG


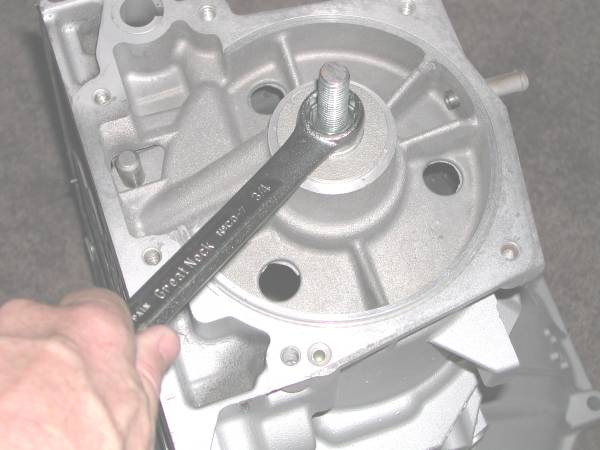
You can see the bolts that attach to the case.. I will post pix here of that process...

DSCN6888.JPG


DSCN6889.JPG


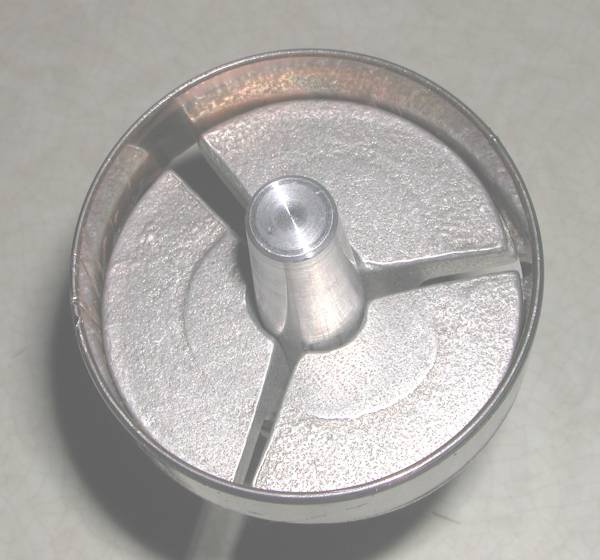
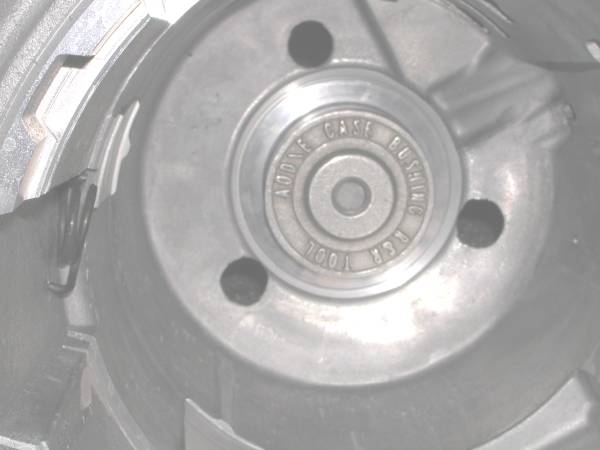
Here is what the bore looks like before the bushing is pressed in
DSCN6890.JPG


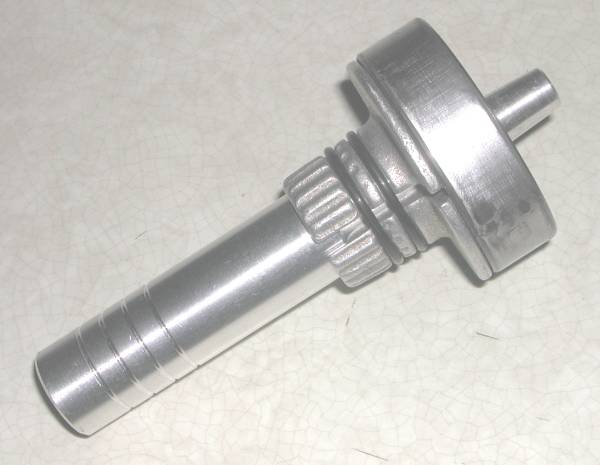
You put the bushing on an installer... you can pound it in, but since I have a press I will press it in...using red locktitte.... more pics to come of that process..

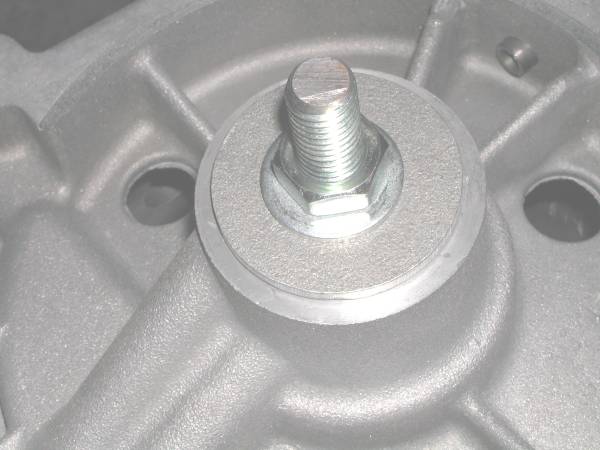
Here is the sleeve pressed in.... I didn't photgraph the process...it was mainly put the bushing on the installer, align it, and press it in. Pretty easy all in all.

DSCN6963.JPG


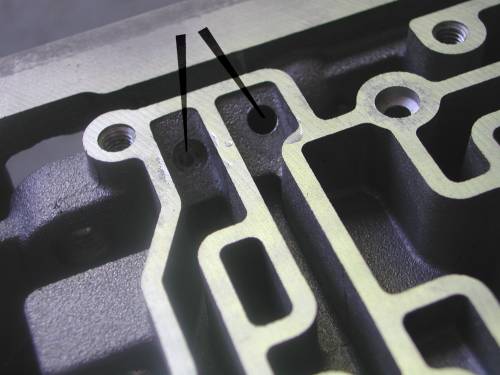
Now we need to drill 2 holes into it. Here are the "tubes" leading to where it needs to be drilled

DSCN6965.JPG


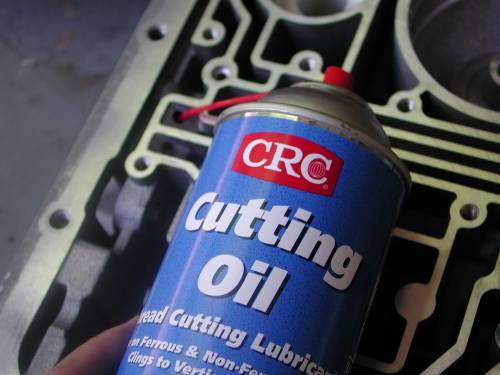
I'll squirt some cutting oil into each

DSCN6964.JPG


Then I will drill them....

DSCN6966.JPG


Until I break through... (bad pic sorry)

DSCN6967.JPG


Then blow the bore out.... cleanup time...

DSCN6968.JPG


Looking down this bore - daylight!

DSCN6969.JPG


I will do the same with the other one and when I am finished I now have 2 holes in the sleeve:

DSCN6971.JPG


Notice the burrs? If not try this view...

DSCN6972.JPG


I used a knife to deburr them, the used 320 grit paper and finally scotchbrite.... all ready !

DSCN6973.JPG


Actually, as i did these photographs... I noticed the bright line at the top of the right hand hole (In the initial hi def photos)... it was looking like a burr I might have missed.... I went back and rechecked and sure enough a SLIGHT one was there. I redid it with a knife and paper and scotchbrite and now it is fine. (Tranny building is all about attention to detail).

So, the case is ready. GUTS time when they are ready to go in!

* * * * * * * * * * * * * * * * * * * * * * * * * * * * * * * * * * *

Direct Drum comments:

Your advice about splines there is a good one. Those are pretty shallow splines. Since I am using new that is not a worry, but if you reuse, check carefully.

The 1-2 aluminum accumulator piston was replaced by a completely different one. I have pics of the new one in the accumulator section. I am still futzing about the 2-3... will post my findings there when I am more confident.

I thought in a year I had assembled more or less everything and my investigation was mostly complete, but as I start the assembly.... I find out where my knowledge is spotty or just plain non-existent.

The TCCOA website has been a great help, but in just 6 years, I am finding it a bit dated in some areas. But then, discovery, and investigation is part of the fun.

Like you, I also understand that in '98 the frictions became more or less as good as they get. That has been troubling for me in some of the upgrades, especially since like in the direct the new stuff is non grooved and the steels are thinner. I have not yet soaked the Kevlar OD yet either.... I am really on the fence with that.

I do notice that this Diary is not very interesting to most folks on here - compared to the A4LD and the valve body rebuild diaries. But I wanted to do this rebuild, and so the info will be there for those who want it. I can imagine in time a lot of non-explorer folks may find it useful.

Anyway again thanks for throwing in your experiences and thoughts, they are an excellent and much appreciated addition.... please feel free to chime in anytime you think I miss the mark in/during the rebuild, or if you have questions etc.


A couple of notes here. First, as I post this stuff frequently I come back and update it and refine my messages. In this process I will be including material and information I glean from other sources. In particular I am very grateful to Jerry W. - a FORD Engineer - for the information he posted on the TCCOA website (link provided in post #8). As I add in information gleaned from others I will try and attribute where it came from, but can tell you there will be times I fail in that effort. I do not want anyone to think I am plegarizing. I will not quote without quotes and attribution, but I may provide information that is not something *I* personally found out, and it may mirror what you read elsewhere. Please read all the links I post on here, and understand I am in many cases just a guy trying to condense everything I have read and learned and found out on my own, in one place for you. Understand?

Secondly... I did previous Diaries sometimes in what was more or less stream of consciousness. Years later when i need to refer someone to something specific, it is a pain. This Diary I am setting up differently. There may in the end be 20 or so separate threads making it up, but it WILL be easier in the future to go to your own particular area of interest. So, on that note...this may be a good place to post and update links to the other threads in this Diary. I'll try and post links at the end of each thread to the next, but maybe ONE place for the whole set would be a good idea... so here goes (this thread will be updated constantly until I have them all in when I finish)

Part 2 -Output Shaft, Ring Gear and Hub (and a discussion of extension housings as well)
http://www.explorerforum.com/forums/showthread.php?t=157283

Part 3 - Torrington bearings and Thrust Washers (including selectives)
http://www.explorerforum.com/forums/showthread.php?t=157376

Part 4 - Servos and Accumulators
http://www.explorerforum.com/forums/showthread.php?t=157428

Part 5 - Direct Drum and Hub
http://www.explorerforum.com/forums/showthread.php?t=157440

Part 6 - Bands (2 of em)
http://www.explorerforum.com/forums/showthread.php?t=157481

Part 7 - Main Planetary and Sun gear
http://www.explorerforum.com/forums/showthread.php?t=157487

Part 8 - Case Support
http://www.explorerforum.com/forums/showthread.php?t=158559

Part 9 - Reverse Shell and Sun Gear
http://www.explorerforum.com/forums/showthread.php?t=158566

Part 10 - Forward Clutch
http://www.explorerforum.com/forums/showthread.php?t=158888

Part 11 - Reverse clutch
http://www.explorerforum.com/forums/showthread.php?t=159597

Part 12 - Transmission assembly up to the Intermediate clutch
http://www.explorerforum.com/forums/showthread.php?t=160569

Part 13 - Intermediate Clutch
http://www.explorerforum.com/forums/showthread.php?t=159423

Part 14 - End Case (pump) Clearance - Selecting the Right Selective
http://www.explorerforum.com/forums/showthread.php?t=160708

Part 15 - Pump Modification & installation
http://www.explorerforum.com/forums/showthread.php?p=1462794#post1462794

Part 16 - Output Shaft Speed Sensor installation
http://www.explorerforum.com/forums/showthread.php?t=161096

Part 17 - Parking Pawl Installation (coming soon)

Part 18- EPC solenoid installation (coming soon)

Part 19 - Shift lever and seal installation (coming soon)

Part 20 Digital transmission range sensor installation (coming soon)

Part 21 - Other case sensors - OSS Sensor install
http://www.explorerforum.com/forums/showthread.php?t=161096

Part 22 - Valve Body - Part 1 - upgrades (coming soon)

Part 23 - Valve Body- Part 2 and installation (coming soon)

Part 24 - Pan install and button up of transmission. End of Project (in my dreams)

Part 25 - Parts listing with part numbers, cost, and where to buy (coming soon)

Part XX - A Discussion about Friction Material (not sure where it will finally go so for now it is the only double X rated thread on the site!) :eek:
http://www.explorerforum.com/forums/showthread.php?t=158669


As you can see, I have a ways to go. I will try and resist the tendency to shortcut the pics and narrative. Just know what could be just a 20 minute job, by the time I slow down and photograph it, and then edit the photos, and then upload then and then create the post and then bring the photos into that post is several hours of effort. Bear with me.

Better yet... find a home for this beautiful thing. I have a year of research and effort and over $2000 in parts, tools, etc invested in it. Help me sell it !

I mean think about it. One of a kind. Remans use old parts to a great extent. These internals are ALL new. Yet!...A brand new trannie not only costs more, but lacks any of the upgrades I put into this. In fact the only reused part is the case, and IT is better than stock because of the steel sleeve. In short, you cannot find this trannie anywhere... except, of course, here.


Keep up the good work. I would be interested in this trans, but I want the fun of doing my own - and I am building a 4x4 trans.

Have you determined the uniqueness of the 4R75W trans used in the 2004+ vehicles? I am not sure how much different it is from the 5.4L 4R70W trans Jerry speaks of. I managed to get a complete nearly zero mile 4R75W with cracked bell housing, which I will use as a donor for my rebuild.

Now, all I need to do is sit down for an hour or so and soak in this whole thread!

Todd


Your question is a good one, and I honestly do not know. I'll post things as I find them, feel free to add whatever you find out as well. I did pick up the bonded intermediate 4R75 intermediate piston, and will report what I find out when I get there.

Oh, and, this is being built as a 4x4.

[Edit] It appears that the difference lies in the planetary/sun gear assembly, and that it ws beefed up somehow and it is also reverse compatable, so that will make a great donor.


Ahh, did not know you were doing 4x4. Shoot me a price on it. Like I said, I need to review the whole post and understand what level of upgrades it will have. I was planning to build one to work with my supercharged / water intercooled 351W - ~600rwhp/tq

Todd
tmsoko@comcast.net


I'm glad that you found this thread Todd. I am also far from done with research for my AWD 99 4R70W. I will need to absorb this as well, I saw on this page that Chris you have replaced the direct drum teflon seals with one piece items. Where did you here of that? The original 80's style factory parts were replaced by the slit teflon seals around 1988, my first AOD.

I will look hard at my stock 99 parts, with mileage in the 40's I hope nothing needs help. Chris, have you learned of a technique to set the end play properly? I know that there is a special tool, but few people ever invest in that. One trans guy I knew did it by feel, and 0.050" is about what he liked. I have relied on only building good transmissions, and keeping the same thickness front shims. Regards,


Todd... I'll send you a PM. Your timing would be good as I have been making certain assumptions regarding certain upgrades based on probable usage for a daily driver also used for towing. Your intended usage would change things, but it would not be too late to make the necessary changes to accomodate 600 RWHP. Stock won't do that. Among the upgrades I have is an alto 8 plate direct clutch with kolene steels, solid teflon seals for the direct drum, I had planned a 5 plate forward but could convert it to 6 or 7 for your application, and I have a 4 plate intermediate with alto reds and kolene steels. I had not planned to use the heavy duty kevlar front band but would in your situation. The OD piston is an upgraded model and as large as the case permits, with a double seal and a seal on the servo to band pin. The case has a steel sleeve in the rear governor bore for better sealing of the output shaft (translates is to stronger apply and more consistent apply to the direct clutch). The planetary is new (indeed all internals are brand new - including all bearings and the pump, which is also slightly modified) and is the heaviest duty version available. The mechanical diode is being used with the spiral retaining ring that won't let go no matter what! The VB will be upgraded as apprioriate and the accumulators will be too to maximize performance. At 600 RWHP the special Fairbanks Transaction model with ring seals would be used. The case will have a 3 quart oversize aluminum pan with a boss for the recommended termperature sensor. Like I said, this level of build is not available anywhere that I am aware of. Some may offer some of the mods, but with used internals. None offer the rear case mod that I know of. Remanufactured do not use all new internals and have none of the upgrades.

Don... I got the input shaft/direct drum one piece seal advice from either the MN12 website, or from Jerry W.'s article on the tccoa site.. Links to both are at the front end of this Diary. They are must reads IMHO.


I found out some info from a FORD employee who works in their Sharonville transmission plant:

The 4R75 will not replace the 4R70W easily, it has an intermediate speed sensor and your wiring has nothing for it to plug into.

The valve body for a 4R70W and a 4R75 are almost exactly the same, have the same casting and wormtrail, but it does have different spring rates.

The 4R75 is called the 4R75E some places, the 4R75W others, within Ford, no real reason, just different people not getting it straight, both are more or less correct. The internal differences are extremely minor, the biggest difference is actually the extra sensor. and an upgraded converter clutch
.

I think that the 4r75 may indicate the trans can handle a little more torque. Maybe upgrgaded internals, I am not sure. The added sensor is consistent with the strategy FORD is following to have the computer "tweak" the settings to optimize performance from an aging transmission.... they now monitor more stuff. Yeah the computer now increases line pressures slightly on an aging transmission to maintain performance levels. There is obviously a different casting for the case with an added sensor hole, whether the rest is the same I do not know. I don't know why he says swap would be tough... "just leave the sensor unhooked" it would seem to me.

Short editorial: Fewer folks these days keep a car long enough for a trans rebuild. The transmissions are getting better (fewer new designs and old ones being upgraded constantly) and the computer control allows compensation for signs of aging. As costs to repair go up, people want their trans to last longer and trade in before they go out. Expect more sealed transmissions and more computer control in more areas. (end editorial)

Note: Sunday May 21, 2006 - This trans is still for sale, not too late to specify if you want something special in it, otherwise it is going to be build as a heavy duty street/towing transmission


LEGAL STUFF: This entire Diary is Copyright 2006, Chris Swanberg. Any republication, dissemination, reposting or reproduction , other than for personal and individual use for reference is strictly forbidden and unlawful. Individual users may print out or download this Diary for their personal use only.

end legal stuff. :D


Can we post links to this when people have questions on 4R rebuilds? :)


What? And expose how much dumber I was then [ edit: dumber is relative... still pretty dumb at times] and how much better organized this rebuild Diary is? NO WAY ! NADA, NOPE! NYET! ;)


Apropos of nothing.... I have added a proposed diary thread (#22 I think) with a parts listings, prices and where to buy them. This was in part because others had suggested it in the A4LD Diary, but mainly because of a new EF Board member who found this thread off a posting I did on www.tccoa.com and who has offered some great info and pics, which I plan to post there when I get to it. Thanks Krazy3o2!

[ps. I assume you mean 4R44 and 4R55... if you meant 4R70W etc, then be my guest... this Diary is all about helping others.]


Don, sorry I somehow missed your Q. We will set end play on this tranny by the book... not as tough as you might think... I hope to have that done and posted within the week.

WITH it's own thread!


My f150 lost 3rd and 4th gear. I pulled tranny and found the direct clutch burnt up. Besides that everything else looks very good and clean except for some small other things, which i know are always important in trannies.

The sealing ring on the output shaft the one closest to the snap ring and the ring gear (not the small ones, the large silver ones) was snapped and broken. All the others look great. Im thinking this had a big factor on why the clutch burnt up? Opinions?

The direct Drum I question?
The back of it were the output shaft inserts seems to be worn a little in the hole and I can see in the hole were the output shaft rings met the hole there is a little line were they were.

The reverse clutch dog ears and the sun gear were the dog ears insert are both worn a little in some spots, but not really bad.

That is what I have seen to be the only thing wrong with this tranny what I have stated above. The tranny was rebuilt/replaced from ford about 50k ago. Its a 97 tranny and I have all the newer parts/upgrades that were already on it when i pulled it down, like ex. mechanical diode and rubber accums. Everything else looks really like brand new on this tranny.
So I will get to my questions now and try not to make this much longer.

Do you think I should replace the direct drum?

Can I get by with not replacing the reverse clutch and the sun gear?

Because I really dont have the money and am not trying to build the strongest tranny, but just trying to fix whats needed so i can drive my truck.

Only parts Im replacing:
I am planning on just replacing the direct clutch frictions and steels, and the seal ring on the output shaft, the reverse servo, the od band, the extension housing seal, a couple of main valve body gaskets, pump gaskets, and installing a drain plug in pan, and sanding all neccesory parts down for better oil circ. Then putting it back on my truck and hoping just to use it as a regular (nothing special) daily driver tranny.

Do you think by me replacing just those things that I stated above that it will be ok?

If not what are you opinions?

Last question: I dont have a dial caliper or depth indicator. I was thinking that i dont think it will matter to much because i am replacing the direct clutch steels and frictions with stock measurements so nothing will have changed in measurement. So I was just going to put the plastic thrust washer (yellow) that i took off and just use that same one for clearence on the pump.

You think that will be ok?


Let Chris answer before you do finish, but here's my take. Look at all of the bearings carefully, including the plastic thrust washer. Replace all of the frictions and steels if you can, they don't cost much. A whole kit with them, and seals, gaskets, etc. should be around $40 or so. Install a basic valve body kit, I like TransGo, runs about $35. Only do that if it can be done very carefully, no mistakes allowed.

The clearances on all of the drums/clutches, should be less than stock. Factory clearances will be in the 0.050" and up, while they should be just under 0.040" give or take 0.005" or so. Different thickness lock rings adjust those, Ford would have to order most of them. You probably don't have time to find the best lock rings for those, so just be sure that the clearances aren't way off for the frictions.steels.

How clean exactly was the fluid, the parts inside? The same fluid/debris is still inside of all of the pistons, and other places that you cannot easily reach. The pistons take special tools to change. Flush the radiator very very well. Install an inline filter between the radiator output, and the trans input. The old fluid can ruin a new rebuild. Good luck,


Join the Elite Explorers for $20 each year.
Elite Explorer members see no advertisements, no banner ads, no double underlined links,.
Add an avatar, upload photo attachments, and more!
.


Do you know were to find a whole kit with frictions/steels, gaskets etc for around $40? I havnt found many good sources for parts. So I think I am going to go with transmissionpartsusa.com for most of my parts.

Yes the fluid was bad. I would like to get in the pistons and replace the seals/gaskets and clean everything, but i dont have the tool to get in them. I saw a valve compressor at autozone that looked like it might work, that they had for the free rent a tool service, but im not sure if it will work. thanks for your help.


Status
Not open for further replies.
Back
Top