- Joined
- August 3, 2000
- Messages
- 31,688
- Reaction score
- 8,348
- City, State
- NORTH IDAHO, 7B
- Year, Model & Trim Level
- B2 "Slightly" Modified
- Callsign
- FOURTEN
OKay here it is, this morning I drove to work with my new drivers seat bolted in and wired up. I installed 1999 Explorer 4 door leather Eddie Bauer power buckets into my 1988 Bronco II.
All I can say is WOW. I thought my 97 buckets were cool.
Best thing that has happened to me on a cold morning in the BII ever! My back is thanking me, which is quite fitting because last night during the 4.5 hour install I was crunched over in the BII with no seats soldering for 2 hours.
I will be posting all the wiring I had to do and how I did it in order to make these seats work. Also how to swap seatbelts from one set of seats to the other and mounting details. This is not a bolt in swap, the holes in the BII/Ranger do not line up to the Explorer seats. I had to run 3 additional wires to each seat and add them into my factory style wiring box.
Details and pictures to follow:
First the wiring.
My BII originally had air lumbar seats, so there is a 20 amp power wire and a ground to the seats already. This power wire (black/white) and is routed from the BII dash fuse panel to each seat along with a ground wire (black).
The 99 Seats w/heat require 4 total power wires:
30 amp hot all times + feed (Light blue/white)
20 amp hot all times + feed (black/white)
switched power (key on) + feed (grey/yellow)
Ground (black)
The heated seat switches are mounted on the side of each seat so there is no wires for additional switches (Nice feature IMO)
PM me if you would like a wiring schematic of the power wires run to these seats in my truck, and also the wire colors on the 99 seats and what they are.
First I removed my 93 power distribution box:

Notice the open fuse locations, very handy for adding accessories
Next I added the necessary wire for the 30 amp fuse to the box (+ wire is in foreground)

and soldered on the male end for the accessory plug I added to my truck. This allows me to take the entire power distribution box out of the truck and work on it on a bench.
Here is the plug:

Here is the box with new 30 amp fuse installed:

I already have a + switched feed inside the cab of the truck, for the seats I simply spliced into that wire. This wire is used so you cannot leave the seat heaters on when not in the truck. The 30 amp power wire was fed through the firewall and ran down the pass side rocker. It appears again under the passenger seat:

You can see here the new wires (30 amp + is green, key on signal is red)
are combined with the existing power and ground wire and a 4 position plug was soldered onto the end of the 4 wires.
I got these plugs at the junk yard for free from two different late model F-150's. They allow me to remove my seats and unplug them, similar to factory.
You can also see the red and green wire is split here and run across the trans hump over to the drivers seat.

The harness was wrapped and covered with conduit (again junk yard free)
You can also see the brackets that I maed a few years ago for the front two seat bolts. These simple brackets allow me to install 4 door power seat tracks into my BII using the factory bolts and mounting holes. The drivers side is similar.
Here is the other side of the F-150 plug, soldered to the seat power harness:


Next I had to swap the seatbelts from my 97 buckets onto these 99 buckets. The 99 uses a new style seatbelt end that my BII does not have (I actually have 94 Ranger seat belts with new black webbing material)

there are two 10mm bolts that hold the sliding seat belt assembly to the bucket seats. Made this very easy to do.
Now the seat can finally be set into position and all 4 hold down bolts loosley threaded. This allows you to sit in the seat and adjust its position slightly.


All tightened up, power supply is plugged in, seat in this picture is at the lowest possible height:

Tallest possible setting (VERY good for 4x4ing, so you can gain visability)

All the way forward with access to the back seat (if I had it installed):

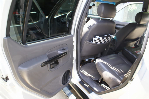
All cleaned up and completed. I used a water and Castrol Superclean to clean the leather surfaces and cracks, then Maguiers Gold Leather conditioner to finish them up:


So far some of the best $$$ spent, I spend alot of hours in the BII and good comfortable and supportive seats are very important. Plus they look cool!
Special thanks to Christopher Wagner for a great deal on these seats, for being patient with me while I got his $$$ and for shipping them quickly.
Next project: New carpet kit, re-furbish dash (paint lower and re-do pad), and a custom center console with cooler, drink holders, gages, switches, floor shifter mount, PDA/GPS mount and more")
All I can say is WOW. I thought my 97 buckets were cool.
Best thing that has happened to me on a cold morning in the BII ever! My back is thanking me, which is quite fitting because last night during the 4.5 hour install I was crunched over in the BII with no seats soldering for 2 hours.
I will be posting all the wiring I had to do and how I did it in order to make these seats work. Also how to swap seatbelts from one set of seats to the other and mounting details. This is not a bolt in swap, the holes in the BII/Ranger do not line up to the Explorer seats. I had to run 3 additional wires to each seat and add them into my factory style wiring box.
Details and pictures to follow:
First the wiring.
My BII originally had air lumbar seats, so there is a 20 amp power wire and a ground to the seats already. This power wire (black/white) and is routed from the BII dash fuse panel to each seat along with a ground wire (black).
The 99 Seats w/heat require 4 total power wires:
30 amp hot all times + feed (Light blue/white)
20 amp hot all times + feed (black/white)
switched power (key on) + feed (grey/yellow)
Ground (black)
The heated seat switches are mounted on the side of each seat so there is no wires for additional switches (Nice feature IMO)
PM me if you would like a wiring schematic of the power wires run to these seats in my truck, and also the wire colors on the 99 seats and what they are.
First I removed my 93 power distribution box:
Notice the open fuse locations, very handy for adding accessories
Next I added the necessary wire for the 30 amp fuse to the box (+ wire is in foreground)
and soldered on the male end for the accessory plug I added to my truck. This allows me to take the entire power distribution box out of the truck and work on it on a bench.
Here is the plug:
Here is the box with new 30 amp fuse installed:
I already have a + switched feed inside the cab of the truck, for the seats I simply spliced into that wire. This wire is used so you cannot leave the seat heaters on when not in the truck. The 30 amp power wire was fed through the firewall and ran down the pass side rocker. It appears again under the passenger seat:
You can see here the new wires (30 amp + is green, key on signal is red)
are combined with the existing power and ground wire and a 4 position plug was soldered onto the end of the 4 wires.
I got these plugs at the junk yard for free from two different late model F-150's. They allow me to remove my seats and unplug them, similar to factory.
You can also see the red and green wire is split here and run across the trans hump over to the drivers seat.
The harness was wrapped and covered with conduit (again junk yard free)
You can also see the brackets that I maed a few years ago for the front two seat bolts. These simple brackets allow me to install 4 door power seat tracks into my BII using the factory bolts and mounting holes. The drivers side is similar.
Here is the other side of the F-150 plug, soldered to the seat power harness:
Next I had to swap the seatbelts from my 97 buckets onto these 99 buckets. The 99 uses a new style seatbelt end that my BII does not have (I actually have 94 Ranger seat belts with new black webbing material)
there are two 10mm bolts that hold the sliding seat belt assembly to the bucket seats. Made this very easy to do.
Now the seat can finally be set into position and all 4 hold down bolts loosley threaded. This allows you to sit in the seat and adjust its position slightly.
All tightened up, power supply is plugged in, seat in this picture is at the lowest possible height:
Tallest possible setting (VERY good for 4x4ing, so you can gain visability)
All the way forward with access to the back seat (if I had it installed):
All cleaned up and completed. I used a water and Castrol Superclean to clean the leather surfaces and cracks, then Maguiers Gold Leather conditioner to finish them up:
So far some of the best $$$ spent, I spend alot of hours in the BII and good comfortable and supportive seats are very important. Plus they look cool!
Special thanks to Christopher Wagner for a great deal on these seats, for being patient with me while I got his $$$ and for shipping them quickly.
Next project: New carpet kit, re-furbish dash (paint lower and re-do pad), and a custom center console with cooler, drink holders, gages, switches, floor shifter mount, PDA/GPS mount and more