98 XLT Dana 44 on Leafs | Ford Explorer Forums - Serious Explorations

  • Register Today It's free!

98 XLT Dana 44 on Leafs

1998 Explorer XLT

4.0 sohc
5r55e
1354 manual

1982 Jeep Wagoneer Dana 44 front axle
4.88:1 Yukon gears
Detroit Truetrac
Passenger side flat top knuckle (73-76 Chevy) milled and drilled by Sky Mfg
Passenger side Sky Mfg tall high steer arm
Small bearing spindles (73-76 Chevy)
5x5.5 hubs, rotors and wheel bearings (Ford Dana 44 ttb)

Stock rear axle
4.88:1 Yukon gears
Detroit locker
Spidertrax 5x4.5 to 5x5.5 wheel spacers

1997 Ranger steering box
1997 (I think) Steering shaft (has 98+ connection at firewall and rag joint at steering box)
Jeep Wagoneer pitman arm (had to retaper splines)
1.5x0.25 wall DOM tie rod and draglink
Ballistic Fab weld in bungs
Parts Mike EX2234R and EX2234L tie rod ends

1995 Bronco master cylinder 1.125" bore
1985 Chevy 3/4 ton calipers with 3 5/32" piston
1985 Chevy G20 van front brake lines (~23" long)
1985 Chevy Monte Carlo rear brake lines axle to caliper
1979 Bronco rear brake line frame to axle
ABS pump delete (kept engine bay computer for speedometer)

Sky Mfg S10 SAS kit
Sky Mfg Toyota front shock hoops
Marlin Crawler 4" lift Toyota front springs
Stock rear springs
Warrior shackles
RuffStuff u-bolts, perches and plates
First gen Explorer front sway bar

Goodyear MTR Kevlar 35x12.5R15
Crager Soft 8 15x8 4" BS

Dakota Digital SGI-5 speedometer calibrator


Before shot with 3" body lift, TT and shackles
IMG_0166.jpg


Opened up the 44 and found this, it cleaned up nicely though
IMG_0176.jpg


Mocking up the steering box, maybe should have looked into an outside the rail mounted box a little more for the longer draglink and ease of mounting
IMG_0338.jpg


IMG_0343.jpg


Wagoneer arm (shown installed) vs. stock Ranger arm
IMG_0305.jpg


I used the stock high pressure line for the power steering but cut off the fitting that went to the old rack and replaced it with the proper fitting for the Ford box
IMG_0344.jpg


Getting the axle installed using Wagoneer 7 leaf packs that were too weak and replaced with the Marlin's
IMG_0371.jpg


Got it done and took it out to Carnegie SVRA to give it a shakedown run where I broke both front lockouts (junk yard Selectro) and pulled apart the front driveshaft. (5" slip is not enough)
P3030363.jpg


IMG_0666.jpg


IMG_0661.jpg


Overall the truck took about two months to complete working in the driveway and I couldn't be any more satisfied with how it came out.


Join the Elite Explorers for $20 each year or try it out for $5 a month.

Elite Explorer members see no advertisements, no banner ads, no double underlined links,.
Add an avatar, upload photo attachments, and more!
.


Great job, looks nice and clean. Is that Sky Off Road bracket one of their stock pieces or did you have them modify it for the waggy axle...looks like a perfect fit.


dude thats sickas hell... jelous.. haha


great truck bro..i live in the bay area as well and im looking for some local help on my sas.i want to keep my rear stock also but i need a d44 up front to math the width..how is the wagoneer 44 with the stock rear? same widths or did you need wheel spacers?
sick truck


Thanks to all!!

Great job, looks nice and clean. Is that Sky Off Road bracket one of their stock pieces or did you have them modify it for the waggy axle...looks like a perfect fit.

I used their off the shelf kit aimed for the Chevy S10. All I had to do was build a shelf for the shackle hangers to mount to, the front hanger is already set at a 31.5" spring spacing which is what the Wagoneer and I believe most other full sizes use. Heres a link to the kit I used

http://www.sky-manufacturing.com/new/detaproduct.php?id=197

Very nice job... My wagoneer leafs are to soft as well, still have not found a fix.

Yea the junkyard packs that I got were pushing 30 years old and stated to go into negative arch just sitting in the driveway. After reading around a bit I found that the Marlin/Trail Gear/All Pro springs for the Toyotas were a pretty popular choice for Tacoma and 4Runner solid axle swaps and with their weights being similar to the Explorers I figured they would work pretty well. The eye to eye and eye to pin measurements are nearly the same as the Wagoneers plus the Marlins use a military wrap to make for a stronger pack. So far they have been working great and flex amazingly.

Heres a few links to a bit of reading on the matter

http://www.ttora.com/forum/showthread.php?t=129584

http://www.ttora.com/forum/showthread.php?t=140739

great truck bro..i live in the bay area as well and im looking for some local help on my sas.i want to keep my rear stock also but i need a d44 up front to math the width..how is the wagoneer 44 with the stock rear? same widths or did you need wheel spacers?
sick truck

The Wagoneer is about 61" wheel mount surface where as the 8.8 is about 58" so with the Spidertrax wheel adapters that I used on the rear to go from 5x4.5 to 5x5.5 that are 1.25" thick each the rear just about matches the front. There are some steering advantages to having the rear be an inch or two narrower than the front as well. The only downside to the Wagoneer axle is that it is a 6 lug so you have to convert it to 5 lug using some Chevy parts and some Ford parts.


Looks good. Maybe this summer we can meet up at Hollister. Does your draglink rub on the driverside spring when the driverside compresses? Sure looks close from the picture posted.


Chad - Yep that 31.5 is the on center measurement between the springs on the front hanger

Bird - There isn't anything on the stock frame to bolt the shackle mounts to and that spot is a touch too narrow to weld the mounts right underneath the frame so you have to build a little shelf to weld them to outboard of the frame

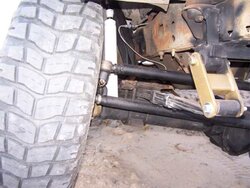
RockRanger - In the picture straight on of the axle the draglink isn't cut to length on the pitman arm side so it IS laying right on the driverside pack haha. Its pretty much flat like in the picture just shorter. The problem I am having however is when the passenger side droops out the draglink contacts the passenger side pack making steering a little difficult. Im thinking of maybe getting a shorter flat pitman then taper it from the top for the TRE and move the draglink to the rear hole of the high steer arm to get it out of the arch of the spring?

And I'm definitely down to beat this thing up over the summer!


I had the same issue with drag link hitting the spring. I basically added 3/8" to the spring perches to allow the draglink to clear the springs. The flat pitman arm with the taper on top should help a lot as well.


I had the same issue with drag link hitting the spring. I basically added 3/8" to the spring perches to allow the draglink to clear the springs. The flat pitman arm with the taper on top should help a lot as well

pics or can you explain a little more briefly you added 3/8" steel?? sorry im lost lol


You can kind of see what I did here.

http://216.189.1.23/forums/showpost.php?p=1292330&postcount=162

The spring perch on the driverside was higher then the passenger side on my setup. So I made the spacer to make it a bit higher. The spacer I just bolted through the center pin as if it was a really short leafspring. This also allowed the steering to clear. I cant take any pictures cause I ripped it apart and went to a three link instead.

Here is another pictures that kind of shows it.
 

Attachments

  • thaven1-06 002a.jpg
    thaven1-06 002a.jpg
    30.9 KB · Views: 8,315


have any pics of the shelf you made dude?? im pretty intrested in this build and its got me motivatedd haha


I really like the plate for the steering box, that is nicely done! :)


have any pics of the shelf you made dude?? im pretty intrested in this build and its got me motivatedd haha

I second that! Pics of the rear shackle mounts please:)

I hope to head out to the j/y tomorrow to start my search for a wagoneer axle. Wish me luck!


lookin good! I need to do this some day, sick of failed ball joints. If you don't mind me asking what was your total cost for the swap?


Join the Elite Explorers for $20 each year or try it out for $5 a month.

Elite Explorer members see no advertisements, no banner ads, no double underlined links,.
Add an avatar, upload photo attachments, and more!
.


I'll grab some pics of the shackle mounts and a few other odds and ends in the morning guys. Anything anyone wants to see in particular?

lookin good! I need to do this some day, sick of failed ball joints. If you don't mind me asking what was your total cost for the swap?

A whole lot more than I'll ever get back from it!! Realistically with regearing both diffs with all new everything and wheels and tires I'm probably on the plus side of 4k. I have all the receipts but don't really want to add them all up haha.


Back
Top