A/C Condenser ? | Ford Explorer Forums - Serious Explorations

  • Register Today It's free!

A/C Condenser ?

91explorer1009

Well-Known Member
Joined
January 14, 2004
Messages
271
Reaction score
0
City, State
NJ
Year, Model & Trim Level
91 sport
Ok, I need some general info here. How hard is it and what special tools does it take to install a new condenser on my 91 ex, with a tranny cooler? I was at a friend of a friends shop and he leak dye tested my system for me and there was a lot of leaks in the condenser, and a leak behind the compressor going into the tubes. I know I can replace the rings inside the connection on the back of the compressor, but don't know what it takes to put in a new condenser. I saw them on ebay for around 100-150$. He quoted me 285 for a new one. And 500 for the job total with that incl. I said I would think about it, and left. Would I have to take out the rad. and fan and belt and all or what.? Cause I dont know if I want to mess with those rusty metal lines on the rad. Please let me know what you think guys. I am pretty good mechanically, change oil, minor things, etc. I have recharged the system in the past by myself. Can I just swap it out from the front behind the grill? This would save me a ton of money, if I could do this myself. And what is a quick connect and how do I get tham off if I need to? Thanks in advance, I really need your opinions. Hot in Jersey :fire:


Join the Elite Explorers for $20 each year.
Elite Explorer members see no advertisements, no banner ads, no double underlined links,.
Add an avatar, upload photo attachments, and more!
.


By your list of stuff you've done in the past, you should be able to do this job. Just be sure to replace your dryer simultaneously, and get a good vacuum before recharging.

You should know to use backup wrenches anytime you work on lines, correct?


Yes, you have to take out the radiator to access the condensor. No special tricks, a Haynes manual might help, but it's pretty much intuitive. A few tips:

- Disconnecting the condensor lines requires special A/C tool ($6)
- Add 3 oz of oil to the condensor prior to installation.
- With a 91, you have R12 installed unless converted to R134a. See sticky about converting if necessary.
- You, are correct that the leak on the lines at the compressor may be from faulty o'rings, also consider the HP relief valve. Replace with green o'rings. Torque bolt to 15 +/- 2 ft/lb
- Whenever the systems opened, it's considered good practice to change the accumulator if older than three years. Add 2 oz of oil
- You will need to evacuate the system prior to filling.
- Some people do the replacement work themselves, then return to an A/C shop for the evacuation and filling.

Ask questions, this is a friendly forum with great depth of experience.


ok, so the radiator has to come out def. it can't be taken out of the grill, damn. and smith, what dryer needs to be replaced? Where is that? Is the vacuum for evacuating the system? How much is the vacuum and is the evacuation necessary, or can I just fill the system back up, since I lost most of the refrigerant anyway. I have never heard of the evac. from anyone so far, I am just curious to what it does and why its necc.

Shamaal, what special tool is needed? What is it called and what should I ask for/look for in a parts store? What is the HP relief valve and where is it? I have a haynes and dont think I saw this. Whats up with green o rings, reg. are no good, I think my friend has a reg. kit with diff. sizes. Where do u get the green? Again the evacuation, I lost almost all refrigerant, not much to evac? Can it be skipped? Oh, and when u say oil, 3 oz. What kind of oil in the condenser needs to go in before installing. Refrigerant, R-134a? or reg. motor oil???

Also what is a quick connect fitting? How do these come off, and is there any in this job??

My system is retrofitted by the way. Well thanks in advance, and sorry for tons of questions, just trying to save myself 500 dollars, by doing my own work. Trying to learn anyway, thanks again.


No problem about the number of questions. Read the stickies at the top of the forum.
My Haynes (91-99 Explorer) has a section for removal and replacement of air conditioning components. Where appropriate I'll indicate the relevant section and comment if needed.

1. Removal of condensor - Sect 17
2. Removal of accumulator (Drier) - Sect 18. As long as the system is open do the orifice also. Use two wrenches to separate, and a needle nose pliers to remove.
3. Why evacuate. Moisture in the system when mixed with the refrigerant forms hydrochloric acid, which eats the compressor, welds and tubing. Lowering the pressure, boils the water and removes it. At its simplest a vacuum pump is connected to the ports through a set of A/C manifold gauges. The vacuum is pulled to ambient pressure (approx 14.7 psi, dependant upon elevation) for 15 min. Then the system is observed to hold the vacuum (leak check), then the vacuum is pulled again for at least 45 min. Yes it's necessary. There are a number of corners that the DIY A/C person can cut with a relatively low loss of efficiency. In my opinion, evacuating the system is not one of them. The stickies contain valuable information.
4. The special tool is called an A/C connector separation tool or Ford springlok separation tool.
5. You want the green o'rings because they have higher temperature and abrasion resistance than the black o'rings.
For the more technically orinted the black o'rings are composed of Acrylonitrile butadiene copolymers, sometimes called Nitrile Butyl Rubber (NBR) and the green o'rings are Hydrogenated NBR.
6. The High Pressure Relief Valve is located on the refrigerant line connector block that connects to the back of the compressor. See picture, it also has an O'ring that should be changed.
7. You want R134a refrigerant oil PAG100. A total of 7 oz goes in the entire system. Put 3 oz in the condensor, 2 oz in the accumulator and we'll assume the compressor has 2 oz in it already. Avoid the temptation to turn the compressor when the refrigerant connector block is removed.
8. All the stuff can be picked up in the A/C department of an automotive specialty store (Autozone, O'Reilly, etc).
9. You may consider replacing the components yourself and bringing the vehicle back to the mechanic for evacuation and fill (<$69)
Wear eye protection, Read the stickies, ask questions.
 

Attachments

  • Compressor Lines.JPG
    Compressor Lines.JPG
    76.8 KB · Views: 1,241


Ok, so the hp relief valve is actualy the metal thing that is flush with the back of the compressor, or the bolt thing on the side? I don't think mine has that, no thing sticking out of the side. Just the two refrigerant lines coming ot the bottom. But I will doublecheck.

Now as of today, the compressor turns on and doesnt shut off. Never cycles, I do have a little gauge that came with a kit, and when hooked up it is at 54-55 psi, constant and doesnt cycle. Last year it use to cycle, go up high then the compressor would turn on and bring it down lower, then shut off. But now it is just staying at 55 and not moving. What does this mean? Is there a small part or something like a sensor or valve that would be causing this? Is there a reader, or a 10 dollar sensor somewhere in the ac system, to check first before replacing the condnsor and the compressor. Like if I replace the hp valve or something, could this be fixed? Or does this just mean a major part is broke, or not enough coolant. I don't know what to think, since now the compresser doesnt shut off.

Thanks for the help so far, thats why I love this site, for a guy with limited funds, and no trustworthy mechanics, it is great to get all of your expert opinions.


The high pressure relief valve (HPRV) is the bolt thing on the side, it's a safety feature only and not part of normal operations. The only reason i mention it is that it has an o'ring also and is a potential spot for leaks.
The last person with a problem of the compressor never turning off had a bad compressor clutch, see http://www.explorerforum.com/forums/showthread.php?t=162990

There is a pressure switch on the accumulator that operates the clutch. When the pressure is below 25 psi it turns off, when over 29 psi it turns on. This switch is what turns your compressor clutch on and off.

From you original post, nothing replaced elsewhere will fix a leaking condensor. Regarding a steady pressure, that could be blockage (orifice) or a bum compressor. Staying on all the time with no cooling is not good.

With a low charge, the compressor will draw down the LP pressure then turn-off. This will happen repeatedly with the compressor staying on for shorter and shorter periods of time until the freon is gone.


It does stay on, but it is doing something. The air does get semi cool, not normal a/c cool, but like it is working but not good. :confused: Anyway, my next move will be the pressure switch maybe. Do you think a pepboys or advance auto type place will carry this or should I go to the dealer?

Also, I am confused a bit, the accumulator is the thing in your pics in the other post, the cylinder near the pass. firewall with the pressure switch, right? Wheres the evaporator? In the other post it talks of a blocked orifice tube? Is this in the compressor? QUOTE "remove the orifice tube and take out the old "receiver/dryer" or "accumulator" (depending on the type of car and what they call it). ? (from stickies) Where is the reciever/dryer? Maybe because of the use of the word accumulator two different parts???, I am getting thrown off here. Do I have a reciever/dryer on my 91. It was retrofitted by a shop to r-134a. I would replace the pressure switch on the ...accumultor (in pics) and also now look to find the orifice tube for blockages, and take care of the reciever/drier, if you can tell me where this is and if its a small part or a big one $$. Thanks, and sorry for the confusion, but I am getting this...by the way shamaal if you have a pic of any of this new stuff like where the reciever/dryer/orifice tube is or what it looks like that would be a huugge help

one more ?, could the comp. not be turning off because of an overcharge?? If there was way too much, could it cause it to stay on? It is blowing fairly cool. How much refrigerant is needed for this setup? Would two normal size cans be too much? I think thats what the guy put in...


We're all over the map with some valid suggestions. However, IME, it pays to start with the least costly, as well as the most likely, fixes.

From what I gather here, my 134-converted Ex performs similar to yours. On 95+ days, when I stop at a light, the vent temperature starts rising. Accelerate and it's fine.

When the AC is on, the compressor clutch never disengages. That is simple to explain: the vent temp never gets below 50 or so. Although the clutch is cycled by pressure readings (on the low side, as described above), pressure is closely correlated with evaporator-core temperature. That keeps a low-charged system from going below 32 and forming ice.

I started with the fan clutch -- making sure I got a heavy-duty model -- but it hasn't helped. I also tried lowering, then raising, the amount of 134 in the system. No change. When I had the radiator out (to change the clutch) I cleaned out a bunch of junk from in front of the condenser (behind the trans. cooler). That helped, but not much.

I am tempted to go with a parallel-flow condenser because that worked with a converted Camry I owned. But it's expensive, and so are the custom-made hoses, vacuum pump, and accumulator -- all necessary for the change-out.

So, in the meantime, I'm looking at other, cheaper possible solutions. One guy at an AC forum suggested sealing around the condenser to make sure all the air flows through it, not around it. I actually did that with the Camry, and it worked. I used strips of rubber cut from old inner tubes, held in place with hi-temp silicone sealant. The vent temp dropped 8 degrees!

It is possible, as mentioned in the post above this one, that the system is overcharged. One way to tell is to put a temperature probe on the evaporator inlet pipe, then on the outlet pipe. The temperatures should be very close. If the outlet is significantly higher, you have too little 134. (Explanation: the air flowing through the evaporator is transferring enough heat to vaporize the liquid, then it's warming the vapor on top of that.)

Sorry this post is sort of disorganized. I don't have time at work to edit it well.


1. I've attached a picture that shows the location of the switch, the accumulator and the evaporator. The evaporator is in the box on the firewall. A reasonable explanation of A/C can be found at:
http://www.explorerforum.com/forums/showthread.php?t=160498
2. For our purposes receiver/dryer and accumulator are the same. The same goes for expansion valve and orifice. R/D and EV are terms used in another type of air conditioning system
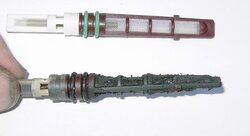
3. The orifice is located under the airbox (remove three nuts in wheelwell and attached hoses). Use two wrenches to separate and do not bend. The orifce is removable with needle nose pliers. The pic shows a good orifice and a 'black death' orifice.
 

Attachments

  • switch.JPG
    switch.JPG
    44.2 KB · Views: 3,213
  • Orifice.JPG
    Orifice.JPG
    72 KB · Views: 23,485
  • closeup.JPG
    closeup.JPG
    44.5 KB · Views: 1,293


Sorry, had to go eat dinner. If I don't show up, she threatens to give the stroganoff to the dog.

1. I think I've covered the questions except for charge. When new, the vehicle contained 32 oz of R12. The R134a charge should be 60-80% of that; between 19-25 oz. I'd go with around 22oz. Because it's a conversion there isn't a spec that I know of. msmith65's suggestion of feeling the evaporator output, is actually how I gauge whether I have a good charge. Depending on the amount, overcharge will cause condensation to form all the way up to the compressor and reduce efficiency. It's improbable, but if you overcharge enough, there will be liquid refrigerant going to the compressor. Liquids being non-compressable that would be bad. As msmith65 says below, at this temp the compressor will stay on a long time. When driving and blowing air over the condensor is when it will become efficient. On 95+ days, + 55mph, I show 54 degF at the vent.

2. You didn't ask my recommendation, but it's free and worth everything you paid for it.

a) You said your condensor leaked - change it (2 oz oil)
b) While system is open - change accumulator (3oz oil) and orifice
c) You are cooling somewhat, the compressor's compressing. I'd leave it in, it's a calculated risk. If switch is bad, it can be changed without evacuating. The 55 constant gauge pressure is bothersome but the gauges are notorious for being unreliable.
d) Vaccum, leak test, and charge system with 22 oz of R234a or bring to an A/C service location.


ok, is the heater core basically under the evaporator? When we were checking for leaks they pulled open stuff inside the cab under the dash, and baically exposed the heater core...was this there way of checking to see if dye had dripped down from the evaporator? What are the signs of a bad evaporator, I think I am so concerned with some leaks in the condensor, that I dont want to overlook the evap.

The orifice tube, can this be bought at a reg. auto parts store? Is it under the piece of plastic under the airbox? My cone intake has to come out then the plastic tray under it, then it is under there?

So far from everything, I think I might replace the switch on the accumulator, the o rings on back of the compressor connecting to the lines, and the hp relief valve o rings on back of the compressor. I am also going to look into seeing if the evap. it leaking dye. Not sure how yet, guessing take off the box?? Does all this sound like a good start?

Then since my compressor doesnt cycle, maybe replace the clutch on that, becuse the comp. is working and the system is semi cool, so maybe just the clutch is bad. In a few weeks prob. replace the condensor, now I remember you saying if the cond. is replaced the accumulator should be too. Is that correct, anything else at the same time? Well thanks for all the help, and if you can think of anything else let me know.
Oh, and how do you get a quick connect fitting off? And ester, or PAG oil for the system? Does it matter?


sorry shamaal, i must have been writing the post the same time u were, sorry if I asked questions that u just answered, man u are fast...thanks and disregard my stupidity... :confused: Oh, and your reccomendation is always welcomed and needed.


1. Heater is inside the vehicle on the passenger side. I've never had to replace an evaporator on mine, so I don't know how to check it without removal. I don't remember if it's visible with the heater removed. If really concerned, pull it out when you have the system apart. It's only 3 nuts to remove the entire assembly and 11 screws to take off the cover when you have it out.
2. Second picture, see those two nuts together, the orifice is inside that junction. It's $6 at any auto store. Remember what I said about holding the left nut steady while unscrewing the right.
3. Check the tool section at an auto shop, you want an A/C connector tool. See pic
4. I'm not sure if there's a compressor problem, your call.

Good Luck
 

Attachments

  • AC Tool.JPG
    AC Tool.JPG
    91.8 KB · Views: 1,149


So the a/c connector tool is for the quick connect fittings on the condensor correct, or something else? And sorry for being dense, but I can't tell from the pic, the orifice tube is on top of the frame rail, right under the air intake box, (cone) ??? And one last question, how do you guys tell temps at the vents? Is there a cheap thermometer meant for measuring air temps?? Not to sound dumb but I have only used conventional ones, and dont think they will work. Well thanks again for your time, Shamaal you have been very patient, thanks, Sam


1. Yes, the tool is for the springclips for the A/C system. There is one on the accumulator, the condensor right and condensor left. There are safety clips that just pry off over the connectors. Do not remove these clips while system is charged. They are an integral part of the connection, especially on the HP (driver's) side.
2. Look on the passenger side of the condensor, there is a line that heads for the firewall. This is the line in the picture and it's going to the evaporator. The orifice is actually inside the joint where the two lines come together. You may be able to see it looking up from underneath the car. Remove the stuff on top to get at it. On mine I have an air box held down by three nuts in the wheelwell. For those outfitted with the cones ... I don't know ... just lift up?
3. Yes, the vent thermometers are available in the A/C section of the autostore. You may be able to swipe your mate's turkey thermometer if it goes down to 40 degrees.
4. One last point, the mechanics of pulling the A/C components in and out is fairly easy requiring basic mechanical skill. While vacuuming and charging isn't exactly rocket science, it is a skill and requires an investment in the tools (manifold, vacuum pump, connector tools). Understand what you are doing before turning the knobs, ask an A/C knowledgable friend to assist or bring it into an A/C specialist for the evacuating and charging bit. Ask questions.


Thank you for all the in depth posts shamaal, you have been a huge help. Well, I will see what happens in the next few days. I will post again if anything changes. Thanks again


WOW Shamaal, your A/C answers on removing the condenser in dude's Ex '91' really helped me out! I thought there might be a specialty tool for removing those spring connectors but wasn't sure what to look for or how much $$$ I would have to spend!
These Forum's are GREAT and I can contribute what tips I have learned about working on these 4X4's
Thanks again for the advise and I will be around the site if anyone needs to know about obtaining Cheap, but excellent parts... $86.00 for a new condenser w/free shipping!!


Ok, I need some general info here. How hard is it and what special tools does it take to install a new condenser on my 91 ex, with a tranny cooler? I was at a friend of a friends shop and he leak dye tested my system for me and there was a lot of leaks in the condenser, and a leak behind the compressor going into the tubes. I know I can replace the rings inside the connection on the back of the compressor, but don't know what it takes to put in a new condenser. I saw them on ebay for around 100-150$. He quoted me 285 for a new one. And 500 for the job total with that incl. I said I would think about it, and left. Would I have to take out the rad. and fan and belt and all or what.? Cause I dont know if I want to mess with those rusty metal lines on the rad. Please let me know what you think guys. I am pretty good mechanically, change oil, minor things, etc. I have recharged the system in the past by myself. Can I just swap it out from the front behind the grill? This would save me a ton of money, if I could do this myself. And what is a quick connect and how do I get tham off if I need to? Thanks in advance, I really need your opinions. Hot in Jersey :fire:
Well this reply is alittle too late, but I purchased a new condenser online for $86.00 from parts america and the only thing with replacing the condenser that is special is the tool to release the quick connect spring on the Hi-LO pressure lines (able to purchase these at National auto stores for about $7.00) The radiator has to come out, but it's not a real big job.
If you decided not to spend the $500.00 that your buddy or whoever was going to replace your condenser for I can walk you through the job at no expense!!
Total for replacing my condenser including oil charge and 134a refrigerant about $125.00


Join the Elite Explorers for $20 each year.
Elite Explorer members see no advertisements, no banner ads, no double underlined links,.
Add an avatar, upload photo attachments, and more!
.


Back
Top