Aaron's Mountaineer: Massachusetts | Page 3 | Ford Explorer Forums - Serious Explorations

  • Register Today It's free!

Aaron's Mountaineer: Massachusetts

Aaron "V8BoatBuilder"s Elite Explorer Registry Page

IMG_0973.jpg

Rausch Creek Off Road Park, PA. 33" Tires, 4" Lift

13422IM001322.jpg


13422ccmounty_web-med.jpg

West Dennis Beach, Cape Cod, MA. Truck as purchased, Christmas Eve 2002

13422dsc00439.jpg

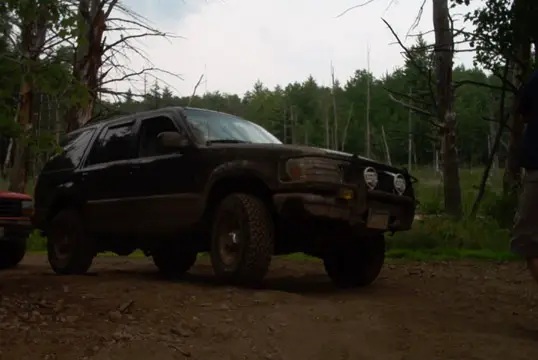
Got lost on the way to the mall..... Offroading in New Hampshire. November 2003

Introduction
I have set up this thread to detail my modifications, provide some step by step instructions for many of them, list my tips for general maintence procedures, and even throw a writeup or two of anytime I decide to subject my truck to the abuse of off-pavement driving.

I strongly encourage all members of Explorerfoum to read this thread, or skim over my dry writing and just look at the photos. Hopefully you can find a usefull tip or learn a little bit about your Mountaineer or Explorer. If you have a question, feel free to PM me, or even post it here. I've edited many posts to reflect conversations I've had over PMs. So yea, check the "older" posts, since I sometimes update them too..... (I have way too much time it seems....)

Now the Disclaimer:
If you follow any of my writeups or tips, I take no responsibilty for damage or injury you may encur. Always double check your work, and make sure everything makes sense. Never work under a truck that is only supported by a hydraulic jack - use jack stands! Remember, some systems, such as brakes, can affect others if you are not careful. Have fun, and get greasy. Make that truck your own.

Specifications As She Stands, 1/19/08:
Year, Make: 1997 Mercury Mountaineer
Color: Black, with gray trim and body cladding
Engine: 5.0 Liter 302cu in. V8. GT40p Heads.
Battery Duralast Gold Grp 65 Wet Cell, custom wiring
Transfer Case: Borg Warner 4406 Control-Trac w/Torque on Demand and low range.
Front Drivetrain: Dana 35 SLA, 4.56 gears, Open Differentail, Center Axle Disconnect
Rear Drivetrain:Ford 8.8" 31 Spline, 4.56 gears, Track-Lock Limited Slip
Tires: Interco TrXus MT 33x12.5R15 on Cragar 15x8 Chrome Plated Steel Wheels
Interior: Gray with Leather and Mountaineer stitching
Options and Creature Comforts Power Seats, Alarm system, remote keyless entry, power locks, power mirrors, overhead console with Autodim mirror, outside temp, compass. Rear Air. Message Center.

Modifications:

Page One (You are here)
- Ford OEM Class III trailer hitch installed 1/10/03
- Rancho 9000x 9way Adjustible shocks installed 2/14/03
- Aux reverse lights installed 2/15/03
- Oil Pressure Sender conversion in progress 3/14/03
- Front Tow hooks installed 3/31/03
- JC Whitney Full Brushguard installed 3/16/03
- Hella 500 Driving Lights installed 3/17/03
- Audio System including: Pioneer MP3 headunit, Pioneer 12 disc changer, Alpine v12 Mono Amp, Dual 10" Rockford Fosgate Subs (Now removed), Sound deading insulation installed 3/18/03

Page Two
- Explorer Express Swaybars installed 4/13/03
- MAC open element Air Intake installed 8/15/03
- Ventshade VentVisors installed 8/15/03
- Custom made Stealth Subwoofer Box with Kenwood eXcelon 10" DVC woofer installed 8/17/03
- Warrior Shackles installed 11/20/03
- Aux Transmission Filter Installed 12/20/03
- Autometer guages (oil pressure, oil temp, trans temp) Installed 12/21/03
- Torsion bar adjusters, January 2004

Page Three
- 2" Front Lift from TT, Add-a-leafs in rear Installed Janurary 2004
- Front control arm Camber Adjusters, Installed January 2004
- 31" BFG AT KO tires Installed January 2004
- Custom Front skidplate, February 2004
- New head Gaskets and a Valve job, June 2004
- Accell DIS coils, Taylor Ignition wires, June 2004

Page Four
- Baumann Engineering Shift kit and other 4R70W Mods, December 2004
- Message Center, January 2005
- Torque Monster Headers, March 2005
- Cruise Controll Deactivation Recall, June 2005
- Control Trac/4x4 trasnfer case swap, June 2005

Page Five
- More on the 1st BW4406 swap EVER!!

Page Six
- Waterpump, Timing Chain, Timing Cover, Cooling Hose Replacement
- Superlift K494 4" Front Lift, Central Axle Disconnect Swap
- Custom Stainless Steel Braided Brake Lines
- Rear SOA, 4.56 Gears


Planned Mods...
- Custom Rocksliders
- Custom Rear Bumper w/Tire Carrier
- Fatmat entire interior
- Sandblast, POR 15, and paint underbody, suspention and frame.
- Replace rear leaf spring bushings with Energy Suspention Poly
- Lockers
- A Pillar grab handles
- Flowmaster Exhaust with 50 series delta flow(s) with dual 2.5" piping or single 3", custom downpipes and high flow catalytic converters.
- Upgraded door speakers and amp
- SCT chip w/87 octane program(s)
- FMS E303 Cam and Roller Rockers
- Cut the roof off and put in a cage!!

Help.... this list is getting too short!

These photos were taken the night I purchased the truck: (Christmas Eve 2002)
13422aaron_s_mountaineer2.jpg


ENJOY THE THREAD!


Join the Elite Explorers for $20 each year.
Elite Explorer members see no advertisements, no banner ads, no double underlined links,.
Add an avatar, upload photo attachments, and more!
.


I want to see it with the 31's and TT! Hopefully I'll be able to make it up to the run this weekend...


Join the Elite Explorers for $20 each year.
Elite Explorer members see no advertisements, no banner ads, no double underlined links,.
Add an avatar, upload photo attachments, and more!
.


Thanks for the Compliments - Here You Go!

I've wanted larger tires for sometime, and after wheeling last month, I decided to drain the bank account and mount 4 31x10.5x15 BF Goodrich all terrain TA KO tires on my rims. I was able to get a great deal on the tires, a roadhazard warranty, and a free alignment. The folks at VIP Auto were quite helpfull and were more than happy to mount the larger tires on the mountaineer.

Camber Shim Install
Before I took it in, I upgraded the stock camber cams/shims to adjustible ones. I found Pep Boys caried them for $18.99 a side.

134221-6-04-Camber_Adjusters.jpg

Comparison of Stock and Aftermarket Camber Shims

The aftermarket shims are adjusted using the upper square hole - it fits a 3/8" ratchet extension as shown below.

134221-6-04-Camber_Adjustment.jpg


Installation was not difficult at all, the 21mm nuts on the upper control arm mounts easily popped off with a breaker bar, and they do not need to be removed. There is a camber shim on each side of each mount, and the bolt head side is identical to the shape of the aftermarket one from the factory. If that makes any sense. :p I did one adjuster at a time, trying to set it like the factory one for the drive to VIP Auto.

Torsion Twist
Now came the fun part - the torsion twist to lift the front. I started by jacking up the truck a bit to releive tension from the front suspension. I ended up applying about 5 turns to the bolts, maxing out on my driver's side. This yeilded about a 1 1/4" lift from stock, giving the control arms a nice downward slant. The distance between the apex of the fender and the 15" stock rim was about 13.5" The T/T brought the front higher than the rear, I have an add-a-lead in the mail from Summit to correct the problem. In my situation, more height is good!

31" Tires!!!
Probubly the single most expensive mod I've done so far:

134221-6-04-31_inch_tires01.jpg


It's blurry due to poor light outside, the weather around here has been quite nasty. But I know ya'll wanted pics!

Living with 31s
-I don't notice mutch difference in power with the stock 3.73 gears, compared to the 235/75s on there before. However, RPMs are definitley lower, I find myself cruising around with the overdrive off to keep the engine in its powerband.
-I'm currently running them at 34psi. I ran the 235s at 33psi. I want to do the chalk test when the driveway dries up. The sidewalls are VERY stiff, coupled with the torsion twise it yeilds a harsh ride. I like it, passengers do not. I have set the Rancho 9000x's at "3" all around.
-Turning circle has increased a slight, but minimal amount due to the width of the tires.
-Traction is AMAZING.

Ford should have put 31's on the Explorer/Mountaineer from the factory. It really completes the truck in terms of looks and will hopefully increase its offroad prowess. Oh well - just makes mine that much more different than the ones lined up infront of the middle school.


Fog Light Upgrade

I've never been happy with the stock fogs, their 30w bulbs didn't provide much illumination. The lenses were crappy, didn't put the light where it should be. They were white - not yellow. (Yellow cuts through fog, snow, dust, rain, etc much better than white) When I removed the lower airdam, I took off the stock fogs as well. They hung down low and looked out of place on their enormous brackets without the valence. No fogs is worse than ford OEM fogs.

I picked up a nice set of Optotronics 55w yellow fogs, rectangular, small, plastic housings and DOT approved street-legal lenses. They were $5.00 for the pair too!

I spliced the Optotronics harness right into the pigtails from the factory fogs using butt connectors and heatshrink tubing:

134221-7-04-Fog_Light_Harness.jpg


134221-7-04-Fog_Light_Harness2.jpg


I wrapped the wireing with split tubing to protect it.

134221-8-04-Fog_Lights.jpg

Final Fog Light install


Front Skid Plate

After removing the lower bumper trim, and radiator air dam, the AC consensor and radiator, were exposed to anything that passed under the bumper. I decided to build a skid plate, similar to the ones in this thread: Dead Link Removed

The plate would look good, protect the condensor and radiator, as well as transmission cooler hoses, the front swaybar, powersteering cooler and hoses, powersteering rack, and maybe reduce the amount of mud and dirt slung up into the engine bay. I originally wanted to use shiny aluminum diamondplate, but the cost was prohibitive. No one would see much of it, and it would no doubt be scratched during use. My truck also has almost no shiny metal or chrome, so it would look out of place.

Finding solid steel plate in eastern MA proved to be much of a challenge, but I was able to land a 3x2x1/8" peice for $25 at a local, small steel yard. Many places I went into were like "$95 minimum order, kid" or "Sorry, we only deal to business."

I also purchased some 1x1x1/8" angle iron from Home Depot, and 5/16" Stainless Steel hardware. The plate will need to be removed when the oil filter is removed.

134221-7-04-Skid_Plate01.jpg

Cut skidplate and angle iron

The angle iron acts as a bolting flange, and is bolted to the IFS crossmember.

134221-7-04-Skid_Plate02.jpg

Dryfitting skidplate

134221-7-04-Skid_Plate03.jpg

Painted skidplate, showing bed liner wrinkle finish

I applied two coats of primer, and three coats of rustoleum semi-flat to the backside of the plate. Three coats of Plasti-Coat spray on truck bedliner were applied over primer to the outside of the skidplate.

134221-8-04-Skid_Plate04.jpg

Angle Iron bolted to front crossmember

134221-8-04-Skid_Plate05-Side_View.jpg


I couldn't take a good front shot one, but I'll grab one someday.


Transmission Pan Drain

I wanted to install a transmission pan drain, so changing out the ATF wouldn't be such a messy, cumbersome process. I purchased the B&M 80250 for about 7 bucks at Summit Racing. It's nothing more than a hollow, threaded bolt, a nut, and a small plug for the inside of the bolt. It won't remove all the fluid, and requires a wrench on the outer bolt to keep it from spinning, but seems like it will be solid.

I removed the pan (full of fluid) and found the ideal spot for it, I wanted it in the rear, and there was in ideal spot clear of the valve body and filter near the pan magnet. Installation was as simple as drilling a 1/2" hole into the pan, and then grinding the edges smooth. Take the pan magnet out - I didn't and it took forever to clean the shavings off it. They just wiped out of the pan, though.

134221-8-04-Trans_Drain01.jpg


134221-8-04-Trans_Drain02.jpg


134221-8-04-Trans_Drain03.jpg


Add-a-Leaf Install

To complete the lift, the rear needed to be raised about 1.5" to match the front. A single Explorer Procom 13120 Add-a-leaf, ordered from Summit Racing did the job nicely. After installation, the final lift of my truck including TT, AAL, Shackles, and 31x10.5" tires puts the apex of the fenderwells at about 35 3/4" from the ground. I started with the fenderwells at around 32-33" from the ground with no lift and 235/75R15s. The ride is excellent with EE swaybars, Rancho 9000x shocks on all four corners and the Spring modifications. I currently have the rear Ranchos set on "1" and the fronts on "3."

Add-a-Leaf Install Writeup

Parts Required
1. Explorer Pro-Comp Single Add-a-leaf, P/N 13120
2. Two grade 8 machine bolts, 2.5" long x 3/8", hex head. Nuts to go with them.
3. 18mm Deep drive socket.

Procedure
1. Jack up rear of truck, place jackstands as high as they can go right infront of rear spring hangers.
2. Remove wheels. Spray everything with PB blaster.
3. Disconnect the shock absorbers at the bottom, let them hang.
4. Remove e-brake cable retainer from passenger side u-bolt/shock mount.
5. Use an 18mm deep drive socket in your impact gun :D to remove the u-bolt nuts. Remove the shock mounts from under the springs. The axle will hang from the swaybar, and the springs will sag much lower than the axle. Be careful.
6. With the rear axle hanging by the swaybar, place a jack under the center of the differential, and jack the axle up. Place some jackstands underneith it, and disconnect the swaybar. BE CAREFUL OF THE HYDRAULIC BRAKE LINE. It is very easy to drop the axle too far and stretch the rubber hose.
13422jack_under_diff.jpg


7. Remove the bolt holding the rear of the leaf spring to the bottom of the shackle. Lower the spring to the floor.
13422Mid_install_-_no_rear_suspention.jpg


8. Place a c-clamp on either side of the leaf spring center pin.
9. Grind off the head on the leaf spring center pin and remove. You won't be able to undo this one. Trust me. Once the head is off, punch out the bolt.
13422Grind_off_bolt_head.jpg


10. Slowly undo the c-clamps and release tension on the leaf pack.
11. Insert the AAL above the overload spring, and below the last leaf. Insert the new center pin bolt and use the two c-clamps to re-compress the leaf pack.
13422recompress_pack_with_2clamps.jpg


12. Tighten and center the center pin. 3/8" is the maximum you can fit through the center hole on the AAL, but is slightly narrower than the metric bolt removed from the lead pack.
13. Remove C-clamps, and reattach the leaf pack to the shackle.
14. Using two hydraulic jacks, raise the spring to meet the axle, and lower the axle to meet the spring. Again, be careful of the brakeline. The center pin bolt head should fit in the recess in the leaf perch on the axle.
13422Reassemble_spring_to_axle.jpg


15. Re-install u-bolts and shock mounts. Sequentially tighten the u-bolt nuts so that the length is even on all four legs. Torque these puppies down with the impact gun.
16. Reattach the shock absorber, and the swaybar. Reattach wheels, and lower.
13422disconnect_swaybar.jpg

Swaybar Mounting bolt

My lower shock mounts were VERY rusty, and with them removed I used this as an opportunity to wirebrush and grind them down. I painted them with 2 coats of Rustoleum primer, and 3 coats of black Rustoleam Paint.
13422Shock_Mounts.jpg

Repainted Shock mounts


Updates: Upper End Rebuild

Been a while since I updated my thread, here's whats been going on:

Upper End Semi-Rebuild

Symptoms Summary:
- The computer will routinely generate codes P0300 - Random Misfire and P0340 - Camshaft Position Sensor Failure.
-The truck feels sluggish, like its towing a heavy trailer (i looked... its not) or the breaks are dragging (they're not), or its not running on all cylinders.
-The truck smells like its running very rich. When I back up, It smells like latex paint or turpentine. I've been filling up at several different gas stations, all high volume and no difference in smell. The truck has been averaging about 10 miles per gallon in mixed driving, it used to get around 13.
- There is often a surging or bucking. Sometimes it is minor, other times VERY pronounced. This is usually when the CEL is set off.
-The last two times I filled up with fuel from the same high volume Sunoco station, about 15min/3miles later the CEL will be thrown and the truck will run like crap. It feels like its running on half its cylinders, won't idle, shakes, very slow, etc. There was a very strong smell of gas in the cab as well. I'm thinking canister purge system? Both days it was around 75 degrees out, and I was in stop/go traffic.

Fix
After doing a leakdown test and simply looking at the condition of the spark plugs, it was determined that the #2 cylinder was not firing/firing intermittantly. The intake valve was observed as leaking, as well as a breach in the cooling system indicating a blown head gasket. The solution? A complete valve job and new head gaskets along with other related parts.

The valve job was performed by Whitaker Automotive, in Needham MA. The machinsity Rusty did a very impressive job on the heads, and they are highly recommended.

Work Preformed:
-Clean heads
-Disasemble
-Measure springs, measure valve stems, measure valve guides.
-Check for warping/straightness
-Magnaflux for cracks
-Grind valve seats
-Grind valves
-Knurl valve guides
-Replace valve guide seals
-Grind 0.010 off heads due to slight warping
-Paint heads

Parts ordered from www.FordPartsNetwork.com , www.SummitRacing.com , and www.50resto.com also my local Autozone. Expensive expensive. :( I'm doing it with quality Ford, Ford MotorSport, Fel-Pro, and upgraded aftermarket. Don't want to take any chances here.

Parts ordered include:
-FMS Graphite Head gaskets (Ended up not using, read on...)
-Felpro Head Gaskets
-Bonded metal/ruber valve cover gaskets
-Ford Exhaust manifold gaskets
-Ford gaskets for TB, EGR, IAC, Intake elbow, etc.
-Fel-Pro GT40 Lower/Upper Intake and thermostat set
-Fuel injector o-rings
-New head bolts
-New exhaust manifold bolts
-New Valve Cover bolts
-New Motorcraft thermostat
-Acell High Power EDIS coil packs
-Taylor Spira pro ignition wires
-Ignition wire/spark plug heat sheild material
-Bosch O2 sensors (for before the cats)
-Lots o' RTV, oil, antifreeze, brake cleaner, gloves, yada yada.
and so much more... $$$$$$$$$$$

As you can see, I also redid the ignition system completely and the O2 sensors.

Photos and dissasembly
Lower Intake removed:
134225-31-04-Lower_Intake_Removed.jpg


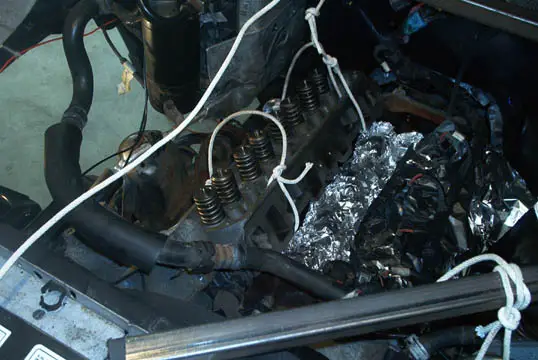
Wrapped in foil for the night:
134225-31-04-Wrapped_in_foil.jpg


Re-tapping alternator mounting bracket:
134225-31-04-retapping_alternator_bracket.jpg


Had a lot of trouble getting this one bolt out, turns out it grabbed some metal in the threads and dragged the shavings all the way though. I was lucky and didn't need to increase the size of the hole, merely cleaned out the threads. Used a die on the bolt to clean it out - all set!

Steering shaft disconnected:
134225-31-04-Disconnected_steering_shaft.jpg


Two-minutes, one bolt. Disconnecting the steering shaft and collapsing it allowed for MUCH easier access to the exhaust manifold bolts and the head bolts. Would also make easier access for routine spark plug changes.

Rockers, pushrods, and driver's side exhaust manifold removed:
134225-31-04-Rockers_and_DS_header_removed.jpg


Decided to remove the manifold since the two collector bolts were not that rusty. With all of the brake lines, it will make for much easier access to the head bolts. Man... this would be the time to upgrade to some headers.

A can of PB blaster, a pack of ziplock bags, a few runs to Sears for tools, 4ft and 2ft sections of galvanized pipe "breaker bars" and a broken fingernail later: Removed both heads!

Ended up having to rig up a support for the driver's side accessory bracket. Supporting the A/C compressor and P/S pump, the aluminum bracket's 3 bolts only attach to the head. I told myself from the begining I wasn't touching my redone A/C system - and it looks like I'll be a-ok. Funny... the passenger side bracket, which only holds the alternator and tensioner/idler, and could have been removed no sweat, mounts to the block.

Exhaust manifold bolts weren't that bad, neither were the head bolts themselves.

Here are some photos:

A/C & P/S support:
134226-1-04-A-C_Support.jpg

1" Box tube and nylon line, there is also wood underneith

Both heads removed, and their head gaskets:
134226-1-04-Both_Heads.jpg


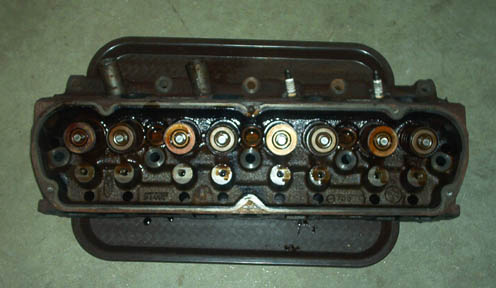
GT-40P Head (Top):
134226-1-04-GT40P_Head.jpg


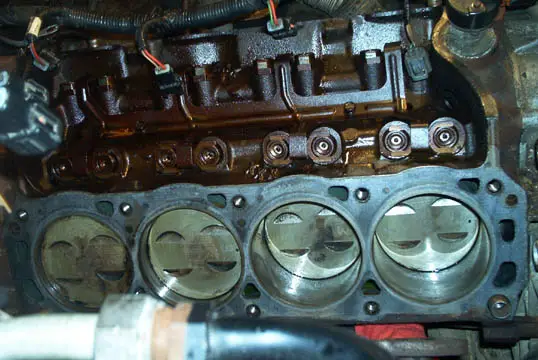
Passenger side head, (CYL #1-#4):
134226-1-04-Pass_Head_Inside.jpg

#2 is oily

Passenger Side Pistons (#1-#4):
134226-1-04-Pass_Pistons.jpg


Driver Side Pistons (#5-#8):
134226-1-04-Driver_Pistons.jpg


There were some key steps that I didn't get shots of, or they came out really blurry.

Cleaned Block and Piston tops:
134222004-06-15_Cleaned_Block2.jpg

Driver's Side

134222004-06-15_Cleaned_Block.jpg

Passenger's Side

I used Permatex' spray on gasket removed and single edge razor blades to clean the block surface. Some overspray got on the piston tops, and lifted the carbon right off!

Painting
In the downtime while the heads were being machined, I broke out the wire wheel and rattle can.

134222004-06-15_Primed_Valve_Covers.jpg

Primed Valve Covers

134222004-06-15_Painted_Intake.jpg

Upper Intake..... shiny!

Refurb Heads
I took the heads to Whitaker Automotive, in Needham, MA. Recommended to me by a local Ford dealer, I was impressed by the machinist when I talked to him and saw his work/shop. This was a very blind item for me, as I had no basis or other recomendation for a shop.

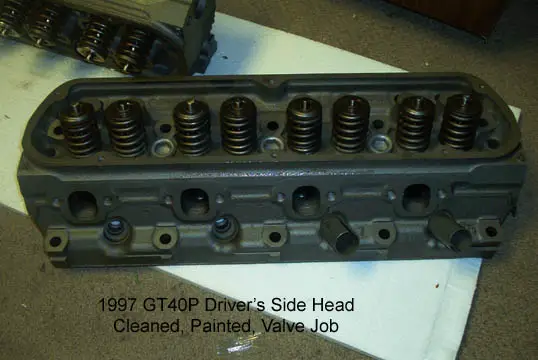
$385 later:
134222004-06-15_Fresh_Heads.jpg


134222004-06-15_Head_Milled.jpg


Head Installation
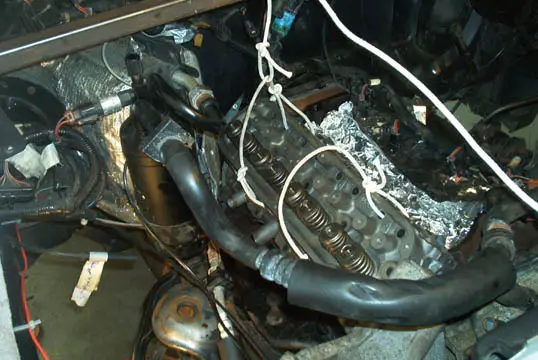
These cast iron heads were quite heavy, and hard to maneuver. I rigged up some handles on them to allow lowering into place. I put in an exhaust manifold bolt, attached some line, and looped through a pushrod hole. The handles not only allowed for easy grasping of the head, setting the angle for lowering onto the dowel pins was quite simple. (I didn't think of this method untill after my Dad and I tried to lower a head in place, but only busted the head gasket in the process. Luckily Autozone has good felpro gaskets for $13.99ea. Order Extras.)

134222004-06-15_Head_Handles2.jpg


134222004-06-15_Head_Handles1.jpg


I also rigged up a 1"x1" steel tube across the rear of the engine compartment, allowing true lowering of the head into position. Made things infinitley easier.

134222004-06-15_Head_Lowered2.jpg


134222004-06-15_Head_Lowered1.jpg


Lots of n/c brake cleaner was used to make sure everything was squeeky clean. Don't tell WallMart execs, but I think I'm still high from it. :smoke:

Reassembly
Ok.. so I don't have photos of head bolt torquing, valve train re-assembly, or lower intake gaskets. :fire:

But, I did grab this photo of the new Motorcraft t-stat ready for installation.
134222004-06-15_tstat.jpg


Lower intake, fuel injectors, valve covers, alternator, belt, upper radiator hose:
134222004-06-15_Fuel_Injectors.jpg

Note: Tin foil should yeild +45hp

Upper Intake, EGR Eblow, Throttle Body, Ingition Coil Bracket:
134222004-06-15_Upper_Intake.jpg


The Original thread, over 5 pages long can be found here:
http://www.explorerforum.com/forums/showthread.php?t=108712&page=1&pp=20


More 4Wheeling

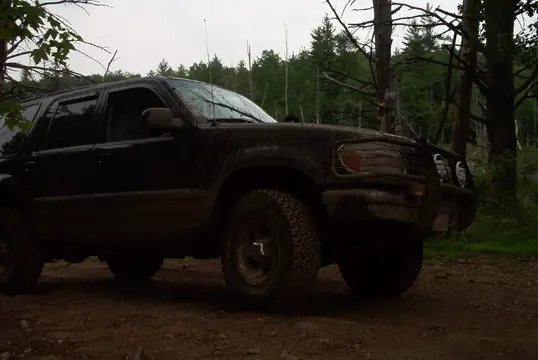
Finally, 4wheeling with 31s, a lift, removed running boards, and an engine that's not missfiring. Oh, and it was a sunny 75 degrees too :)

OK Kids.... Here are the photos my little HP camera took that weren't too blurry. Unfortunatley, I didn't get any cool action shots (the camaera dispises motion) and we didn't stop for many cool parts in the trail - just drove over them!

Help me choose a new avatar! (Yea... I shot alot of my own truck.... :rolleyes: )

13422IM001333.jpg


13422IM001332.jpg


13422IM001339.jpg


13422IM001338.jpg


13422IM001335.jpg


That back tire is in the air!
13422IM001331.jpg


13422IM001322.jpg


Isaac pulling parts off the old Bronco:
13422IM001326.jpg


Its a real shame this thing is up there, a real mess that needs to be cleaned up. Glass everywhere, its belly up with the engine torched out of it, parts strewn about. Its pretty well stripped. This is the stuff that gets trails closed!!! Not to mention the trash bag I filled just collecting Keystone Lights and Pepsis whenever we stopped. :nono:

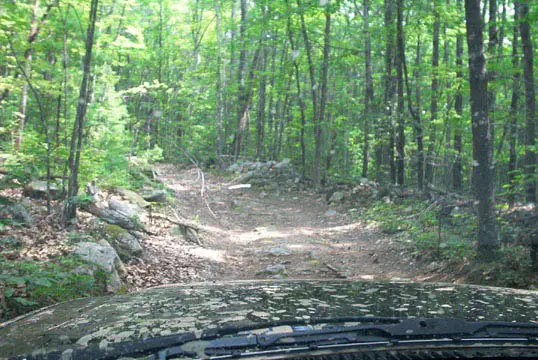
Dirty windshield shots:
13422IM001321.jpg


13422IM001317.jpg


13422IM001340.jpg


The Trail:
13422IM0013231.jpg


Hangin out:
13422IM001320.jpg


Nick's Hydrolocking:
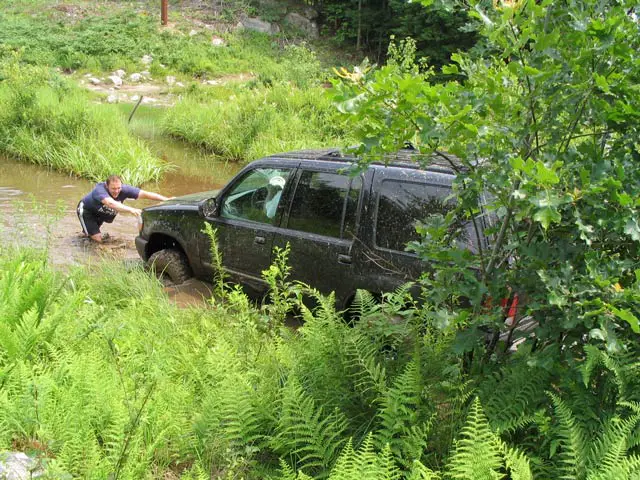
This shot actually came out, probubly the best one of the day. It shows how the wall of water hit the hood, and soaked the engine.
13422IM0013271.jpg


13422IM001328.jpg


13422IM0013291.jpg


Post Hydrolocking, runs like new!
13422IM001337.jpg


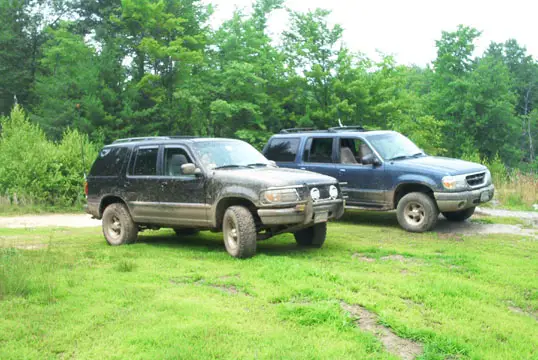
My truck and Isaac's while we drained Nick's engine:
13422IM001330.jpg


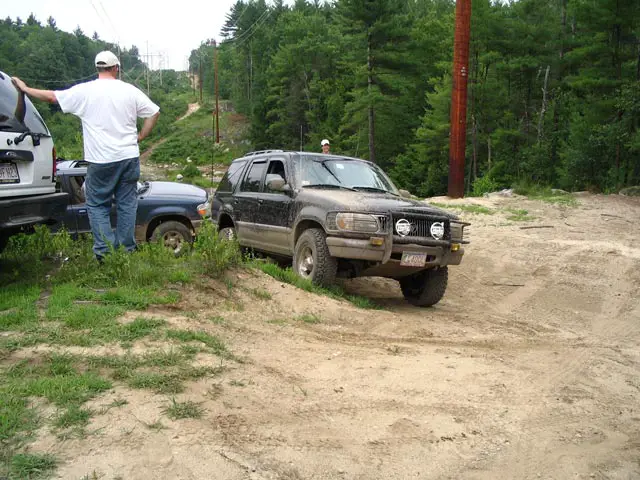
Fred pre-ran this trail, deemed it too difficult for the rest of us:
13422IM001336.jpg


Fred's new ride:
13422IM001334.jpg


This engine was disassembled, cleaned and painted 3 weeks ago:
13422IM001347.jpg


Here are some of MontanaGT's photos of the run:
Nick's mishap
9867IMG_0515.jpg

Nick helping out in the recovery.
9867IMG_0517.jpg


My Ex
9867IMG_0522.jpg


On the Trail
9867IMG_0506.jpg

9867IMG_0500.jpg

9867IMG_0499.jpg

9867IMG_0498.jpg

9867IMG_0524.jpg

9867IMG_0521.jpg

9867IMG_05231.jpg

9867IMG_0505.jpg
[/QUOTE]


did the CMP sensor code go away? I remember it tripped the engine light on my lincoln; it was just a corroded connector that i replaced. (5-finger junkyard discount :p)


izackary said:
did the CMP sensor code go away? I remember it tripped the engine light on my lincoln; it was just a corroded connector that i replaced. (5-finger junkyard discount :p)

The CMP code P0340 has not come back. I am running the original sensor, however I did clean some rust from the steel rotor in the block.

I have a hunch that the P0340 code was more a "miscalculation" by the EEC-V, rather than an error with the sensor itself or wiring. Each time the P0340 would be thrown, it would be accompanied by the P0300 random misfire code. The EEC uses the CMP to determine which cylinder misfired. My guess is multiple cylinders misfired in successtion, and as a result the EEC was not able to determine which ONE misfired, so it blamed the messenger and threw the P0340. Its the same deal as replacing the O2 sensors when you get any O2 sensor code. :banghead:


i remember researching that damn thing wondering how much it would cost to tear the heads apart....till i reached for the connector and it broke off!! what a relief that was...

Oh, and that was EEC-IV, btw.


AAron,

I am takeing some pics from you to make a NEX music video. So far I need pics from IKE Fred and whoever else is in. I will make a post in our forum


Right-on! Take as many as you need from here, I also have others in both my Gallery and on my hard drive. Let me know what you need, or how I can help.


V8BoatBuilder said:
Right-on! Take as many as you need from here, I also have others in both my Gallery and on my hard drive. Let me know what you need, or how I can help.

I need a good picture of you beside your X, without your gotee. the gotee is totally not you. Does not even look like you


Pulled from Nick's online archive:

:thumbsup:
 

Attachments

  • aaron 2 wheels.jpg
    aaron 2 wheels.jpg
    96 KB · Views: 5,578


music videos are full of blurry shots. :)


Fordexplorer157 said:
I need a good picture of you beside your X, without your gotee. the gotee is totally not you. Does not even look like you


HAHAHAHA.... I haven't had the dead animal on my face in over a year. I'll try to take one soon, but I think my digital camera is in my sister's friend's explorer.

That two-wheels one was a fun one of me screwing around, and not being that 'trail friendly.' We shall leave it at that.

On another note... I just installed my message center - works awesome!


Yeah, man. She's gotta green EB almost like Tim's. She's a cutie, too. ;)


Join the Elite Explorers for $20 each year.
Elite Explorer members see no advertisements, no banner ads, no double underlined links,.
Add an avatar, upload photo attachments, and more!
.


Wow, those are some great pics :thumbsup:


Back
Top