Body Mount Bushings | Page 5 | Ford Explorer Forums - Serious Explorations

  • Register Today It's free!

Body Mount Bushings

Ok so hopefully photobucket works so I can upload these pictures.

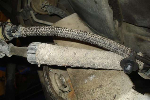
So here's the rear body mount sleeve that Valas had to cut off due to the inside clip being set. You can see it inside the outer sleeve holding it in place.

IMG_8597.jpg


Here's how we figured out how to slice the outer sleeve just past the clip to separate the two halves on the other four body bushing sleeves...

IMG_8613.jpg


IMG_8610.jpg


This should look like two pieces of metal tubing but thanks to the rust belt it's been fused into one.

IMG_8603.jpg


These are the new upper and lower cups/ sleeves that have the clip.

IMG_8587.jpg


IMG_8586.jpg


IMG_8594.jpg


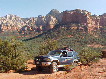
and I know y'all want to see Valas's Trac, well here it is being watched over by it's big brother "Battle Born". I couldn't do any of the physical work on his truck but I supplied the welder, grinder, sawzall, misc. tools, body lift instructions (his kit didn't come with them, I still had mine and I knew all the shortcuts and tricks from when I did my BL years ago), that and I could be the one taking the pictures for the future write-ups as well as posting them here to help others on their body lift or body bushings.

IMG_8516.jpg


Join the Elite Explorers for $20 each year.
Elite Explorer members see no advertisements, no banner ads, no double underlined links,.
Add an avatar, upload photo attachments, and more!
.


O great make it look like my truck is lopsided. Thanks. Lol


In his defense the right side was jacked up. The body bushings were shot and his truck did have a "Ranger Lean" to it but not this bad. LOL


I'm quite sure every ST is going to lean quite a bit when doing body mounts. I fell short of completing mine on 5/30/2015 due to the shop closing and I had to share a single working air hose with another bay. So, only my right side is mostly done.

11334266_10152987741498178_6824091625822958404_o.jpg

You doing body lift also? That's actually why mine was learning. At that point only one side was done.


No. Stock height.


Excellent info and pictures. :thumbsup: Good thing in Hawaii the salt stays in the ocean and off the streets, unless we have a hurricane.


Air Force mentality is to work smarter, not harder. :) Due to a previous injury to my L5 and coccyx I don't do any work laying on my back anymore. Can't chance it. This is the 1st, and hopefully last, time I've ever done body mounts. The D.I.Y. shop at MacDill AFB is only open 3 days a week and for a few hours each day. Hope soon to get the passenger side done.

11114759_10152987742858178_2827739821344120964_o.jpg

How did you get your old bushings apart? Or did you get new hardware?


How did you get your old bushings apart? Or did you get new hardware?

What bushings?

11246477_10152987742463178_167335591104505508_o.jpg


No new hardware except for 2 new bolts for the front mounts. So far, the other bolts look fine. The shells had some rust which I wire-wheeled off. I WD-40'd them and left them dripping wet during reinstallation. They were a little bit of a pain to separate.

1500961_10152987742018178_8888615417396255141_o.jpg

Looks like you don't live in the rust belt. If you look at the pictures of mine Midnightrebel07 posted yours looks pristine. Hope you locktighted them.


I bought this 2002 in New Port Richey, FL in early 2015 with 163K on the odometer. I think that at the very least it was taken decent care of on the outside minus the ton of dog hair, sand, and pennies under the flooring. Undercarriage was pretty clean then.


Well here in PA ours turn to rust no matter how much you clean the vehicle.salt reeks havoc on steel.


How are you guys getting the rear (Location D) mount out? I couldn't get mine out at all. Couldn't get it to move. I looked back at page 1 of this thread and used this picture as a reference. That type of vise grip isn't regularly available here in Tampa, FL at just any store that I know of. That's actually a "large jaw locking plier" ( V12LC from Matco or 12LC from Irwin Tools ). I tried with large regular Vise-Grips and they kept popping off. Any other successful methods?

IMG_20140322_150342_246_zps4vkupx9z.jpg

Well we cut the rubber off then took an angle grinder and cut thievery bottom of top sleeve off. But if you take a 6" long piece of 1/2" conduit lower your body down onto the bushing and drive the conduit down into the hole from the top then get a long punch or steel rod and drive it down the center of condui it should come apart. I would suggest you thread your bolt from that bushing up from the bottom to hit against so you don't screw up your hardware if your reusing


This is what you're trying to get apart
IMG_8594.jpg

Conduit is for pushing the little fingers in.


Helmut, you can get those pliers at most home depot's, lowe's, any place that sells welding equiptment, Harbor Freight.


Helmut are you trying to take bushing apart or just take bolt out?


Join the Elite Explorers for $20 each year.
Elite Explorer members see no advertisements, no banner ads, no double underlined links,.
Add an avatar, upload photo attachments, and more!
.


I was trying to get the bushings out. I got the bolt out with an impact gun no problem. The mount didn't even move even with the body being lifted on the driver side. I had to leave it in place asI was running out of time.


Back
Top