Completed Project - Brian1's Twin Trail Build (Lift, Gears, TTB Mods, Bumpers, Sliders, Cage & More!) | Page 8 | Ford Explorer Forums - Serious Explorations

  • Register Today It's free!

Completed Project Brian1's Twin Trail Build (Lift, Gears, TTB Mods, Bumpers, Sliders, Cage & More!)

Use this prefix for completed projects that are not "How to" articles or threads asking for help.
Brian1's Twin Trail Build

1991 Ford Explorer 4-Door XL 5-Speed Manual 4x4

Project Background and Goals:

I bought this Explorer at a Police auction in August of 2015. I really didn't know what I was going to do with it when I bought it but I couldn't pass up the great deal I got. I stored it away for a bit while deciding to part it out, build it up or just flip it. In the end I decided to build it into a cheap trail truck and use it to R&D some new ideas I had on how to build an Explorer and develop some new parts.

The goal of the build was to do it cheaply while keeping it low, lightweight, and simple. Another goal was to completely transform the Explorer into a trail machine and debut it at the 20th anniversary forum run in Moab (May 2016) while keeping the entire build a secret.

The build has already been completed and made its successful debut in Moab. I will be adding to this thread as time permits of what I did.

Table of Contents - Modifications

to be filled in as the thread progresses for quick access

1" Body Lift
Rear 8.8 Swap and Build
Rear F150 Hybrid Leaf Springs
Front Daystar 2" Coil Spacer & F250 Shock Tower Conversion
Corbeau Seats Pt1
Corbeau Seats Pt2
Rear Shock Bar Pin Eliminators
Dana 35 TTB Beam Boxing
Hybrid Dana 35 Beams with Dana 44 Outer Conversion
Extended Radius Arms
Dana 35 Diff Build with LockRight Locker
Power Steering Cooler
Cutting the Rocker Panels Off
Rear Bumper Build
Front Fender Cutting
Rock Sliders Pt1
Rock sliders Pt2
Front Winch Bumper Build
Extended Breathers and Fuel Pump Access Panel
Rear Fender Cutting
Cage Building
Fabricated Door Panels/Skins
Doubler Install

IMG_20150820_113129908_HDR.jpg


Join the Elite Explorers for $20 each year.
Elite Explorer members see no advertisements, no banner ads, no double underlined links,.
Add an avatar, upload photo attachments, and more!
.


I've been knocking out a few smaller mods and upgrades the past few days. I finished swapping in some upgraded JBL door speakers I pulled out of my last parts Explorer that had the premium sound system.

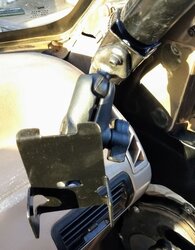
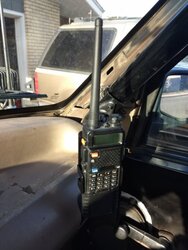
I also made a clamp for my roll cage to mount a RAM mount and a radio bracket for my Baofeng radio I use mainly for my APRS ( Ham radio stuff). It uses a hose clamp to secure it.

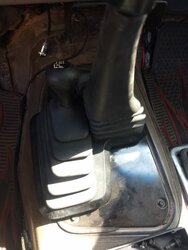
I finally found a manual t-case and trans shifter bezel too in my local yard. I had to do some rebuilding of cracks and broken out screw holes. It is all glued up, reinforced and now installed making my sparse interior look a little better.
 

Attachments

  • IMG_20200404_182656631.jpg
    IMG_20200404_182656631.jpg
    55.1 KB · Views: 154
  • IMG_20200404_182617211.jpg
    IMG_20200404_182617211.jpg
    51.3 KB · Views: 156
  • IMG_20200408_152315478.jpg
    IMG_20200408_152315478.jpg
    39.6 KB · Views: 176


Join the Elite Explorers for $20 each year.
Elite Explorer members see no advertisements, no banner ads, no double underlined links,.
Add an avatar, upload photo attachments, and more!
.


Went wheeling about 2 weeks ago on a local trail and my front diff has gotten worse with violent popping and ratcheting of my lunchbox locker on the driver side. It has always given me problems since the first run in Moab. It made it through the big 3 and started having problems a little before the big fall at the end.

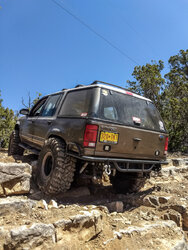
I've wheeled it like that for the past few years and it works, mostly. I finally took on the project to pull the diff and inspect. See my next post but for now here are a few photos from playing around on the steps at my local trail and testing a new mod (more on that eventually...)
 

Attachments

  • IMG_20200425_115050911.jpg
    IMG_20200425_115050911.jpg
    369.9 KB · Views: 162
  • IMG_20200425_115515551.jpg
    IMG_20200425_115515551.jpg
    306.6 KB · Views: 160


The locker I bought was a new "monkey grip" from Ebay but arrived in a Lockright box with Lockright instructions. Must be a house rebrand or something to sell it cheaper.

First indication something is not right:

IMG_20200429_162729529.jpg


I went to pull the carrier and it was being very stubborn so I made a spreader out of some 3/8" scrap steel and 3/4" all-thread. It worked so good! I was able to pull the carrier out by hand.

IMG_20200507_133152573.jpg


Got the locker out and wiped down. Driver problem side on right.

IMG_20200507_142908473.jpg

IMG_20200507_143043038.jpg


No broken teeth but you can see how worn they are compared to the passenger side and they have some sharp burrs on the edges. It shouldn't be like that for how little trail miles are on it.

I'm fairly certain I set it up right and that wear has to be the reason it ratchets and pops so loudly. I'm guessing this locker isn't salvageable for my use.

So now I'm not sure what to do. I'm not ready to SAS it. Maybe buy an Aussie Locker? They are supposed to be better and actually warrantied for bigger tires unlike the Lockright. Any good experiences with the Aussie in the front TTB? Im definitely not putting money into a full case locker.


No problem.

Just weld up the corners of the teeth, and grind them down to the proper shape.

;)


dude you never cease to amaze with the fab and creations, I love the spreader!

contact lock rite and see what gives
I love my ARB in the d35 ttb.................... but ARB are only as good as the installer and they are $$$$$$$$$$$$$$$$$$$$$$$$$$$$$$$$$$$


I have the lock right in the 95. And have never had any issues with it, in the ten years it's been used. Works amazing, and virtually silent. It's been used very hard on 35s in all terrain but sand.

I installed an aussie in the 94 a few years ago, and it's a daily, that sees some trail use. No issues with it either.


Bummer dude. That diff is a process to get out of there. I will never install any locker but an ARB in my diffs. If I cant swing the ARB, I will put in an open diff until I can afford an arb. I know that sounds ridiculous, but I have had enough experience with using and breaking lock rights and Detroit's and elect tracs and true tracs and welded diffs. So I think you should swing for an ARB I guess.


I got a good deal on a new Aussie Locker so I installed it a few weeks ago and got the front end put back together. The Aussie locker is a little bigger than the Lock Right and was harder to fit in the case but no grinding was needed. Additionally they did something smart and put both sized pin holes in the cross pin, one on each end. The Lock Right takes an additional pin purchased separately with a different sized hole for the roll pin in the TTB35 vs the bolt in the Jeep 35. I haven't had a chance to take it out yet to test.

IMG_20200515_163405257.jpg


I also installed my Brian Built 4.0 OHV Valve Cover Reinforcement Rails. The rails provide even pressure across the thin sheetmetal valve covers to prevent warping and the associated oil leaks that are common with the covers.

IMG_20200519_150729617.jpg


IMG_20200519_152329672.jpg


those are so dang cool!!
Did he send the hardware too?


For a year or two I have had several members ask about a skidplate for the leaf spring hangers. The hangers get beat up pretty bad and can get caught on rocks and ledges because they have a fairly abrupt angle to them. I've seen Phil (RIP) weld on some angle iron to make a shallower approach angle to help the hangers slide over ledges easier and @gmanpaint use bolt on skids on his FJ build many years ago. I also noticed the factory hangers on an Xterra are very long and at a gradual angle. Nothing has been available for the Explorers until now!

Taking all the above into consideration I designed and built some 100% bolt-on leaf spring hanger skids for the 1st and 2nd Gen Explorers. I figured it was a good use of my time during the lock down we had in March. Of course the first set would go on this Explorer as one of the main purposes is to be a test mule for my products. The sides are 3/16" steel and have a provision for the capture nut to be reused. The bottom is 1/4" steel. The skids slide onto the stock leaf spring hanger bolt so it does not have to be completely removed. Up front, there is a tab that hooks onto the frame rail to prevent rotation of the skid. Installation is very easy especially if you have an impact. First, I used a grinder with flap wheel to sand down the existing rock rash that would prevent these from sliding over the hangers. Next, remove the nut and back the bolt out 1/4". Hook the tab on the frame and slide them back. They are a tight fit so I tapped them into place with a hammer. Lastly reinstall the capture nut and tighten. It probably took less than 5 minuted to install per side.

I've put a pretty good beating on them so far. Sliding them forward and backward over rock ledges and so far they are performing well. Here are a few photos during the build and testing.

IMG_20200331_182616303 (Small).jpg


IMG_20200331_182701010 (Small).jpg


IMG_20200401_160836481 (Small).jpg


IMG_20200401_160918929 (Small).jpg


IMG_20200425_115126000 (Small).jpg


IMG_20200425_115538833 (Small).jpg


IMG_20200425_115638491 (Small).jpg


Those look great Brian, well done.


Fine... take mine too!


I like those. Smart of you to keep a piece of frame with the leaf spring mount attached lying around.

Need someone to make a weld on reinforcement plate for the gas tank skid. Mine isn't flat anymore.


I like those. Smart of you to keep a piece of frame with the leaf spring mount attached lying around.

I cut them out of a scrap Explorer many years ago just for this reason. I'm glad I kept both sides. Makes it so much easier to prototype stuff on a bench rather than under the Explorer! Also makes a nice fixture to build additional skids with, looks like I have some cutting to do now.

I've also thought about your suggestion of including the factory style slot for a tow truck hook point but I don't think these are designed strong enough (or more accurately attached strong enough) to hold the weight of the vehicle like the factory bracket. Maybe if they were also welded on front and back.


Your design is for sliding over rocks with the force directed up into the bracket, not pulling on it like a tow point. It would have to be welded in place to do both. This isn't for you so much as other readers because I am sure you have thought of this already. If I hadn't already modified my perches, I would be asking you for a set of these.

Your engine mounts are holding up very well, by the way.


When I installed my valve cover rails my engine developed an antifreeze leak immediately in my driveway as I was buttoning everything up. I don't think it could be related but at least it happened in the driveway. Definitely some weird timing.

I parked it in the backyard out of the way and took off the p/s bracket to pinpoint the leak. Turns out the timing cover gasket gave out on the driver side at the water port, a very common problem. I have been tearing it down the past few weeks little by little when I get time and it's not so hot. This afternoon I finally popped the cover, cleaned it all up and reinstalled with a new Ford OEM gasket. The Ford gasket is the best in my opinion, the Felpro failed after only a year on my other Explorer.

This is the 4th time I have performed this repair on 3 different engines so at least it is easy and I know what I'm doing! I installed a new balancer too since the old one had chunks of rubber cracking and falling out.

Maybe I will get it put back together this week. I haven't even tested out the locker install yet!

IMG_20200707_190333224.jpg


Join the Elite Explorers for $20 each year.
Elite Explorer members see no advertisements, no banner ads, no double underlined links,.
Add an avatar, upload photo attachments, and more!
.


Lots of updates to get to so here are some things I have done the last few months in no particular order-

My Bosch AGM battery died at 2 yrs old. It would show 12v but didn't have the amps to crank the engine over. I warrantied it out for no cost with PepBoys but they don't sell Bosch anymore and instead sell a Champion AGM battery that I exchanged it for which appears to be made by Johnson Controls like many other Parts Store AGM batteries. The parts counter guy was disappointed too that they stopped carrying Bosch batteries and he said the Pepboys owner has a stake in Champion Auto which is why the switch. As far as Bosch customer service, who I also contacted, I give them 2 thumbs down.

I found a great deal on a new 130 Amp Alternator to replace the 95A factory one which I suspected may have some bad diodes that contributed to the battery death. It was a closeout deal for about $65 with no core needed however it was for a 7.3 Powerstroke Application. With a little research I found it would work and all I had to do when I got it was swap to the Explorer pulley. With the Winch, lights, radio and so on the charging system and battery should be a little happier. (I also have one on my other Explorer but it was from a 94 Explorer Limited application)

In addition to the 2, 2.5lb dry chemical fire extinguishers I carry I added another one, an Element E50. It is like a road flare and you strike it off and the chemical reaction puts out a fire with a 50second capacity which is MUCH longer than the small 2.5 extinguishers and in a much smaller package. Plus, it doesn't leave a mess. I fabbed a simple bracket with some clips from McMaster to mount it on the side of my seat for easy reach.

Fire Extinguisher Exp2.jpg


I also got to thinking about adding an aftermarket steering wheel that was a bit smaller to allow for easier entry/exit because it is a non-tilt column and the cage and high bolster seats make it a little more difficult. I found that Grant makes an adapter kit for the 1st Gens and I have used their wheels in the past with good luck. I ordered the Grant Kit 4288 and 414 wheel. Got them in and started the install when bolt-on became a much bigger project because of Grant's fit, finish and quality.

The steering column cover is punched with a worn-out punch because of the large burrs left so I had to sand those down flat. With the wheel tightened down the column cover rubbed the column so hard it made it hard to turn so I had to make a spacer plate. Reassembled that and found the decorative bolts in the wheel protrude out the back too far pushing the cover into the column so I had to remove those and grind them down flush. The reason this happens is that the Explorer cover is purposely offset when the wheel is straight so for a normal application that shouldn't happen. Two of the decorative top bolts were loose and stripped so I welded up the holes and re-drilled and tapped them.

Their horn button design is one of the worst I have ever seen. The cap "threads" over a fiber disc with a spring that when applied pushes two plates to make contact. After 20 tries to get the cap locked on I tested the horn. 1st one worked great, 2nd tap and the horn stuck on so I quickly pulled the fuse. After reading many forums it is clear that the Grant horn should be thrown in the trash. When it fails, the horn fails in the on position. I debated what to do and came up with a plan. I fabricated a small plate with two standoffs for a 10-32 bolt that I would bolt my own cap on. I found a small momentary push button switch at my local electrical parts supply and wired that to the only part of Grant's horn kit that is worth keeping. It turned out pretty good I think but this simple swap was much more involved than it should have been. The steering wheel is smaller by the width of the stock wheel all the way around and does make it a little easier getting out of. So if it isn't obvious, no I would not recommend the Grant kit and their steering wheels aren't what they used to be 20 years ago.

IMG_20210401_174228240.jpg


IMG_20210402_155441483.jpg


Lots more updates to come eventually...


Back
Top