I finally got my 3rd brake light wired and ran the wires for the future dome light. I followed these instructions from
http://mysporttrac.com/mysporttrac/ in the project section 'how to wire a camper shell'
The instructions were great but photos were lacking clarity so I tried snapping a few in hopes it would help. It look me awhile to figure out how I was going to run the wire, I didn't want to drill any new holes so this is what I did.
I test fitted a 3/8 loom (had to twist it to make thinner) I believe the hole I used was for the bed extender, I don't have 1 nor plan on getting 1 so this worked for me. If you have an extender you will need to find another way. I have a 5x10 utility trailer which is why I have no need for the extender.
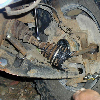
I removed taillight for easier access and view
It was a tight fit but the loom worked in that hole. After I ran an estimate of how much wire will be needed, where I was going to run it. I cut my wire with extra for play, put in the 3/8 loom and wrapped with electrical tape. My harness looked like a Y, my 4 wires (red & black for brake light and blue & black for dome light) ran down the pocket (same used for the drivers rear taillight/reverse wire harness. Once the wire got past the end of that pocket, the blue & black ran up the same wall on the opposite side following the 12v power point wire harness. I did this to make it look professional. Back to the Y intersection, the red & black was ran to the aux chmsl (center high mount stop light) power, located about 6" from the tow harness plug. The 2 wires were just poking out of the wire harness.
And a fuller view of the 2 wires. I popped all the Xmas trees out to pull the wire down for more slack.
This is at the bottom of the pocket where my harness had the Y intersection. In the photo look at the new, the loom going down is actual going up following the wires for that taillight, the loom going up is following to the power point in the bed and the loom going left goes to the 2 wires sticking out near the tow harness
I'll tap into this later for the dome light when I get it
Then I solder my connection for the brake light
Put the wires in the loom and taped it
Then made my connections up top. I want to find a good weatherproof type plug but for now I left excess wire and solder together.
Tip:since I had 2 black wires 1 for the brake light and 1 for dome light, I made sure to tape together so when I made the connections they didn't get swapped around.
Edit:I didn't tape the black wires together, I meant I taped them to there designated colored wire.