Hello Everyone! Been on the forums for quite a while now, and have never actually made a post relating to my explorer! I've owned 2 explorers so far, bought both not running and fixed them up over time. My previous explorer was a white 99 and my current is a 97, both 5.0L and both have alot of hours and work into them, but this thread will be mainly about my current build the 97


Current Mod List (Will be updated as much as possible):
-3" PA853 Daystar body lift
-1.5" Torsion bar lift with adjustable rear shackles to match front
-Custom built retrofit headlight housings with blue halos and switchback LEDs
-20x10 Gear Alloy Armor wheels with 33x12.50 Ironman All Country M/T tires
-Aftermarket Grill insert with custom Ford lettering courtesy of Buggman Mods on Facebook
-2004+ Ford Ranger mirrors (needs revisited)
-Tinted tail lights (didn't like the aftermarket options)
-Rebuilt front suspension with TTX parts and Rancho shocks front and Monroe Load adjusting rear shocks
-Blue LED rock lights
-All new Exhaust parts with true duals all the way back with OBX Headers and Magnaflow Hi-Flow front Cats and deleted rear cats
-Pinstriping removed as well as factory badges
-HO Mustang camshaft, Rebuilt GT40-P heads with stiffer springs and new valves, polished upper GT40 intake, and CAI
-LED Pillar pods for Voltage and Coolant temperature
Parts Waiting to be installed and upcoming projects:
-Removing rhino liner from lower sections of doors and body matching with the OE color
-Modifying and installing Ford Ranger aftermarket pocket style fender flares
-New chrome grill and removing the aftermarket front bumper and re-installing OE style bumper
-New Rocker panels, dog legs, and undercoating body
-Removing body and sanding rust off frame and coating with POR
About 2 months after rolling my white explorer, i found this poor thing on the Facebook marketplace. The owner was asking 400$ for it, had a bad axle seal and bearing in the rear end, ABS light was on, The check engine light was on, the radio didn't work, and neither did the sunroof. Still being injured from the accident i was in, i didn't honestly think that this was going to be an overnight transformation, but i knew that this was going to be a fun and slow build that my daughter and I would both enjoy! So i messaged the seller, and the next week i signed the papers at the bank for a loan of 1500$ to pay for the explorer and get started on the build knowing id have it paid off in a few months anyways, and the following weekend me and a coworker drove to pick it up nearly 2 hours away from where we lived. When we got there, the vehicle was obviously neglected, the paint was sun faded and filthy from sitting in the sun, it was filled with rotting food (still yet to get rid of the smell), and sure enough the bearing on the rear end was bad, ABS light, Engine light, blah blah blah. Paid the lady 500$, 100$ extra since she was nice enough to hold it for 2 weeks after contacting her, and her allowing me to pick it up at a time that was convenient to us as we had to drive a while to get it. Surprisingly enough I was able to drive it up on the trailer without the wheel falling off the Right Rear as the bearing on that side was completely gone.
Fast forward to the following weekend, I was still in a lot of pain so working on it was very slow, but i started diving in to the tons of ideas that i had for this build. I started with coating the fender flares and lower doors with Rhino liner as i hated the Gold/Purple two tone paint, and installing the body lift and removing the factory running boards. Second time around on the body lift so installation was a breeze, had it done by Sunday, and the Rhino liner was finished up waiting to dry.

Taken in the middle of installing the body lift
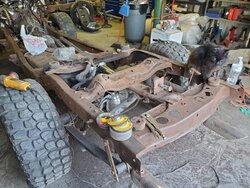
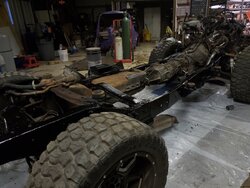
After the lift was finished i got the new wheels and tires mounted up, and prepared to try and pull the rear end out of my wrecked explorer to swap under the new one. Installed the aftermarket bumper that i built for my white explorer, some vent visors, and some other oddball parts here and there for a couple days while i mounted and took home a tire a day. Wheels were easy, just mounted them after work one day and took them home in my car, NOTE: 33s don't fit well in the back seat of a Pontiac G6 lol. The rear end proved to be a major pain in the ass, it was 10 degrees outside, snow on the ground, and i was still injured from the accident so i couldn't do anything too strenuous. After a couple weeks of doing a little bit here and there i was able to get the rear end out and under the new explorer! Built new brake lines to go across the axle, and also from the axle to the master cylinder as it broke while bleeding the brakes after building the line across the rear axle. Got the new wheels tossed on and got it ready for its maiden voyage to the backyard to wash the filthy pig.

Taken after mounting the last wheel onto the vehicle and waiting to finally drive it for first time

Taken after driving for the first time, around the corner of my garage to the back yard
This picture was exactly 1 month after initially purchasing the vehicle and i was extremely happy with the results thus far, but still had a lot of work that needed done. The next thing that I wanted to do was wash it, you can't really tell from the pictures but the paint was very neglected and filthy. I spent a long time washing it and then pulled it back into the garage where i spent the next 5 hours Clay barring the paint, waxing it, cleaning the windows and making it revealing all the paint blemishes that would need buffed out. Underneath the layers of dust and grime, was a very pretty color that i honestly would never have thought would look as good as it did.

Drivers side after Wash, Clay bar, and Wax

Passenger side after Wash, Clay bar, and Wax
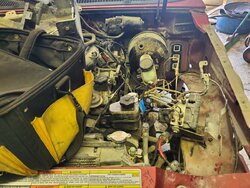
As i did away with the Gold on the trim pieces and the running boards, i also wanted to do away with the pinstriping, was a very long process as i didn't want to damage the paint any, and didn't have the proper tools to do it. The following weekend i was actually able to drive it 30 minutes to the shop that i work at, where i got to experience all the fun new problems that i needed to address. About 5 minutes away from the shop, the truck started to act up, bogging down and losing power. Lucky i was able to limp it to the shop, to find that the alternator was not charging, and my battery was now shot. Replaced the alternator, accidentally stabbed a hole in my radiator, replaced the battery, and low and behold, the alternator still wasn't charging. Thanks Fuse. After that, it was on to installing the dual exhaust from my wrecked explorer, as well as replacing all the front suspension parts, headers, adjusting the rear bumper to the correct spot, replacing the rear diff fluid and installing the new cover, changing the oil, tranny flush, full coolant flush, and then finally driving it back home without any hiccups. Since then i have done alot of work here and there, including the Ranger mirrors, Cam install, new wheels, and am currently preparing to do alot of body work

Taken just 5 minutes before taking it home
Headlight Build:
After a few months of it sitting at home i was ready to start throwing more money at it, so i started looking at headlights. On my white explorer i had a set of Anzo USA projector headlights and absolutely loved them, but decided that i wanted to go a different route with this one so that i didn't feel like i was building the same explorer again. Did a lot of research into Retro fitting, and decided that i loved the different look.
The parts i used for the Retro fit were:
-Nilight 2.5" mini HID Bi-Xenon projectors
-Autoxon 23" dual color LED strips
-EverBright 70mm Blue LED halo rings
-Innovited H1 HID 8000k Bulbs
-Innovited 9007 HID Conversion kit
-HeadlightDepot Black chrystal halogen housings
I will not go into exact details as to how i built the lights, but as of right now i plan on going back in and replacing the strips with a more flexible LED strip and adding some RGB demon eyes. The build was fairly easy over all, did require a little bit of trimming but i would definitely do this build again as the light output is a lot better than most of the aftermarket projector housings I've bought. I had to purchase the 9007 kit to use the plug and play ballasts, and then use the H1 bulbs for the projectors, only costed an extra 20$ for the extra bulbs but i think that it made the process alot easier.


Ranger Mirrors:
I bought the Mirrors thinking that it would be an easy process, but taking apart the ranger mirrors without breaking them was a royal PITA. The Ranger mirror bases are nowhere near the right size, and making an adapter plate would have made them look absolutely ridiculous. I ended up taking the bases off the explorer mirrors, and the tops of the ranger mirrors and using 2 self tappers to fix them into place, which makes it so that you cannot pivot the mirrors. I will be snagging another set of both and dissecting them again to figure out a more stable and functional way to make them work, but as of right now the mirrors hold up ok, do not move with wind, and are surprisingly sturdy. I will update this section of my thread when i get around to redoing these mirrors so that if anyone decides they would like to do it, they will have something to go off of.
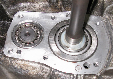
Camshaft Install:
About 6 months ago i began looking into putting a different cam in the explorer, and was absolutely torn on the cam i should choose. The cam i decided on was the H.O Mustang Cam, this cam was a lot cheaper than the other options and required the least amount of supporting parts and work. I found the cam on Ebay for about 150$, and it was at my doorstep in 2 weeks. While i waited for the cam to get here i started tearing the engine down, and thinking of what parts i would use from the white explorer which had a GT40P engine. I ended up sending the GT40P heads to a local machinist who installed new springs, valves, seats, etc. I unfortunately started this progress before winter had fully set in, and my garage is not insulated, so when it dropped below 20 degrees outside i began to lose motivation and it took me about 4 months to finish the project. I ended up using Carquest Timing components as i install those on the vehicles i work on at the shop, as well as new water pump, thermostat, thermostat housing, Ford Racing Lifters, OE rockers, Sealed Power OE push rods, Summit Racing Intake spacer, and a lot of other new parts that im sure i'm forgetting. It seems to be running very well without a tuner, so i don't know exactly when i will buy it but i am currently looking at getting a SCT X4 tuner.


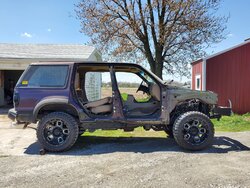
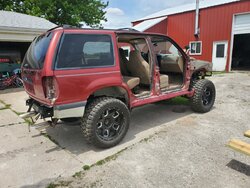
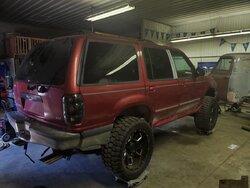
Here are some updated pictures of the explorer since i bought it. It has definitely been fun building, and i don't plan on stopping any time soon! Thank you to anyone that reads this, i will always do my best to answer any questions about the build so far as quickly as possible!


Current Mod List (Will be updated as much as possible):
-3" PA853 Daystar body lift
-1.5" Torsion bar lift with adjustable rear shackles to match front
-Custom built retrofit headlight housings with blue halos and switchback LEDs
-20x10 Gear Alloy Armor wheels with 33x12.50 Ironman All Country M/T tires
-Aftermarket Grill insert with custom Ford lettering courtesy of Buggman Mods on Facebook
-2004+ Ford Ranger mirrors (needs revisited)
-Tinted tail lights (didn't like the aftermarket options)
-Rebuilt front suspension with TTX parts and Rancho shocks front and Monroe Load adjusting rear shocks
-Blue LED rock lights
-All new Exhaust parts with true duals all the way back with OBX Headers and Magnaflow Hi-Flow front Cats and deleted rear cats
-Pinstriping removed as well as factory badges
-HO Mustang camshaft, Rebuilt GT40-P heads with stiffer springs and new valves, polished upper GT40 intake, and CAI
-LED Pillar pods for Voltage and Coolant temperature
Parts Waiting to be installed and upcoming projects:
-Removing rhino liner from lower sections of doors and body matching with the OE color
-Modifying and installing Ford Ranger aftermarket pocket style fender flares
-New chrome grill and removing the aftermarket front bumper and re-installing OE style bumper
-New Rocker panels, dog legs, and undercoating body
-Removing body and sanding rust off frame and coating with POR
About 2 months after rolling my white explorer, i found this poor thing on the Facebook marketplace. The owner was asking 400$ for it, had a bad axle seal and bearing in the rear end, ABS light was on, The check engine light was on, the radio didn't work, and neither did the sunroof. Still being injured from the accident i was in, i didn't honestly think that this was going to be an overnight transformation, but i knew that this was going to be a fun and slow build that my daughter and I would both enjoy! So i messaged the seller, and the next week i signed the papers at the bank for a loan of 1500$ to pay for the explorer and get started on the build knowing id have it paid off in a few months anyways, and the following weekend me and a coworker drove to pick it up nearly 2 hours away from where we lived. When we got there, the vehicle was obviously neglected, the paint was sun faded and filthy from sitting in the sun, it was filled with rotting food (still yet to get rid of the smell), and sure enough the bearing on the rear end was bad, ABS light, Engine light, blah blah blah. Paid the lady 500$, 100$ extra since she was nice enough to hold it for 2 weeks after contacting her, and her allowing me to pick it up at a time that was convenient to us as we had to drive a while to get it. Surprisingly enough I was able to drive it up on the trailer without the wheel falling off the Right Rear as the bearing on that side was completely gone.
Fast forward to the following weekend, I was still in a lot of pain so working on it was very slow, but i started diving in to the tons of ideas that i had for this build. I started with coating the fender flares and lower doors with Rhino liner as i hated the Gold/Purple two tone paint, and installing the body lift and removing the factory running boards. Second time around on the body lift so installation was a breeze, had it done by Sunday, and the Rhino liner was finished up waiting to dry.
Taken in the middle of installing the body lift
After the lift was finished i got the new wheels and tires mounted up, and prepared to try and pull the rear end out of my wrecked explorer to swap under the new one. Installed the aftermarket bumper that i built for my white explorer, some vent visors, and some other oddball parts here and there for a couple days while i mounted and took home a tire a day. Wheels were easy, just mounted them after work one day and took them home in my car, NOTE: 33s don't fit well in the back seat of a Pontiac G6 lol. The rear end proved to be a major pain in the ass, it was 10 degrees outside, snow on the ground, and i was still injured from the accident so i couldn't do anything too strenuous. After a couple weeks of doing a little bit here and there i was able to get the rear end out and under the new explorer! Built new brake lines to go across the axle, and also from the axle to the master cylinder as it broke while bleeding the brakes after building the line across the rear axle. Got the new wheels tossed on and got it ready for its maiden voyage to the backyard to wash the filthy pig.
Taken after mounting the last wheel onto the vehicle and waiting to finally drive it for first time
Taken after driving for the first time, around the corner of my garage to the back yard
This picture was exactly 1 month after initially purchasing the vehicle and i was extremely happy with the results thus far, but still had a lot of work that needed done. The next thing that I wanted to do was wash it, you can't really tell from the pictures but the paint was very neglected and filthy. I spent a long time washing it and then pulled it back into the garage where i spent the next 5 hours Clay barring the paint, waxing it, cleaning the windows and making it revealing all the paint blemishes that would need buffed out. Underneath the layers of dust and grime, was a very pretty color that i honestly would never have thought would look as good as it did.
Drivers side after Wash, Clay bar, and Wax
Passenger side after Wash, Clay bar, and Wax
As i did away with the Gold on the trim pieces and the running boards, i also wanted to do away with the pinstriping, was a very long process as i didn't want to damage the paint any, and didn't have the proper tools to do it. The following weekend i was actually able to drive it 30 minutes to the shop that i work at, where i got to experience all the fun new problems that i needed to address. About 5 minutes away from the shop, the truck started to act up, bogging down and losing power. Lucky i was able to limp it to the shop, to find that the alternator was not charging, and my battery was now shot. Replaced the alternator, accidentally stabbed a hole in my radiator, replaced the battery, and low and behold, the alternator still wasn't charging. Thanks Fuse. After that, it was on to installing the dual exhaust from my wrecked explorer, as well as replacing all the front suspension parts, headers, adjusting the rear bumper to the correct spot, replacing the rear diff fluid and installing the new cover, changing the oil, tranny flush, full coolant flush, and then finally driving it back home without any hiccups. Since then i have done alot of work here and there, including the Ranger mirrors, Cam install, new wheels, and am currently preparing to do alot of body work
Taken just 5 minutes before taking it home
Headlight Build:
After a few months of it sitting at home i was ready to start throwing more money at it, so i started looking at headlights. On my white explorer i had a set of Anzo USA projector headlights and absolutely loved them, but decided that i wanted to go a different route with this one so that i didn't feel like i was building the same explorer again. Did a lot of research into Retro fitting, and decided that i loved the different look.
The parts i used for the Retro fit were:
-Nilight 2.5" mini HID Bi-Xenon projectors
-Autoxon 23" dual color LED strips
-EverBright 70mm Blue LED halo rings
-Innovited H1 HID 8000k Bulbs
-Innovited 9007 HID Conversion kit
-HeadlightDepot Black chrystal halogen housings
I will not go into exact details as to how i built the lights, but as of right now i plan on going back in and replacing the strips with a more flexible LED strip and adding some RGB demon eyes. The build was fairly easy over all, did require a little bit of trimming but i would definitely do this build again as the light output is a lot better than most of the aftermarket projector housings I've bought. I had to purchase the 9007 kit to use the plug and play ballasts, and then use the H1 bulbs for the projectors, only costed an extra 20$ for the extra bulbs but i think that it made the process alot easier.
Ranger Mirrors:
I bought the Mirrors thinking that it would be an easy process, but taking apart the ranger mirrors without breaking them was a royal PITA. The Ranger mirror bases are nowhere near the right size, and making an adapter plate would have made them look absolutely ridiculous. I ended up taking the bases off the explorer mirrors, and the tops of the ranger mirrors and using 2 self tappers to fix them into place, which makes it so that you cannot pivot the mirrors. I will be snagging another set of both and dissecting them again to figure out a more stable and functional way to make them work, but as of right now the mirrors hold up ok, do not move with wind, and are surprisingly sturdy. I will update this section of my thread when i get around to redoing these mirrors so that if anyone decides they would like to do it, they will have something to go off of.
Camshaft Install:
About 6 months ago i began looking into putting a different cam in the explorer, and was absolutely torn on the cam i should choose. The cam i decided on was the H.O Mustang Cam, this cam was a lot cheaper than the other options and required the least amount of supporting parts and work. I found the cam on Ebay for about 150$, and it was at my doorstep in 2 weeks. While i waited for the cam to get here i started tearing the engine down, and thinking of what parts i would use from the white explorer which had a GT40P engine. I ended up sending the GT40P heads to a local machinist who installed new springs, valves, seats, etc. I unfortunately started this progress before winter had fully set in, and my garage is not insulated, so when it dropped below 20 degrees outside i began to lose motivation and it took me about 4 months to finish the project. I ended up using Carquest Timing components as i install those on the vehicles i work on at the shop, as well as new water pump, thermostat, thermostat housing, Ford Racing Lifters, OE rockers, Sealed Power OE push rods, Summit Racing Intake spacer, and a lot of other new parts that im sure i'm forgetting. It seems to be running very well without a tuner, so i don't know exactly when i will buy it but i am currently looking at getting a SCT X4 tuner.
Here are some updated pictures of the explorer since i bought it. It has definitely been fun building, and i don't plan on stopping any time soon! Thank you to anyone that reads this, i will always do my best to answer any questions about the build so far as quickly as possible!