Chief Tons of new mods!!! Good Ones!!!! | Ford Explorer Forums - Serious Explorations

  • Register Today It's free!

Chief Tons of new mods!!! Good Ones!!!!

Hello Everyone,
Long time no talk..... Anyway, I have been doing some work. A Lot! I will list in Chronilogical order how this has come about. Then I will Start with the first mod and try to make some nice contributions here for all. Dont worry, detailed reports will come as I report on each Item... There is sort of a lot of explaining........

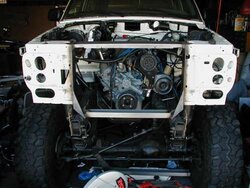
1) Re-design Radiator support. (finished)
-To Allow for More clearance between engine and for rubber Isolator
mounting
-Re- Paint Rad Support.
2) Fabricate custom Aluminum Radiator shroud. ( Finished )
-Purchase and install Flex-A-Lite Fan Variable Speed Controller.
-Purchase and install DUAL Spal High- Performance 13" Fans.
3) Modify Ron Davis Radiator. (Finished)
-To Allow For remote filler neck
-To Allow for mounting of new shroud.
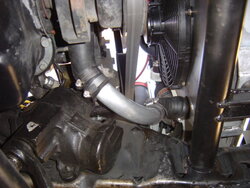
4)Fabricate New Front Crossmember. (Finished)
-To Eliminate Frame Flexing
5)Rebuild T-5 Tranny with High Alloy gears ( Finished)
-So It Wont Break Again!!
6)Fab.Gauge Pod for New"factory style" intrument cluster. (Finished)
7)Install Full Autometer Phantom II gauge set.(Went With Sport Comp)
8)INSTALL KENNE BELL 2.2 BLOWZILLA!!(Coming Soon)
-More power to handle new gear ratios
-Also, ...... ITS MORE FUN!!!

I know that is alot to take in....... I will try to post as I can On the work I already have "(Finished)" and What I am in process with as it happens.\

Yes I will have pics as usuall.... Because otherwise this thread will suck :rolleyes: I know you will have tons of questions, bring em on... But dont get ahead of ourselves (ie; what about the blower??!) as keeping up will be alot of work to begin with. We dont want to make this a mixed up thread that noone can get usefull info out of.

I will try to get pics and info up Wednesday 13th in the late evening!! Talk to you soon!
-Chief


Join the Elite Explorers for $20 each year.
Elite Explorer members see no advertisements, no banner ads, no double underlined links,.
Add an avatar, upload photo attachments, and more!
.


Welcome back! :D

Can't wait to see pics of the aluminum shroud and the crossmember. :cool: I need to make a new tranny one soon.


Can't wait for the pics, this truck was always a monster!


Signing up


jerk!

Always one step ahead aren't we? hahaha Kidding!!

What are you running for engine mounts these days? I notice my L&L's are suffering from abuse lately and will require attention..

get pics! I want to see your cooling setup, I have to re do mine ASAP too.....


Good to see you back. Nice list of mods you've got there:chug:


Hey guys....
Just had a sec to check the thread. I will try to get pics and post some report tonight.

410fortune:
I am running custom mounts due to braking L&L mounts twice. I need to put new poly-urathane bushings in it while I have my tranny and headers out right now, so I will take a couple pics for you and you can see what I did. Very simple and easy. WILL NOT break!

Talk to you guys later!
-Chief


So I ended up having to help my freind move some furniture tonight and didnt get a chance to get the pics for the first few parts of this thread.... I wont bore you with a post with no pics, so I will try to get them tomorrow and Start on the posting..... Everything that says finished next to it will be addressed and I will be rebuilding the tranny tomorrow if all goes well.

Talk to you soon,
Tim


Ok,
Sorry it took so long....

Starting with number one. I was climbing a hill out at the river over Memorial day weekend and my fan touched the A/C compressor and sheared all the blades off. I left at night on sunday and got home no problem. here is a pic of what I used to have after my first attempt to modify the rad support when I put the engine in.
 

Attachments

  • New Rad support (Front).jpg
    New Rad support (Front).jpg
    28.5 KB · Views: 865
  • New Rad Support  (side).jpg
    New Rad Support (side).jpg
    27.4 KB · Views: 878


So anyway, It seemed strong enough. The problems were the radiator was hard mounted top and bottom. When the frame flexed, and It did hard! it tore the mounts on the radiator. Then eventually allowed it to flex enough to shear the blades off the fan when it touched the A/C compressor. I had a pic but it didnt really do justice to the actual clearance of the fan. There used to be about 3/4" from the fan blade to A/C compressor.... which is the tightest area.


I needed a new revised System!


This is a pic of the first time, but this is what I did again.....
 

Attachments

  • Rad support is Gone!.jpg
    Rad support is Gone!.jpg
    24.9 KB · Views: 860


This time I made a new top piece out of 3/8" thick steel. I cut 3/16" pieces for the front and back of the "Top" Piece that creates the new Radiator Support. You can see in this picture, it goes all the way from one side to the other and is fully welded in and together. Then I redrilled holes for the hood pins and cut holes for the stock hood supports grommets.

Once I got this piece in the whole front of the truck was strengthened ike you wouldnt believe....
 

Attachments

  • Fornt New Rad Support.JPG
    Fornt New Rad Support.JPG
    61.4 KB · Views: 777
  • From Driver Profile Rad Support.JPG
    From Driver Profile Rad Support.JPG
    59.6 KB · Views: 783
  • Pass FRT New Rad Support.JPG
    Pass FRT New Rad Support.JPG
    59.8 KB · Views: 770
  • Pass Profile New Rad Support.JPG
    Pass Profile New Rad Support.JPG
    58.5 KB · Views: 743


At this point, the top is done. I now made some "perches" if you will to hold the "Grainger" rubber grommets that I used to mount the radiator, top and bottom. This picture shows the perch mounted. You can see the mount that comes off the new radiator shroud holds the other side of the grommet. These are the top mounts for the radiator.......


In this pic, you can also see the New remote fill neck that comes off the radiator itself. You can also see the Flex-a-lite Variable speed fan controller.
The "VSC" will control dual fans, user adjustable t-stat, relay for A/C and manual control overide available. It has a soft start feature that when fans kick on they come on at 60% power.. If temp rises they will increase up to 100% so they only run what they need to. Soft start is also helpfull on the electrical system and lights.


That remote fill neck made things much more simple and got rid of this header tank that I used to use ......
 

Attachments

  • Header tank, coolant overflow and brackets.JPG
    Header tank, coolant overflow and brackets.JPG
    24.7 KB · Views: 862


Now that we have covered the, Custom aluminum shroud ,the upper mounts and the new top part of the radiator support, I will go to the bottom....

The bottom is now open. The body mounts that mount to the frame and to the lower part of the radiator support are what is holding the lower portion.
We made a new front crossmember out of 1 3/4" tube I think. and welded it in. This will stop most of , if not ALL of the frame flex that was occuring before and allowing the support to twist. The lower radiator grommets are mounted to perches on the bottom of the radiator shroud and attached to the mounts coming off the new front crossmember. here is the pic
 

Attachments

  • Radiator lower grommets and support.JPG
    Radiator lower grommets and support.JPG
    60.1 KB · Views: 843
  • Lower Radiator support and Front crossmember.JPG
    Lower Radiator support and Front crossmember.JPG
    60.7 KB · Views: 804
  • Front Crossmember and rad support.JPG
    Front Crossmember and rad support.JPG
    60 KB · Views: 797


That last pictures shows it well. That would be looking under the front bumper back toward the radiator.


Here is the new front accessory clearance..... oh yeah and dual spal 13" fans with flex-a-lite controller.
 

Attachments

  • Dual Fans Clearance to Accessories.JPG
    Dual Fans Clearance to Accessories.JPG
    60.4 KB · Views: 795
  • Dual Fans and Shroud.JPG
    Dual Fans and Shroud.JPG
    61.2 KB · Views: 810


There is now tons of room and shouldnt be any flex. You can also see the custom upper radiator tube of aluminum we made in those last pics. here is another one of the lower custom tube... (first pic) The last pic shows the old style tubes (cool flex)
 

Attachments

  • The engine compartment all done.JPG
    The engine compartment all done.JPG
    22.4 KB · Views: 788
  • New Lower radiator tube.JPG
    New Lower radiator tube.JPG
    60.6 KB · Views: 810


Join the Elite Explorers for $20 each year.
Elite Explorer members see no advertisements, no banner ads, no double underlined links,.
Add an avatar, upload photo attachments, and more!
.


This moves us on to the tranny.... I didnt get many pics guys but let me recap what went wrong.

1) Input shaft bearing went out. the main output shaft of the tranny is basically 2 pieces... One is the main output shaft itself, the other is the "input shaft". they connect together via loose needle bearings that reside inside the end of the input shaft. The output shaft end surface goes inside the needle bearings into the end of the input shaft..... I hope you are following me.

2) I found out that the dumb ***** who gave me this tranny originally
gave me a 4cylinder tranny. Biggest difference is the end of the input
shaft, where it goes through your clutch splines and into the back of
the crankshaft. It is supposed to go inside a needle, or "pilot" bearing
in the crankshaft on the engine. well the input shafts out of a 4 cly
mustang had a smaller diameter end on the input shaft. what this
means is the input shaft was moving around in the back of the engine
and made the bearing go out. ( the needle bearings inside the imput
shaft where the end of the outputshaft resides.)

3)This ended up scoring the end of the output shaft. The shaft is a
special shaft with 23 splines that is hard to come by these days. It
was gonna cost about 300 bucks for a new one so my freind fixed it for
me. He Turned the surface down a ways on the lathe. Then made a
sleeve to press on the surface and turned it down on the lathe to the
correct original demension.

So I decided while I was in there I would get higher strength gears... The super alloy gears are extremely strong but are only made in a 2.95 first gear. I had a 3.97 first gear with a .76 overdrive. It drove well with this set up only 1st and 2nd could have been a little higher for my liking and overdrive could have been slightly higher to drop Rpms just a little. Well 2.95 with a .59 overdrive was gonna be WAY to much. My truck wouldnt have any power and wouldnt probably be able to use 5th gear a tall.

My alternative was to get the High alloy set. This is better than stock but not as strong as the "super" . The only gearset that they have is a 3.35 first wich will bring my overdrive down to a .69 I believe if i rember right. This will lengthen 1st through 3rd. 4th will be the same 1:1 and overdrive will better for fuel economy.

I was a little worried about it still not having quite enough power for these gears so that is why I got the KENNE BELL blower coming. I didnt want to regear my rearends again because that would be a lot of cost. (not that the blower wasnt more but lets face it.... It is a Supercharger!!! Thats alot more fun the rear and front end gears!!!!!!
 

Attachments

  • Done installing new high alloy gears.JPG
    Done installing new high alloy gears.JPG
    58.9 KB · Views: 804
  • Tranny is done.JPG
    Tranny is done.JPG
    60.2 KB · Views: 794


Back
Top