Alright my disclaimer in the beginning… This is going to be really long and the pictures aren’t great. I know there are other maybe even better ways to do just about everything but because I gave myself only 1 month to put this together and I didn’t want to spend a fortune, it is what it is.
I guess I’ll start with how this madness came about. I heard from some friends that a guy selling a low mileage 12 valve with a transmission for cheap. So I bought it and wasn’t entirely sure what I wanted to do with it, so it sat in my shop for about 8 months and finally I had a great idea. I wanted a 4 door ride; Only things I really cared about were straight body, clean interior and damn near free. I put the word out and came up with tons of really sharp 4 door trucks for like $5000+. Here is where the magic happens. I work at an auto shop so obviously I come across great deals every once in awhile. Some guy didn’t want to spend the money on putting an engine in a ‘99 Ford Explorer WHITE with tan interior and LOADED, this thing was show room quality with all the options, but it was a 4x4 and I had a 2wd transmission. Either way I was able to get it for $50. The deal was I was to make his check engine light and ABS light go away on his Ranger, took me like 1 hour and $50. About this time a friend of mine was about to put an engine in this blue explorer (2wd) but I offered to trade because it would make my life easier and I wouldn’t have to feel guilty for cutting up such a nice vehicle, and I’m a really nice person. The trade was final and I now had my platform.
I started by asking this friend to DRIVE it in the shop so we could tear it apart. It sat on the lift for about 2 days and we decided to drive it around some more and try to blow it up, 284319 miles and still running. So we gave up and tore it down cause winter was coming and I needed a new winter vehicle. This is when I set the deadline of 1 month til completion and here we go…..

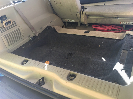
Started by pulling the engine, transmission, front seats and the entire dash including all of the HVAC unit. Since my donor truck didn’t have A/C I wasn’t going to add it. While pulling the dash I managed to crack the windshield in 2 places where I was being lazy and using an electric impact with a swivel to get the bolts on top of the dash, the socket slipped and smashed the window, twice.

Then I decided it would be easier to remove everything between the fenders from the grille to the firewall. So I grabbed the trusty sawzal and had some fun cutting everything. With everything removed the project moved forward extremely fast. I started by sliding the engine in til it stopped, on the firewall of course. So I cut a little bit out at a time until I had a hole cut that was about 2.5 feet wide 1.5 into the tranny tunnel and from the bottom of the wiper linkage to the floor. I even had to clearance the bolt that holds the throttle pedal on because the hole needed to be so wide.

The awesome part to this was I was able to set the engine on the stock Explorer frame mounts. I slotted the hole on the passenger side to line up with a hole on the stock Cummins metal engine mount bracket. Then on the driver side I used the stock Cummins rubber mount and bolted it right to the stock Explorer frame mount. This put the back two cylinders in the cab. Exactly what I was after, this keeps the weight off the nose and still gives me room to put the radiator and fan up front. Note that this setup would make the engine sit offset to the passenger side; This was done on purpose because stock ford drive train is offset and if it were centered the drive shaft would had hit the fuel tank and not been in line with the rear axle. I then added a ¼ inch steel plate on the front of the drivers side of the engine to essentially solid mount it so it wouldn’t torque up into the hood.
After this I moved to mounting the transmission. This turned out to be really simple. Because I have built several jeeps in the past and had tons of spare parts I naturally had a 4.0 Jeep engine mount laying around to be used as a transmission mount for this A618. I made it as simple as I could.

I did all that in about 5 days after work. But now I needed some help to do the small things. So a friend named Justin R. helped me form up a transmission tunnel, just like a van. Sorry no pictures but here is how we did it:
1: Neatly folded a beach towel from the back seat of the explorer and laid it on the back of the engine and top of the transmission.
2: Covered the towel with poster board to give a good foundation, and finish covering the entire hole in the firewall.
3: Covered the entire poster board tunnel with masking tape to smooth out all the sharp edges and give it a flowing shape.
4: Call it a night cause that was a long process that actually really sucked.
5: Now we sprayed the entire tapped off area with a Teflon lubricant as a
redneck release agent.
6: Mixed up some fiberglass resin and placed the precut fiberglass strips we spent a whole 3.4 minutes planning and cutting.
7: Repeated the lay up like 7 times to give it a rigid structure and decent sound insulation.
8: Removed the rough tunnel and all the forming materials.
9: Trimmed away the excess and sprayed it with under coating on the engine side, for more sound insulation.
10: Paint and covered in Dynamat
I also fiberglassed the plastic panels around the wipers to prevent them from allowing water to drain. Since I cut a massive gap in the drain channel I didn’t want water coming in and soaking my feet.
We then worked on the rest of the stuff in random order. So I’ll just start with the dash. I built a steel frame out of 1x1 square tubing and welded it to the explorer. Then placed the pre-bent aluminum dash on it and trimmed the corners just a little bit to make it fit. If you look close you can see how far back the engine is.

Then laid out where I wanted to place all the factory controls that were on the stock dash. I put the headlight switch and dimmer in the stock-ish location to the left of the steering wheel.

Then cut a rectangle for the digital gauge cluster.

By this time I was tired of cutting holes so I stopped and another friend named Justin D. stopped by and wanted to help so he cut a steel frame for the DVD player and the hole in the dash to slide it into. Then Justin R. placed the rear defrost and rear wiper switch to the right of the steering wheel.

Right here it is really hard to see but Justin R. cut a tiny slot in the dash directly in front of the driver for a defroster vent. Which is supplied with air by a Mojave heater blowing through a 1955 Chevy truck defroster vent I found in the junk yard. I used it because stuff was actually made from metal back then and is was easier to adapt with a welder. Look at the reflection on the windshield.

And of course the finished dash.

Eventually I added the factory power outlet and the bass knob for the Memphis belle amp.
But I moved on to wiring the Dodge computer and into the factory Explorer wiring so everything works on the factory Explorer key switch. Obviously I left the steering column so I kept the stock multi-function switch and shifter. On the shifter I just welded the explorer cable bracket to the dodge bracket that was bolted to the transmission and done.
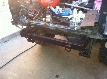
The cooling was addressed next. The radiator is a 33x19 chevy style aluminum radiator. Made a very simple bracket that actually ties the front back together, holds the radiator, serves as a mount for the transmission cooler and power steering cooler. If you look real close the intercooler was mounted horizontal under the frame rails mostly because that’s the only place it would fit.

In this picture you can see some of the intercooler piping. It actually runs through the header panel. I had a co-worker who is way more talented than me at bending pipe do this up and he made it look easy. Also the stock computer hole is used to run the vitals through to the gauges. And the stock dodge intake hose was used with a cone filter. And the 31 group battery was mounted by cutting out the inner fender and recessing the battery so it would fit under the hood. You can clearly see it in the fender well. This picture also shows how far forward the radiator sits. And if you look real close it still sports the cracked windshield in this pic.

Then I changed the turbo to a bigger HX40/T3 hybrid. Then put a 4200 RPM governor spring in the pump followed by the M5 fuel pin and adjusted the smoke screw to MAX. Later on I decided to turn the pump timing up and it wasn’t that bad to do in the Explorer.
After this I had to have a badass lift pump. So I went with an AirDog 150 for a GEN1. This way it comes with a fuel pickup tube. Which I had to have so I could run full ½ inch fuel lines from the tank. I just pulled out that funky green vent and used the supplied rubber gasket and done without any serious modifications. I pulled the pump off the stock sending unit because I needed 2 return ports. The normal return was used for the lift pump return and the original pressure line was used for the engine return. Look at this mess I had to rig up because I had a special engine with special quick connect fittings on the engine fuel rail. Ended up using LT1 fuel rail connectors and this junk pictured.


Now for the finishing up stuff because this is getting long:
The stock grille and bumper cover were modified but still used in their stock appearing form.
The entire explorer wiring harness was used so this means the seat belt reminder still dings.
The factory Ford power steering hose screwed right into the Dodge power steering pump.
I added a frame connector under the transmission pan to help with frame flex.
I used the stock explorer drive shaft and only changed the slip yoke from the Dodge.
Still sporting an already worn out 8.8 that seems to be tough enough for 20+ psi of boost.
The stock fuel sending unit works great.
The filler neck was beat out with a hammer and a chisel to allow for those strange oversized diesel nozzles.
The stereo is all vintage 2001 Pioneer top of the line DVD head unit, AVM9000R surround sound module, 6 disc CD changer, Old School Navigation unit (not hooked up cause I need a serial cable), Memphis belle, 3 Memphis HPO 10s, Boston Acoustic front component speakers, Memphis M-Class rear door speakers. All because it’s necessary to overcome the noise of a Cummins.
The Cummins already had a vacuum pump so the power brakes work. The windshield was replaced.
Gets 21 MPG because I drive it like my Mustang GT and it turned up.
EGT’s have never been over 989F.
Transmission Temp stays comfortably under 200F
The exhaust was extremely tight on the firewall (2.5 inch pipe had to be used) but opens up to 3inch then 4 inch out.
I put new shocks on it cause they were stock from 99.
Easy to work on.
Stops great considering the extra weight, but you have to remember it has 4 wheel disc breaks and it still is an SUV.
Has a great stance.
Handles better now than it ever has before even after we added a spacer under the sway bar for oil pan clearance.

I’m sure I left some stuff out but overall 2 young punks put this beast together in under 1 month of nights and weekends. All because we could and I didn’t feel like driving the Mustang ( that’s the honest truth).
And the best part I almost left out…. When it was drivable I realized I didn’t have any way to latch the hood so we bunggy corded that beast so we could drive it to the parts store and buy hood pins. If y’all look close there are no hood pins. Reason being, those super awesome black bunggies that always break, BROKE. The only reason this happened was because I didn’t listen to my brain and drive slow knowing the hood wasn’t latched. I’m 23 and used to driving a 150MPH Mustang and decided to see what the Explorer had right up until the hood went 12 o’clock and got all farked up. So I bought a new hood had it painted and made a bracket for the stock hood latch. Which would have been so much easier and cheaper to do the first time. Oh well I always have good stories.
And for those of you who like to argue….. Argue with this


And the final touch.... as I was cleaning up the shop I found this laying around and instead of thowing it away I made it fit.

 Thanks for reading this and now that I wrote it I'm not entirely sure I want to sell it.... but if someone has cash it will be gone.
Finally I have to thank a few people for thier help Justin R. (for helping with alomost everything), Justin D. ( for getting the radio put in), David P. ( for bending the intercooler piping), and Dennis M. (Need More Rod Shop painting the hood) Thanks
Jacob
I guess I’ll start with how this madness came about. I heard from some friends that a guy selling a low mileage 12 valve with a transmission for cheap. So I bought it and wasn’t entirely sure what I wanted to do with it, so it sat in my shop for about 8 months and finally I had a great idea. I wanted a 4 door ride; Only things I really cared about were straight body, clean interior and damn near free. I put the word out and came up with tons of really sharp 4 door trucks for like $5000+. Here is where the magic happens. I work at an auto shop so obviously I come across great deals every once in awhile. Some guy didn’t want to spend the money on putting an engine in a ‘99 Ford Explorer WHITE with tan interior and LOADED, this thing was show room quality with all the options, but it was a 4x4 and I had a 2wd transmission. Either way I was able to get it for $50. The deal was I was to make his check engine light and ABS light go away on his Ranger, took me like 1 hour and $50. About this time a friend of mine was about to put an engine in this blue explorer (2wd) but I offered to trade because it would make my life easier and I wouldn’t have to feel guilty for cutting up such a nice vehicle, and I’m a really nice person. The trade was final and I now had my platform.
I started by asking this friend to DRIVE it in the shop so we could tear it apart. It sat on the lift for about 2 days and we decided to drive it around some more and try to blow it up, 284319 miles and still running. So we gave up and tore it down cause winter was coming and I needed a new winter vehicle. This is when I set the deadline of 1 month til completion and here we go…..
Started by pulling the engine, transmission, front seats and the entire dash including all of the HVAC unit. Since my donor truck didn’t have A/C I wasn’t going to add it. While pulling the dash I managed to crack the windshield in 2 places where I was being lazy and using an electric impact with a swivel to get the bolts on top of the dash, the socket slipped and smashed the window, twice.
Then I decided it would be easier to remove everything between the fenders from the grille to the firewall. So I grabbed the trusty sawzal and had some fun cutting everything. With everything removed the project moved forward extremely fast. I started by sliding the engine in til it stopped, on the firewall of course. So I cut a little bit out at a time until I had a hole cut that was about 2.5 feet wide 1.5 into the tranny tunnel and from the bottom of the wiper linkage to the floor. I even had to clearance the bolt that holds the throttle pedal on because the hole needed to be so wide.
The awesome part to this was I was able to set the engine on the stock Explorer frame mounts. I slotted the hole on the passenger side to line up with a hole on the stock Cummins metal engine mount bracket. Then on the driver side I used the stock Cummins rubber mount and bolted it right to the stock Explorer frame mount. This put the back two cylinders in the cab. Exactly what I was after, this keeps the weight off the nose and still gives me room to put the radiator and fan up front. Note that this setup would make the engine sit offset to the passenger side; This was done on purpose because stock ford drive train is offset and if it were centered the drive shaft would had hit the fuel tank and not been in line with the rear axle. I then added a ¼ inch steel plate on the front of the drivers side of the engine to essentially solid mount it so it wouldn’t torque up into the hood.
After this I moved to mounting the transmission. This turned out to be really simple. Because I have built several jeeps in the past and had tons of spare parts I naturally had a 4.0 Jeep engine mount laying around to be used as a transmission mount for this A618. I made it as simple as I could.
I did all that in about 5 days after work. But now I needed some help to do the small things. So a friend named Justin R. helped me form up a transmission tunnel, just like a van. Sorry no pictures but here is how we did it:
1: Neatly folded a beach towel from the back seat of the explorer and laid it on the back of the engine and top of the transmission.
2: Covered the towel with poster board to give a good foundation, and finish covering the entire hole in the firewall.
3: Covered the entire poster board tunnel with masking tape to smooth out all the sharp edges and give it a flowing shape.
4: Call it a night cause that was a long process that actually really sucked.
5: Now we sprayed the entire tapped off area with a Teflon lubricant as a
redneck release agent.
6: Mixed up some fiberglass resin and placed the precut fiberglass strips we spent a whole 3.4 minutes planning and cutting.
7: Repeated the lay up like 7 times to give it a rigid structure and decent sound insulation.
8: Removed the rough tunnel and all the forming materials.
9: Trimmed away the excess and sprayed it with under coating on the engine side, for more sound insulation.
10: Paint and covered in Dynamat
I also fiberglassed the plastic panels around the wipers to prevent them from allowing water to drain. Since I cut a massive gap in the drain channel I didn’t want water coming in and soaking my feet.
We then worked on the rest of the stuff in random order. So I’ll just start with the dash. I built a steel frame out of 1x1 square tubing and welded it to the explorer. Then placed the pre-bent aluminum dash on it and trimmed the corners just a little bit to make it fit. If you look close you can see how far back the engine is.
Then laid out where I wanted to place all the factory controls that were on the stock dash. I put the headlight switch and dimmer in the stock-ish location to the left of the steering wheel.
Then cut a rectangle for the digital gauge cluster.
By this time I was tired of cutting holes so I stopped and another friend named Justin D. stopped by and wanted to help so he cut a steel frame for the DVD player and the hole in the dash to slide it into. Then Justin R. placed the rear defrost and rear wiper switch to the right of the steering wheel.
Right here it is really hard to see but Justin R. cut a tiny slot in the dash directly in front of the driver for a defroster vent. Which is supplied with air by a Mojave heater blowing through a 1955 Chevy truck defroster vent I found in the junk yard. I used it because stuff was actually made from metal back then and is was easier to adapt with a welder. Look at the reflection on the windshield.
And of course the finished dash.
Eventually I added the factory power outlet and the bass knob for the Memphis belle amp.
But I moved on to wiring the Dodge computer and into the factory Explorer wiring so everything works on the factory Explorer key switch. Obviously I left the steering column so I kept the stock multi-function switch and shifter. On the shifter I just welded the explorer cable bracket to the dodge bracket that was bolted to the transmission and done.
The cooling was addressed next. The radiator is a 33x19 chevy style aluminum radiator. Made a very simple bracket that actually ties the front back together, holds the radiator, serves as a mount for the transmission cooler and power steering cooler. If you look real close the intercooler was mounted horizontal under the frame rails mostly because that’s the only place it would fit.
In this picture you can see some of the intercooler piping. It actually runs through the header panel. I had a co-worker who is way more talented than me at bending pipe do this up and he made it look easy. Also the stock computer hole is used to run the vitals through to the gauges. And the stock dodge intake hose was used with a cone filter. And the 31 group battery was mounted by cutting out the inner fender and recessing the battery so it would fit under the hood. You can clearly see it in the fender well. This picture also shows how far forward the radiator sits. And if you look real close it still sports the cracked windshield in this pic.
Then I changed the turbo to a bigger HX40/T3 hybrid. Then put a 4200 RPM governor spring in the pump followed by the M5 fuel pin and adjusted the smoke screw to MAX. Later on I decided to turn the pump timing up and it wasn’t that bad to do in the Explorer.
After this I had to have a badass lift pump. So I went with an AirDog 150 for a GEN1. This way it comes with a fuel pickup tube. Which I had to have so I could run full ½ inch fuel lines from the tank. I just pulled out that funky green vent and used the supplied rubber gasket and done without any serious modifications. I pulled the pump off the stock sending unit because I needed 2 return ports. The normal return was used for the lift pump return and the original pressure line was used for the engine return. Look at this mess I had to rig up because I had a special engine with special quick connect fittings on the engine fuel rail. Ended up using LT1 fuel rail connectors and this junk pictured.
Now for the finishing up stuff because this is getting long:
The stock grille and bumper cover were modified but still used in their stock appearing form.
The entire explorer wiring harness was used so this means the seat belt reminder still dings.
The factory Ford power steering hose screwed right into the Dodge power steering pump.
I added a frame connector under the transmission pan to help with frame flex.
I used the stock explorer drive shaft and only changed the slip yoke from the Dodge.
Still sporting an already worn out 8.8 that seems to be tough enough for 20+ psi of boost.
The stock fuel sending unit works great.
The filler neck was beat out with a hammer and a chisel to allow for those strange oversized diesel nozzles.
The stereo is all vintage 2001 Pioneer top of the line DVD head unit, AVM9000R surround sound module, 6 disc CD changer, Old School Navigation unit (not hooked up cause I need a serial cable), Memphis belle, 3 Memphis HPO 10s, Boston Acoustic front component speakers, Memphis M-Class rear door speakers. All because it’s necessary to overcome the noise of a Cummins.
The Cummins already had a vacuum pump so the power brakes work. The windshield was replaced.
Gets 21 MPG because I drive it like my Mustang GT and it turned up.
EGT’s have never been over 989F.
Transmission Temp stays comfortably under 200F
The exhaust was extremely tight on the firewall (2.5 inch pipe had to be used) but opens up to 3inch then 4 inch out.
I put new shocks on it cause they were stock from 99.
Easy to work on.
Stops great considering the extra weight, but you have to remember it has 4 wheel disc breaks and it still is an SUV.
Has a great stance.
Handles better now than it ever has before even after we added a spacer under the sway bar for oil pan clearance.
I’m sure I left some stuff out but overall 2 young punks put this beast together in under 1 month of nights and weekends. All because we could and I didn’t feel like driving the Mustang ( that’s the honest truth).
And the best part I almost left out…. When it was drivable I realized I didn’t have any way to latch the hood so we bunggy corded that beast so we could drive it to the parts store and buy hood pins. If y’all look close there are no hood pins. Reason being, those super awesome black bunggies that always break, BROKE. The only reason this happened was because I didn’t listen to my brain and drive slow knowing the hood wasn’t latched. I’m 23 and used to driving a 150MPH Mustang and decided to see what the Explorer had right up until the hood went 12 o’clock and got all farked up. So I bought a new hood had it painted and made a bracket for the stock hood latch. Which would have been so much easier and cheaper to do the first time. Oh well I always have good stories.
And for those of you who like to argue….. Argue with this
And the final touch.... as I was cleaning up the shop I found this laying around and instead of thowing it away I made it fit.
Thanks for reading this and now that I wrote it I'm not entirely sure I want to sell it.... but if someone has cash it will be gone. Finally I have to thank a few people for thier help Justin R. (for helping with alomost everything), Justin D. ( for getting the radio put in), David P. ( for bending the intercooler piping), and Dennis M. (Need More Rod Shop painting the hood) Thanks
Jacob