trueblue02
Member
- Joined
- April 27, 2015
- Messages
- 31
- Reaction score
- 2
- Year, Model & Trim Level
- 1991 exploder
Hello Explorerforum!
Ive been learning to weld and wanted to put my skills to use on a project. I'm building a set of rock sliders as right now i just have the plastic cladding and the pinch welds already got damaged. I've decided to use 1-3/4" diameter .120" wall tubing for the sliders, and 3×2" angle iron for the frame attachments. These should be strong enough to support the vehicle, but not stronger than the frame itself. I'm not a hardcore rock crawler and would prefer these bend or break rather than twisting the frame of the truck.
First step is assembling the supplies and prepping the "patient":

All the tubing for the build, ended up needing 40' of tube and 4' of angle iron. I went with hot rolled ERW tube due to steel prices these days, the total bill ended up at $194. Cold rolled or DOM is the stronger option for the same weight, but would have been 3x the price.

Also picked up a new set of gloves and a couple pounds of TIG rod.

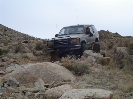
Our "patient". I picked up this explorer almost a year ago for $1500 and it's been a bit of a basket case but I've sorted out most of the issues. Also managed to find time to put in skyjacker springs, lift shackles, bilsteins and BFGs. After getting everything together I only had time to fit a few supports and mock up the tube placement.

This needs to come up higher but a clamp was in the way. Should have it mocked better later. More to come...
Ive been learning to weld and wanted to put my skills to use on a project. I'm building a set of rock sliders as right now i just have the plastic cladding and the pinch welds already got damaged. I've decided to use 1-3/4" diameter .120" wall tubing for the sliders, and 3×2" angle iron for the frame attachments. These should be strong enough to support the vehicle, but not stronger than the frame itself. I'm not a hardcore rock crawler and would prefer these bend or break rather than twisting the frame of the truck.
First step is assembling the supplies and prepping the "patient":
All the tubing for the build, ended up needing 40' of tube and 4' of angle iron. I went with hot rolled ERW tube due to steel prices these days, the total bill ended up at $194. Cold rolled or DOM is the stronger option for the same weight, but would have been 3x the price.
Also picked up a new set of gloves and a couple pounds of TIG rod.
Our "patient". I picked up this explorer almost a year ago for $1500 and it's been a bit of a basket case but I've sorted out most of the issues. Also managed to find time to put in skyjacker springs, lift shackles, bilsteins and BFGs. After getting everything together I only had time to fit a few supports and mock up the tube placement.
This needs to come up higher but a clamp was in the way. Should have it mocked better later. More to come...