- Joined
- July 5, 2003
- Messages
- 6,669
- Reaction score
- 63
- City, State
- Brockton, MA
- Year, Model & Trim Level
- '93 XLT 4x4
There are lots of threads on fixing a sagging door (some of which are noted below). This info is very informative and the basis for my write up.
http://www.explorerforum.com/forums/showthread.php?t=131385
http://www.explorerforum.com/forums/showthread.php?t=87414
http://www.explorerforum.com/forums/showthread.php?t=173707
http://www.explorerforum.com/forums/showthread.php?t=167719
http://www.explorerforum.com/forums/showthread.php?t=23287
http://www.explorerforum.com/forums/showthread.php?t=152911
http://www.explorerforum.com/forums/showthread.php?t=92798
http://www.explorerforum.com/forums/showthread.php?t=27570
Before I replaced my hinge pins I drove around with a very bad door sag. Because of the need to really slam the door to get it to close I ended up breaking/cracking the driver's side pull handle. Check out my Driver's inner door handle repair thread for info on fixing a cracked door handle pull for a few $ of plastic epoxy and fiberglass cloth.
After reading through all this info I tackled this job without removing the door and without removing the hinge to body bolts. The result is the door is rock solid and closes with one finger.. I no longer have to shut the door with my left hand pushing up on the door while my right hand slams the door shut..")
Here is a picture of the equipment used to perform the job.. Missing in the picture is a tie down strap used to support the door... The gray bottle is Anti-Seize used to lubricate the new Pin.

The infamous 38410 door Hinge pin & bushing kit

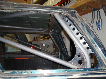
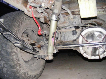
Firmly supporting the door.. Lots of threads indicate to support the door with a floor jack as pictured below. Unfortunately this isn't enough because once you remove a hinge the door is unstable and wants to flop around.. the solution is to also support the door with a Tie down strap as pictured below. The door glass is all the way down and the strap is wrapped around the top part of the door and to the overhead tree branch... The Jack is bearing 90%+ of the door's weight, while the Strap keeps it rock Steady.. I had ZERO fear of the door flopping around.

Use a permanent marker to outline the door hinge. This will save lots of time and aggravation trying to re-align the door after the bolts are removed.

Remove the two 13MM hinge to door bolts; leave the hinge to body bolts in place as they don't need to be removed for this repair

After the bolts are removed you can swing the hinge inward as pictured below. You can see the lower bushing is very worn on the lower right side. The upper side was even worse. Spay the pin with penetrating oil...

I used the Dremel rotary tool to score the upper OEM pin compression fitting/head . I then used the air hammer (with a chisel bit) to knock the head off Flush with the top of the hinge. I then drove the pin down as pictured below. The air hammer took maybe 10 secs to remove the fitting and under 10 secs to drive the pin down.

The air hammer shank was too big and only drove the pin down as far as pictured below (notice the worn right side of the pin).. I then used a regular drift and hammer to knock it all the way out. If the pin gets hard to drive out knock it side to side or even back up to free it up and continue.

Once the pin comes out you can remove the hinge and examine it up close. I then knocked out the upper and lower bushings.

I installed new bushings by manually tapping new ones in with a hammer. The narrow part of the bushings face inwards (it is the only part visible below); while the flange side (not pictured) face outwards. I then put some anti-seize on the pin and tapped it all the way up until it was completely seated. I then used a flat screwdriver to install the "E" clip. The hinge bolts were installed with attention payed to the alignment marks. I then repeated the entire procedure for the lower hinge. The result is the door is rock solid and closes with one finger.. I no longer have to shut the door with my left hand lifting up on the door while my right hand slams the door shut..

38438 Reference chart
Ford Explorer 1991-2001......Door Pin And Bushing Kit FRONT LOWER, FRONT UPPER
Ford Explorer 2000-2001......Door Pin And Bushing Kit FRONT LOWER, FRONT UPPER
Ford Explorer 2001..............Door Pin And Bushing Kit FRONT LOWER, FRONT UPPER
Ford Ranger 1993................Door Pin And Bushing Kit FRONT UPPER
Ford Ranger 1994-2006........Door Pin And Bushing Kit FRONT LOWER, FRONT UPPER
http://www.explorerforum.com/forums/showthread.php?t=131385
http://www.explorerforum.com/forums/showthread.php?t=87414
http://www.explorerforum.com/forums/showthread.php?t=173707
http://www.explorerforum.com/forums/showthread.php?t=167719
http://www.explorerforum.com/forums/showthread.php?t=23287
http://www.explorerforum.com/forums/showthread.php?t=152911
http://www.explorerforum.com/forums/showthread.php?t=92798
http://www.explorerforum.com/forums/showthread.php?t=27570
Before I replaced my hinge pins I drove around with a very bad door sag. Because of the need to really slam the door to get it to close I ended up breaking/cracking the driver's side pull handle. Check out my Driver's inner door handle repair thread for info on fixing a cracked door handle pull for a few $ of plastic epoxy and fiberglass cloth.
After reading through all this info I tackled this job without removing the door and without removing the hinge to body bolts. The result is the door is rock solid and closes with one finger.. I no longer have to shut the door with my left hand pushing up on the door while my right hand slams the door shut..
Here is a picture of the equipment used to perform the job.. Missing in the picture is a tie down strap used to support the door... The gray bottle is Anti-Seize used to lubricate the new Pin.
The infamous 38410 door Hinge pin & bushing kit
Firmly supporting the door.. Lots of threads indicate to support the door with a floor jack as pictured below. Unfortunately this isn't enough because once you remove a hinge the door is unstable and wants to flop around.. the solution is to also support the door with a Tie down strap as pictured below. The door glass is all the way down and the strap is wrapped around the top part of the door and to the overhead tree branch... The Jack is bearing 90%+ of the door's weight, while the Strap keeps it rock Steady.. I had ZERO fear of the door flopping around.
Use a permanent marker to outline the door hinge. This will save lots of time and aggravation trying to re-align the door after the bolts are removed.
Remove the two 13MM hinge to door bolts; leave the hinge to body bolts in place as they don't need to be removed for this repair
After the bolts are removed you can swing the hinge inward as pictured below. You can see the lower bushing is very worn on the lower right side. The upper side was even worse. Spay the pin with penetrating oil...
I used the Dremel rotary tool to score the upper OEM pin compression fitting/head . I then used the air hammer (with a chisel bit) to knock the head off Flush with the top of the hinge. I then drove the pin down as pictured below. The air hammer took maybe 10 secs to remove the fitting and under 10 secs to drive the pin down.
The air hammer shank was too big and only drove the pin down as far as pictured below (notice the worn right side of the pin).. I then used a regular drift and hammer to knock it all the way out. If the pin gets hard to drive out knock it side to side or even back up to free it up and continue.
Once the pin comes out you can remove the hinge and examine it up close. I then knocked out the upper and lower bushings.
I installed new bushings by manually tapping new ones in with a hammer. The narrow part of the bushings face inwards (it is the only part visible below); while the flange side (not pictured) face outwards. I then put some anti-seize on the pin and tapped it all the way up until it was completely seated. I then used a flat screwdriver to install the "E" clip. The hinge bolts were installed with attention payed to the alignment marks. I then repeated the entire procedure for the lower hinge. The result is the door is rock solid and closes with one finger.. I no longer have to shut the door with my left hand lifting up on the door while my right hand slams the door shut..
38438 Reference chart
Ford Explorer 1991-2001......Door Pin And Bushing Kit FRONT LOWER, FRONT UPPER
Ford Explorer 2000-2001......Door Pin And Bushing Kit FRONT LOWER, FRONT UPPER
Ford Explorer 2001..............Door Pin And Bushing Kit FRONT LOWER, FRONT UPPER
Ford Ranger 1993................Door Pin And Bushing Kit FRONT UPPER
Ford Ranger 1994-2006........Door Pin And Bushing Kit FRONT LOWER, FRONT UPPER