Double DIN conversion | Ford Explorer Forums - Serious Explorations

  • Register Today It's free!

Double DIN conversion

RustySJohnson

Well-Known Member
Joined
July 11, 2011
Messages
215
Reaction score
1
City, State
Indianapolis, Indiana
Year, Model & Trim Level
'94 Limited
Owning retro doesn't mean you have to settle with obsolete electronics, those of us loyal to the first gen's we are now dealing with a 20 year old (or more on the '91) technology. Media, safety, entertainment, and navigation can all be modernized and upgraded but your options are limited with a single DIN cutout on the first Gen's. I don't care for the flip out monitors due cost, lack of options, quality, fitment, and complexity. To expand your options of electronics choices, at this moment in time - my opinion go with double DIN.

This is the second one I've done, we'll call this Version 2. I didn't document the first one, I wasn't really into creating threads back then. It gives me a chance to correct the mistakes made on the first one, there were some flaws. I take the lessons learned from the first and try to correct it with the second. I'm still breaking new ground, but the first one wasn't bad.

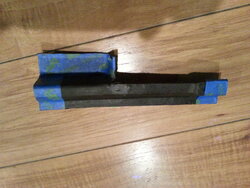
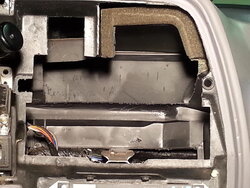
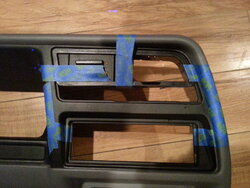
My goal is to make it look factory, keep the ducts and vents working, as well as the 4x4 button. Keep it smooth, crisp, and sturdy.

I didn't place this in the Electronics section because this isn't how to hook up a stereo or discuss any electrical aspects of this mod - double vs single DIN, hooking up a stereo is pretty much the same to me, I'm simply expanding the cutout in the dash and moving a few things around. If the Mod's on this forum want to move this, I'm good either way.

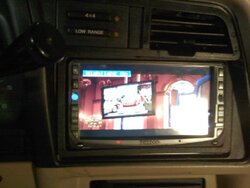
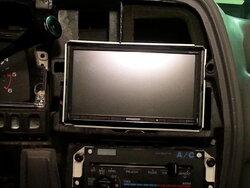
I'm not real familiar with any differences in sizes for each specific stereo manufacturer, for discussion purposes the stereo I'm using a Kenwood DDX770. I'm assuming most manufacturers stick to a common trade size, so hopefully whatever your brand preference is, this mod will work for you.

First pics are of the Version 1, just a little sneak peak.
 

Attachments

  • ExplorerDash1.jpg
    ExplorerDash1.jpg
    49.3 KB · Views: 1,353
  • ExplorerDash.jpg
    ExplorerDash.jpg
    43 KB · Views: 2,242


Join the Elite Explorers for $20 each year.
Elite Explorer members see no advertisements, no banner ads, no double underlined links,.
Add an avatar, upload photo attachments, and more!
.


Basic tools to get started

The lions share of the work is done with the hacksaw. The tape measure didn't get much use, most of it is eyballed. T20 Torx head screwdriver is a must. Blue tape helps me mark were to cut and aides with the pictures. Heavy duty scissors, sharp knife, and black tape will get their share of use. A file will help, but I haven't used one up to now.

There will be some adhesives and other fabricating materials and media, I'll edit this post later on.
 

Attachments

  • 20131230_120948.jpg
    20131230_120948.jpg
    84.7 KB · Views: 1,101


Can't wait to see how the second one comes out. I've got one in my super duty, and have wanted to put one in the Explorer, but like you, I want it to look like it belongs... Not some hack job. It'll be interesting to see how you fit everything in there.


Let's start cutting

Be prepared to cut your hands up, lots of sharp edges.
 

Attachments

  • 20131229_164218.jpg
    20131229_164218.jpg
    68 KB · Views: 1,064
  • 20131229_161223.jpg
    20131229_161223.jpg
    73.3 KB · Views: 1,111
  • 20131230_111246.jpg
    20131230_111246.jpg
    72.5 KB · Views: 1,027
  • 20131229_160549.jpg
    20131229_160549.jpg
    74.4 KB · Views: 1,023


..and more cutting.

Only the hack saw was used for all of this. No power tools or knife yet.
 

Attachments

  • 20131229_165426.jpg
    20131229_165426.jpg
    71.1 KB · Views: 1,060
  • 20131229_180146.jpg
    20131229_180146.jpg
    75.8 KB · Views: 1,032
  • 20131230_104526.jpg
    20131230_104526.jpg
    63 KB · Views: 1,051
  • 20131229_180327.jpg
    20131229_180327.jpg
    68.3 KB · Views: 1,007


Sealing the vent.

Using any plastic tub, storage box, or food container, fabricate a piece to seal off the vent space and create the chamber for the stereo. A container with square edges and no concave/convex curves are ideal. Word to the wise, don't let your significant other know you're about to cut up one their storage containers.

I didn't get the vent pipe cutout right the first try, there were several test fits with the stereo mounting bracket in place and cut/trimmed small pieces from the vent pipe - KEEP THESE. I taped the small bits back to the main cutout and used the remainders of the vent pipe to mark the container. I used scissors for the main parts and trimmed the finer pieces with the knife.

I removed the climate control so I could feel behind from underneath with my fingers with the stereo in place and make sure there's ample space in the rear so the stereo cooling fan has room to breathe. I ended up taking an additional 3/4" off the vent pipe to allow additional stereo cooling fan space.
 

Attachments

  • 20131230_104556.jpg
    20131230_104556.jpg
    66.7 KB · Views: 966
  • 20131230_104414.jpg
    20131230_104414.jpg
    77.2 KB · Views: 975
  • 20131229_180327.jpg
    20131229_180327.jpg
    68.3 KB · Views: 960
  • 20140101_223614.jpg
    20140101_223614.jpg
    48.4 KB · Views: 982
  • 20131230_103833.jpg
    20131230_103833.jpg
    70.1 KB · Views: 997
  • 20131229_180913.jpg
    20131229_180913.jpg
    57.4 KB · Views: 1,118


The easy part's done

Time to start fabbing the dash trim. I used pieces of the cutouts to fabricate the edges. I created the molds out of card stock, balsa wood, and blue tape. I poured bondo-glass. This is a very tedious and intricate process. It takes hours upon hours to get it right.
 

Attachments

  • 20131230_163101.jpg
    20131230_163101.jpg
    73.2 KB · Views: 1,014
  • 20131230_194230.jpg
    20131230_194230.jpg
    47.5 KB · Views: 1,158
  • 20131230_215243.jpg
    20131230_215243.jpg
    66.2 KB · Views: 994
  • 20140101_170655.jpg
    20140101_170655.jpg
    66.2 KB · Views: 974
  • 20140101_170644.jpg
    20140101_170644.jpg
    63.8 KB · Views: 999
  • 20140101_170739.jpg
    20140101_170739.jpg
    66.6 KB · Views: 1,009


Sand, bondo, sand, bondo

I've got somewhere around 24 hours in getting it to this point. Still rough, It's got to be perfect, because every flaw will be highly noticeable so close to your view.

Time to get started on the vents. Fortunately, I kept the dash trim and vents from the green Explorer to use as a model. It's a bit flimsy and was in an accident, so I'll have to redo it.
 

Attachments

  • 20140101_223938.jpg
    20140101_223938.jpg
    72.1 KB · Views: 1,296
  • 20131230_104341.jpg
    20131230_104341.jpg
    76.8 KB · Views: 1,024
  • 20131230_111104.jpg
    20131230_111104.jpg
    55.2 KB · Views: 1,141


Back
Top