f1explorer
New Member
- Joined
- July 24, 2010
- Messages
- 9
- Reaction score
- 3
- City, State
- Asheville, NC
- Year, Model & Trim Level
- 96 exp
So, I have been lurking for a while on the forum, been reading and using everyone's knowlege, so I figured I would give some back. First, some background...
I bought a 1996 Explorer 5.0 2wd, 124k miles. It came from around Temecula California, for those of you that dont know thats in the desert, lots of dust and fine sand. So the guy said it runs fine, never had a problem with it... uh huh... So I bought it and 10 minutes down the interstate the check engine light came on.... and I have to smog it to get it registered... great...
So, borrowed a scanner, code is P0446 - EVAP Canister Purge Valve Open
After some research, on Explorer Forum, I came to the option of cleaning the purge valve... and couldnt find any pictures or threads on doing it... So, I keep getting temp passes and put off fixing it for another 2 months ...
Finally I get around to doing it, and here are some pictures for those of you who want to try it...

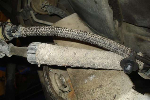
This is what you see if you drop the spare tire and look up... there are three bolts to take it off, two vapor lines and one electrical connection... BE CAREFUL WITH THE ELEC. CONNECTION! I snapped one of the clips off because I got impatient...

So, to remove the vapor lines i used these Harbor Freight line tools, they are really cheap and you will be surprised how often they come in handy! They are used for most fuel, transmission, power steering, ect. in late model vehicles... Make sure to use some masking tape and mark which one goes where, if you get these two lines switched you will probably throw some more codes...

Canister looks like this, twist to get the circular clip around the valve out of the bracket, and slowly apply pressure from the bottom to take the valve and connectors off of the canister.

And here is the removed valve...

Look how much dirt is inside! No wonder the valve was stuck open...

So, you slowly take a small screwdriver and go side to side and pry the cover off the large end on the valve, this is the intake side, and you can see mine was covered...
Take Carb cleaner, because it evaporates quickly and breaks down all the gunk, and start spraying. There was a lot of gunk in mine, as you can see here...

Now look down into the canister you pulled the valve out of if it looks like this, spray into it with the carb cleaner as well...

Wait for everything to dry (about a minute) reassemble, and clear the code with a scan tool... Go for a drive and see if you fixed it. The drive cycle that test's the EVAP system is 15-20 minutes of driving between 45 and 65 mph. So go an a nice cruise down the interstate and back to see it the light stays off. If it does, congradulations! If not, you can put some voltage to the valve and see if it is functioning, or start tracing the wire off of it down the framerail to make sure it isn't broken... and search the forum for more answers, this place is awesome!
Total time, including the 20 minute drive, was one hour... If I had known it was that simple, I wouldn't have put it off so long!
I bought a 1996 Explorer 5.0 2wd, 124k miles. It came from around Temecula California, for those of you that dont know thats in the desert, lots of dust and fine sand. So the guy said it runs fine, never had a problem with it...
uh huh... So I bought it and 10 minutes down the interstate the check engine light came on.... and I have to smog it to get it registered... great...So, borrowed a scanner, code is P0446 - EVAP Canister Purge Valve Open
After some research, on Explorer Forum, I came to the option of cleaning the purge valve... and couldnt find any pictures or threads on doing it... So, I keep getting temp passes and put off fixing it for another 2 months
...Finally I get around to doing it, and here are some pictures for those of you who want to try it...
This is what you see if you drop the spare tire and look up... there are three bolts to take it off, two vapor lines and one electrical connection... BE CAREFUL WITH THE ELEC. CONNECTION! I snapped one of the clips off because I got impatient...
So, to remove the vapor lines i used these Harbor Freight line tools, they are really cheap and you will be surprised how often they come in handy! They are used for most fuel, transmission, power steering, ect. in late model vehicles... Make sure to use some masking tape and mark which one goes where, if you get these two lines switched you will probably throw some more codes...
Canister looks like this, twist to get the circular clip around the valve out of the bracket, and slowly apply pressure from the bottom to take the valve and connectors off of the canister.
And here is the removed valve...
Look how much dirt is inside! No wonder the valve was stuck open...
So, you slowly take a small screwdriver and go side to side and pry the cover off the large end on the valve, this is the intake side, and you can see mine was covered...
Take Carb cleaner, because it evaporates quickly and breaks down all the gunk, and start spraying. There was a lot of gunk in mine, as you can see here...
Now look down into the canister you pulled the valve out of if it looks like this, spray into it with the carb cleaner as well...
Wait for everything to dry (about a minute) reassemble, and clear the code with a scan tool... Go for a drive and see if you fixed it. The drive cycle that test's the EVAP system is 15-20 minutes of driving between 45 and 65 mph. So go an a nice cruise down the interstate and back to see it the light stays off. If it does, congradulations! If not, you can put some voltage to the valve and see if it is functioning, or start tracing the wire off of it down the framerail to make sure it isn't broken... and search the forum for more answers, this place is awesome!
Total time, including the 20 minute drive, was one hour... If I had known it was that simple, I wouldn't have put it off so long!