FAKRWEE Navajo 44 swap | Page 11 | Ford Explorer Forums - Serious Explorations

  • Register Today It's free!

FAKRWEE Navajo 44 swap

My new front end got in today. It's a custom Dynatrac 44 front axle assembly.

List of goodies include:
Reverse cut housing upgrade
Warn premium manual locking hub set
30 spline 3/4 ton alloy steel axles
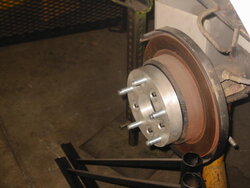
Upgraded Disc brake Ass. 5.5.5
Ford coil spring bracketry
5:13 gears-reverse cut
ARB 3.92+ ver.
1310 dana 44 u-bolt style yoke
Heavy duty ends package
Heavy duty steel dif. cover
High clearance steering package
Width= 62 in.

I saved my pennies for quite awhile to be able to afford it but she's a beauty. I almost feel like not installing it.

I hope the pictures come out my battery started going dead.

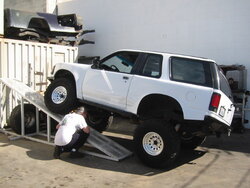
The installer is fourxDr. in Burbank and Winter's designing the radius arms. We know they will be wristed but will not have pin's like bc broncos. I'll include pictures as we go along. Today they took apart the front end. I'm hoping the job will take about a month.:bounce:
 

Attachments

  • left side 1.jpg
    left side 1.jpg
    97.1 KB · Views: 1,973


Join the Elite Explorers for $20 each year.
Elite Explorer members see no advertisements, no banner ads, no double underlined links,.
Add an avatar, upload photo attachments, and more!
.


driver side hoop & trac bar mounts.
 

Attachments

  • 21-dr. side hoop & trac bar brk..jpg
    21-dr. side hoop & trac bar brk..jpg
    59.9 KB · Views: 468


Join the Elite Explorers for $20 each year.
Elite Explorer members see no advertisements, no banner ads, no double underlined links,.
Add an avatar, upload photo attachments, and more!
.


Passenger side hoop and inner fender. The battery bracket on the fender is the white mark. We'll be moving the battery frame higher and cutting out most of the black metal inner fender.
 

Attachments

  • 22-pass. side inner fender.jpg
    22-pass. side inner fender.jpg
    58.2 KB · Views: 459


Close up of what we're cutting out. This should give us about 3' more of stuff maybe more.
 

Attachments

  • 23-closeup of cutting out.jpg
    23-closeup of cutting out.jpg
    54.8 KB · Views: 453


View of what we're cutting out and the driver side and rewireing that has to be done.
 

Attachments

  • 23-dr. side cutting and rewire.jpg
    23-dr. side cutting and rewire.jpg
    67.4 KB · Views: 446


Hoop cross member.One of the problems with the cross member was that it had to be welded. This would be a problem if you had to work on the engine. The solution was a bunge connector. Look closely and you can see a sleeve at the end of the bar. This is not the final bar. The final will be chromoly. I'll show a close
up of the bunge connector and how it works in the next pic.
 

Attachments

  • 24-cross member and bunge.jpg
    24-cross member and bunge.jpg
    54.8 KB · Views: 438


This is the bunge connector. It permits you to weld one side of the bar and connect it to the other piece but permits you to take it apart by unscrewing some allen bolts.
 

Attachments

  • 25-close-up bunge.jpg
    25-close-up bunge.jpg
    39.9 KB · Views: 423


We used the same system on the tranny cross member and every other place we might need removing.
 

Attachments

  • 26-tranny cross member bunge.jpg
    26-tranny cross member bunge.jpg
    61.7 KB · Views: 434


We also tucked up the Atlas T-Case higher.
 

Attachments

  • 27-tucked up atlas t-case.jpg
    27-tucked up atlas t-case.jpg
    54.1 KB · Views: 431


Made a skid plate with drainage.
 

Attachments

  • 28-skid plate off.jpg
    28-skid plate off.jpg
    42.2 KB · Views: 431


And it bolts right on.
 

Attachments

  • 29-skid plate installed.jpg
    29-skid plate installed.jpg
    58.8 KB · Views: 426


Protecting T-Case.
 

Attachments

  • 30-protecting t-case skid p..jpg
    30-protecting t-case skid p..jpg
    56.8 KB · Views: 418


View of upper link dog leg and bracket. We were able to make link longer.
 

Attachments

  • 31-upper link & brkt..jpg
    31-upper link & brkt..jpg
    59 KB · Views: 421


Better view dog leg.
 

Attachments

  • 32-better view dog leg.jpg
    32-better view dog leg.jpg
    61.2 KB · Views: 416


We're going to have to re-route the exhaust.
 

Attachments

  • 33-rerout exhaust.jpg
    33-rerout exhaust.jpg
    54.7 KB · Views: 406


Rear spacers. 1 1/2'
 

Attachments

  • 34-rear spacers.jpg
    34-rear spacers.jpg
    38.5 KB · Views: 408


Hope you guy's enjoy and be free to make any comments on how to improve the setup or questions. As to pricing I don't have the final numbers yet. (Maybe I don't want to know.):rolleyes: I'll know when all is finished and I tally up. Can't wait for T-Haven in Jan. and see what she can do.:D


Um.... dat was alot of pics! looks good...

So like, ya ever gonna get this thing back? When is the eta? :p


Lookin' great Tom! I was anticipating the latest round of photos and they didn't disappoint:D:thumbsup:


Thanks guy's. I should have it back before the X-mas vacations. I want to do T-Haven in Jan. and ARIZONA in March to celebrate a couple of B-days.:D


Join the Elite Explorers for $20 each year.
Elite Explorer members see no advertisements, no banner ads, no double underlined links,.
Add an avatar, upload photo attachments, and more!
.


Poop, Thats the coolest thing I've ever seen. That is way cooler than Ricks- Sorry rick! I love it. I want to see some action shots! Keep us posted.


Back
Top