-
Performance Upgrades - Maintenance - Modifications - Problem Solving - Off-Road - Street Trucks.
Covering the Explorer, ST, Sport, Lincoln Aviator, Sport Trac,
Mercury Mountaineer, Mazda Navajo, Ford Ranger, Mazda Pickups, and the Aerostar.
Featuring H.I. - Human Intelligence.
Register Today It's free!
- Forums
- Generation Specific Forums
- 1991 - 1994 Explorer Ranger Navajo 1st Generation
- Stock 1991 - 1994 Explorers
You are using an out of date browser. It may not display this or other websites correctly.
You should upgrade or use an alternative browser.
You should upgrade or use an alternative browser.
Going to look at a 94 Explorer today, your opinions please!
- Thread starter JeffNJ94Explorer
- Start date
Elite Explorer members see no advertisements, no banner ads, no double underlined links,.
Add an avatar, upload photo attachments, and more!.
JeffNJ94Explorer
Active Member
- Joined
- October 29, 2006
- Messages
- 50
- Reaction score
- 0
- City, State
- Middlesex, NJ
- Year, Model & Trim Level
- 94 Explorer 5MT
Thanks guys, I couldn't get them dowm to $1000, they were tough ") , we split the difference at $1100.
, we split the difference at $1100.
You think i should weld up the ones i have or just buy a good used set?
Any thats not rust! lol, the truck is actully pretty damn rust free for around here, no body rot, the floors and frame look good too. Ive seen plently of them that have no rockers left!
, we split the difference at $1100. You think i should weld up the ones i have or just buy a good used set?
Any thats not rust! lol, the truck is actully pretty damn rust free for around here, no body rot, the floors and frame look good too. Ive seen plently of them that have no rockers left!
unpredictable1
Well-Known Member
- Joined
- July 16, 2001
- Messages
- 738
- Reaction score
- 1
- City, State
- AB, Canada
- Year, Model & Trim Level
- 01 blazer lt
Nice find!!
Do yourself a favour and upgrade to a polyurethane radius arm bushing (I have energy suspension)
If you can turn your own wrenches this is not a hard job. Congrats on the 1st gen!!!
Do yourself a favour and upgrade to a polyurethane radius arm bushing (I have energy suspension)
If you can turn your own wrenches this is not a hard job. Congrats on the 1st gen!!!
- Joined
- August 3, 2000
- Messages
- 31,627
- Reaction score
- 8,271
- City, State
- NORTH IDAHO, 7B
- Year, Model & Trim Level
- B2 "Slightly" Modified
- Callsign
- FOURTEN
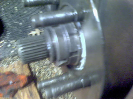
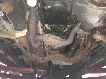
WELD EM UP, Its hard to tell if they are completely shot from those pics since the radius arm is hanging down low int he hole, but I dont suspect they are in good shape with the bushings that far gone (completely missing!)
Welding the hole closed a bit and then shaping with a file, grinder, etc witht he new bushings will be good enough, as long as you have access to a welder, or shop who can help.
nice truck! looks in great shape for a 94
Welding the hole closed a bit and then shaping with a file, grinder, etc witht he new bushings will be good enough, as long as you have access to a welder, or shop who can help.
nice truck! looks in great shape for a 94
ma96782
Explorer Addict
- Joined
- January 21, 2006
- Messages
- 1,122
- Reaction score
- 4
- City, State
- Vancouver, WA
- Year, Model & Trim Level
- '94 XLT, 4dr
It might just be the rubber that goes in to the metal has broken off and caused the bushing to sag...cross your fingers.
Anyway to change the RABs:
There are many other threads to fix the other problems......SEARCH FIRST......and start a new thread for the problems (when you can't find answer).
Congrats.......on your new purchase.......it looks good.......and $1100.....what a deal.
Aloha, Mark
Anyway to change the RABs:
http://www.explorerforum.com/forums...ius+arm+bushing
________________________________
http://www.partsamerica.com/Product...R1&mfrpartnumber=SHB1495K&parttype=76&ptset=A
_________________________________
http://www.explorerforum.com/forums/showthread.php?t=49028&highlight=radius+arms+install
_________________________________
From the Singleton site, and where I got my first info a couple years ago...
"I would suggest purchasing the GRADE 8 bolts prior to taking the part off, since you might have a little trouble finding them. You will need 4 bolts, I bought 4 bolts, 8 washers, and 4 nuts (all grade 8) for about $3.55 at my local NAPA store. I bought them all the same size (about 7/16" diameter with size 14 threads work perfectly). Get 3 bolts about 1 1/4" long, and 1 about 3/4" long. This is VERY IMPORTANT and will save you much grief. I bought them all the same size (1 1/4") and it caused me an extra hour and a half work.
The procedure:
First, jack up the car and place it firmly on jack stands. You will NEED the jack stands, because the passenger side is difficult to remove with the jack holding the car by the suspension. The weight of the car puts enormous pressure on that radius arm. I put the jack stand in the center of the car, and jacked the car up at the big end of the radius arm.
First, remove the two bolts holding the radius arm bracket to the frame of the car. They are pointing toward the ground.
Next, remove the 4 bolts holding the center of the two brackets together.
On the driver's side, you will also need to remove the fuel filter, contained in the frame of the car. Do this by removing the two nuts holding the bracket in place.
To remove the two rivets, (they are horizontal) I used a Dremel motor-tool with a cutting "blade" on the end (like the one they use in the commercial to cut the nail). Make sure you have several, I chewed up about 4, and I only had rivets on one side (the driver's side). If you have rivets on both sides you will need at least double that many. Remember this is VERY HARD STEEL. I cut several slots in the head of the rivet, to remove most of the material. Then I used an air chisel to remove the rest of the head of the bolt, and a steel punch to knock the rest of rivet out. This will be by far the hardest part of replacing the radius arm bushings.
Next, remove the large nut at the end of the radius arm. I used a huge adjustable wrench to remove it. Remove the nut and NOTICE THE WAY THE PARTS FIT TOGETHER. This is important. The bracket should be removed.
Remove the old bushing, and put the new one on the same way. Don't forget the heat shield on the passenger side, it protects the rubber bushing from the heat of the cat. converter next to it.
Replace the bracket, and put your new grade 8 bolts in place of the rivets. On the driver's side, use the SHORT bolt in the front, or you will have difficulty replacing the fuel filter bracket. I didn't use a short bolt, and had to cut a slot in the bracket."
I found that Pep Boys had grade 8 bolts in the appropriate sizes. A note, the passenger side can all be longer bolts.
_______________________________________________________________
You'll need a 28 mm 6 point deep socket (not commonly available) for the radius arm nut. I got mine from KD Tools. http://www.kd-tools.com/
And what Glacier991 posted above, from the Singleton site, is excellent information...
__________________
Anyone know what to torque the large radius arm nut to when tightening?
The Moog set I bought the other day said to torque to 100 lbs, but the Chilton says to torque to 113, so somewhere in that area.
_________________
Center punch the middle of round rivet head so your drill bit won't wander off on you, and then using like a 3/16's bit, drill down into the head of the rivet, deep enough to get the the shaft of the rivet. Change to a larger size bit and repeat. Go up in size until you have drilled thru the head down to the shaft. Next take a punch (an air chisel with a punch is ideal) and bash out the rivet from the side you just drilled. When you reassemble replace the rivets with GRADE 8 (!!) 1" bolts. GRADE 8 is IMPORTANT!
___________________
Pictures of the process can be found at http://home.att.net/~metjt/wsb/index.html. I know they are a bit large but at least you can get good close ups.
____________________
Don't grind them! Just get two drill bits, one 3/8" and one 7/16". Cobalt bits work really nice for this job, since they can drill through most hard metals. You'll have to loosen the plastic wheel wells to get good access to the front rivets on each side. The rivets towards the back are a little trickier to drill straight through because of the cabin mount bolts in the way, but you can still get to them.
Use a center punch to make a starter point for drilling, unless you've got a steady hand. Drill a starter hole with the 3/8" bit. Drill about 1/3 to halfway through. Then use the 7/16" bit to continue drilling, and drill to the same point that you drilled with the smaller bit. By this time, the head of the rivet should be just about gone, except for the outer edges.
Use a cold chisel to knock off the rest of the head. You may get lucky and the head might just pop off during drilling. That's what happened with one of my rivets. After you loosen the rest of the bolts holding the bracket on, you should be able to take a crow bar and break the bracket lose. Then you can use a cold punch or your chisel to pound the rest of the rivet out.
I replaced the passenger side first, because that one was obviously worn; I could wrap my thumb and forefinger around it and twist it a little back and forth. I'm no bushing expert, but I believe those things are supposed to be tight. When I removed the old bushing, I noticed that the about 1/3 of the stem was gone, right where the RA spindle had put pressure against the bracket and chewed it away. I replaced it with a polyurethane bushing, and I doubled up on the dish (or cup) washers near the shoulder of the spindle (thank you Conyl Horn and Brad Martin!) The driver's side was fine, but I replaced it anyway, to make things even. It only took me about three hours to do the driver's side, once I had my system down, and that included loosening the fuel filter bracket and the parking brake cable, and no air ratchet or impact wrench (although that wouldv'e been nice). So, the total time to complete the job should probably take five to six hours tops. And what a difference in the handling! My wife even noticed the difference just riding shotgun.
___________________________________________________________
I've DOne This On Both My Trucks, A 91' XLT and A 93' XLT.
Depending On The Condition Of Your Suspension (rusty bolts...etc), You Might Wanna Take It To a Mechanic. It's Only Like 100.00 For Them To Do It And Saves The Hassle And Headache. Alot Of The Nuts Are Hard As Hell To Get Off On The Axle Side. Which Is The Recommended Way To Do It By Ford.
WAY ONE
You Need To Disconnect The Springs And Stud Bolts From The Axle On A 4WD. Remove The Control Arm From The Axle. Remove The Shock, Which Is All A PITA. Then Remove The Two Large Nuts On The End And Pull It Through.
WAY TWO
If You Go For The Removal Of The Crossmember, There Should Be Two Rivets On Either Side Of The Crossmember, If You See Them, It's Never Been Removed. If There Are 4-5 Bolts With Nuts On Either Side, It's Been Changed. You Can Drill The Out Or Sawzall Them, But Mark The crossmember Placement Before You Start. Just Replace The Rivets With Strong Bolts Of M10 Or Higher To Be Safe.
The Two Big Bolts, At The End Or The Arms, Which Are Normally 1 1/8 socket Size, Need To Be Removed No Matter What. And There Is A Heat Cover Over The Passenger Side's Bushings Due To Heat From The Cat. Make Sure That Shield Goes Back On. In My Experience The Axle Studs And Spring Bracket Nut Are Same Size. You Can Get The Bushing Sets For Around 10.00 a piece At Most Autoparts Stores. If You Remove The Crossmember, It's Easiest.
There are many other threads to fix the other problems......SEARCH FIRST......and start a new thread for the problems (when you can't find answer).
Congrats.......on your new purchase.......it looks good.......and $1100.....what a deal.
Aloha, Mark
- Joined
- August 3, 2000
- Messages
- 31,627
- Reaction score
- 8,271
- City, State
- NORTH IDAHO, 7B
- Year, Model & Trim Level
- B2 "Slightly" Modified
- Callsign
- FOURTEN
Good luck getting a drill in front of all those rivits, again I suggest a disc grinder, much easier to get in there between the frame and body
I have used a torch, a drill, air hammer, and found the grinder makes short work of those suckers, its the easiest to fit in there and works fast.
Electric or pneumatic, you choose
I have used a torch, a drill, air hammer, and found the grinder makes short work of those suckers, its the easiest to fit in there and works fast.
Electric or pneumatic, you choose
JeffNJ94Explorer
Active Member
- Joined
- October 29, 2006
- Messages
- 50
- Reaction score
- 0
- City, State
- Middlesex, NJ
- Year, Model & Trim Level
- 94 Explorer 5MT
Cool, thanks for the ideas. Hey If i put a lift kit on it, would it come with new radius arm and drop brackets? Just a pipe dream..... maybe
- Joined
- August 3, 2000
- Messages
- 31,627
- Reaction score
- 8,271
- City, State
- NORTH IDAHO, 7B
- Year, Model & Trim Level
- B2 "Slightly" Modified
- Callsign
- FOURTEN
no
a lift kit would come with brackets that drop your existing OEM bracket by spacing it away from the frame
extended radius arms would come with a whole new everything
a lift kit would come with brackets that drop your existing OEM bracket by spacing it away from the frame
extended radius arms would come with a whole new everything
daisyrock
New Member
- Joined
- November 1, 2006
- Messages
- 6
- Reaction score
- 0
- City, State
- North Carolina
- Year, Model & Trim Level
- 93 EB, 94 XLT
Hi, I went through the same senario as you did three weeks ago. I had the same fuel smell problem and found out the tiny neck sticking out where the fuel line connect was squirting out fuel constantly because of a rusted pin hole. Take care of that first. It took me four hours to complete the job, hardest part is removing the heavy tank shield.
unpredictable1
Well-Known Member
- Joined
- July 16, 2001
- Messages
- 738
- Reaction score
- 1
- City, State
- AB, Canada
- Year, Model & Trim Level
- 01 blazer lt
Holy resurrection batman!
Featured images


Featured images
Similar Threads
- Replies
- 1
- Views
- 911
- Replies
- 12
- Views
- 1,135
- Replies
- 8
- Views
- 988