Greg_DonWindsor
Elite Explorer
- Joined
- February 25, 2007
- Messages
- 384
- Reaction score
- 77
- City, State
- Calgary, Alberta
- Year, Model & Trim Level
- 2008 Limited V8 4x4
Hey guys,
since I had so much trouble getting this HID foglight installation to work, dealing with several bulb and kit compatibility issues, and after having searched several threads on the topic, I decided to document my own experience due to all the hurdles I encountered, just in case anyone ever runs into similar trouble trying to pull this off.
Thanks to the wisdom of several board members, I realized that the 6000k HID H3 foglight conversion kit I got had the wrong type of male connector (the connector on the HID harness that goes to the stock foglight connector), I gathered the materials I'd need to make the installation work. It should also be noted that I swapped out the H3 type bulb for a type 9006, as the plastic flange at the base of the bulb fit the foglight socket properly. In another thread I found while searching, I found some other members had experienced trouble twisting the bulb due to the filament preventing twisting and locking it in place. I used the method of applying silicone to seal the bulb into the socket once it was in place.
You will need:
An electrical multimeter capable of reading 12V DC
Rosin core solder
A soldering iron
Electrical tape
A sharp utility knife
Wire clippers
Clear silicone
Zip ties
Paint marker
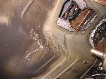
Before removing the stock foglight connectors from the truck, I sanded a small spot on the frame to use as a ground, and used the multimeter to test both prongs of the stock connector to determine which one was the (+), or "hot" wire. (It is important to note that the fog lights must be switched to "on" on the dash in order for this test to work. So if your truck has automatic lights, which only come on when they sense that it's dark out, remember to switch your lights to the "on" position so that you get a proper reading on the multimeter.) I marked the side of the connector with the (+) wire with a paint marker, so that I wouldn't lose track once I clipped the end off. The connector on the ballast that was to be removed had appropriately coloured red and black wires. Pictured below is the ballast and harness placed next to each other in the way that the connection will be spliced:

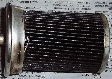
This is a close up of the connection , where the stock foglight connector does not properly match up with the corresponding connector on the HID wiring harness.

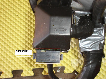
The picture below shows which end of the stock connector to remove. I also removed a small amount of the protective plastic wire loom, in order to place another yellow mark on the positive lead, so I didn't lose track once I clipped the end off.

I also clipped off the connector on the other half of the connection, and then soldered the (+) wire to the red lead, (-) wire to the black lead.

Then I sealed everything up with electrical tape, as I did not have any heat shrink tubes, which would also have worked.

I took everything outside, and connected the stock explorer foglight connector back into the truck, leaving the bulbs hang underneath the front bumper so I could start the truck and ensure everything was wired in correctly before I placed them in the foglight socket.

Having confirmed everything was wired properly, I installed the bulbs into the housing. I then hung that ballasts in a nearby location and secured them in place with zip ties, for now. I applied silicone around the bulb socket to ensure they would be watertight, and to prevent the bulbs from falling out, as mentioned before due to the construction of HID bulbs, it can be difficult or not possible to rotate them clockwise such that they lock perfectly in place. The solution of using a watertight adhesive is just one possibility. Of course it would have to be cut off with a razor for a future bulb change. It just seemed like the easiest and quickest solution for me. Besides, HID bulbs have a long life and it is only a minor annoyance for greater visibility! Below is a picture of the final result

since I had so much trouble getting this HID foglight installation to work, dealing with several bulb and kit compatibility issues, and after having searched several threads on the topic, I decided to document my own experience due to all the hurdles I encountered, just in case anyone ever runs into similar trouble trying to pull this off.
Thanks to the wisdom of several board members, I realized that the 6000k HID H3 foglight conversion kit I got had the wrong type of male connector (the connector on the HID harness that goes to the stock foglight connector), I gathered the materials I'd need to make the installation work. It should also be noted that I swapped out the H3 type bulb for a type 9006, as the plastic flange at the base of the bulb fit the foglight socket properly. In another thread I found while searching, I found some other members had experienced trouble twisting the bulb due to the filament preventing twisting and locking it in place. I used the method of applying silicone to seal the bulb into the socket once it was in place.
You will need:
An electrical multimeter capable of reading 12V DC
Rosin core solder
A soldering iron
Electrical tape
A sharp utility knife
Wire clippers
Clear silicone
Zip ties
Paint marker
Before removing the stock foglight connectors from the truck, I sanded a small spot on the frame to use as a ground, and used the multimeter to test both prongs of the stock connector to determine which one was the (+), or "hot" wire. (It is important to note that the fog lights must be switched to "on" on the dash in order for this test to work. So if your truck has automatic lights, which only come on when they sense that it's dark out, remember to switch your lights to the "on" position so that you get a proper reading on the multimeter.) I marked the side of the connector with the (+) wire with a paint marker, so that I wouldn't lose track once I clipped the end off. The connector on the ballast that was to be removed had appropriately coloured red and black wires. Pictured below is the ballast and harness placed next to each other in the way that the connection will be spliced:
This is a close up of the connection , where the stock foglight connector does not properly match up with the corresponding connector on the HID wiring harness.
The picture below shows which end of the stock connector to remove. I also removed a small amount of the protective plastic wire loom, in order to place another yellow mark on the positive lead, so I didn't lose track once I clipped the end off.
I also clipped off the connector on the other half of the connection, and then soldered the (+) wire to the red lead, (-) wire to the black lead.
Then I sealed everything up with electrical tape, as I did not have any heat shrink tubes, which would also have worked.
I took everything outside, and connected the stock explorer foglight connector back into the truck, leaving the bulbs hang underneath the front bumper so I could start the truck and ensure everything was wired in correctly before I placed them in the foglight socket.
Having confirmed everything was wired properly, I installed the bulbs into the housing. I then hung that ballasts in a nearby location and secured them in place with zip ties, for now. I applied silicone around the bulb socket to ensure they would be watertight, and to prevent the bulbs from falling out, as mentioned before due to the construction of HID bulbs, it can be difficult or not possible to rotate them clockwise such that they lock perfectly in place. The solution of using a watertight adhesive is just one possibility. Of course it would have to be cut off with a razor for a future bulb change. It just seemed like the easiest and quickest solution for me. Besides, HID bulbs have a long life and it is only a minor annoyance for greater visibility! Below is a picture of the final result