HID Retrofit Log 99 Explorer *LOTS OF PICS* | Page 4 | Ford Explorer Forums - Serious Explorations

  • Register Today It's free!

HID Retrofit Log 99 Explorer *LOTS OF PICS*

Ive always loved the look of HID and aftermarket lighting on cars. On my old explorer, I had the diamond cuts with high temp harness and hyper white 80 watt halogen bulbs. On my new explorer, I wanted to do something new and go beyond what I used to have. Eairly on I decided to buy one of those 9007 HID kits on ebay that are plug and play but after doing some homework I found that they are actually illegal and dangerous to operate due to the amount of glare and stare light they give out. I then decided to fork out the extra money and do it the right way. (Plus I love the way projectors look!)

I bought a kit off ebay that consisted of the projectors, 4300k D2S bulbs, ignitors, and ballasts. ($350 shipped) I also had to buy a new set of diamond cuts because my old set on my old truck got smashed in the wreck ($100 overnighted, Thanks sideswiped for the awsome deal

Now to the pics

It was a friday nite and instead of going out with my friend and such, I decided to stay home and work on this project. I started around 8 and ended at 12 so i got 4 hours in of measuring, cutting, recutting, and playing around in. Heres what I have so far...

Diamond Cut with projector sitting inside with lense on, this will be about what it will look like when it is all done (Plus the shroud)
hid4.jpg


Halo Eyes from Advance Autoparts
hid10.jpg


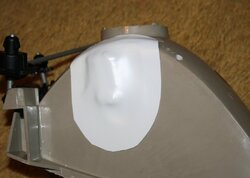
Shoud that will go around the projector, had to be trimmed at the top
hid8.jpg


Lense on again with projector inside
hid4.jpg


Lense off, projector inside...test fitting
hid2.jpg


....
hid3.jpg


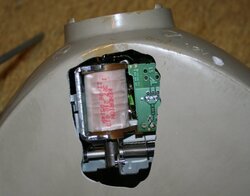
Rear before trimming
hid6.jpg


Rear after
hid5.jpg

A lot more trimming to go, the whole inner circle needs to be cut out.

BMW Projectors I am using
hid7.jpg


Ballast and ignitors with 9006 plug. I already have a 9007 high power harness so I will just cut off the 9007 plugs and splice these 9006 in and bam...power to the ballast. The only easy thing to this project!
hid9.jpg


More to come tomarrow night when I get more progress! I will try and show I mount the projectors and seal everything up


Join the Elite Explorers for $20 each year.
Elite Explorer members see no advertisements, no banner ads, no double underlined links,.
Add an avatar, upload photo attachments, and more!
.


I already have the diamond cuts and the projectors are on the way to me and should be here in a day or so.


Join the Elite Explorers for $20 each year.
Elite Explorer members see no advertisements, no banner ads, no double underlined links,.
Add an avatar, upload photo attachments, and more!
.


Did you align the projectors with the solenoid on top of it? The solenoid is supposed to go on the bottom of the projector I have found out. They say its a fairly common mistake to put it on top.
Wish mine would get here so I could start. :fire:


Cue said:
Did you align the projectors with the solenoid on top of it? The solenoid is supposed to go on the bottom of the projector I have found out. They say its a fairly common mistake to put it on top.
Wish mine would get here so I could start. :fire:

lol, now that you mention it you are right. There is a funny story to this. I had both projectors mounted up and sealed. I lit them up and I realized the cut off was upside down. Either way, I dont think they will fit. If you can get them to fit with the solenoid, dont tell me. I will be jealous/mad that I cut them off LOL


blah I just noticed a lot of my pics were down. Here are some pics I have saved

Misc
DSC00825.JPG


12000k bulbs

DSC00149.JPG

DSC00150.JPG

DSC00151.JPG

DSC00153.JPG


8000k
DSC00833.JPG

DSC00834.JPG

DSC00836.JPG


Do you have any more pictures on how you installed the projector in the housing? How far did you have it stick out the back? Mine dont seem to want to go in very far without hitting at the top ot bottom and thats with the solenoid off of it.


the projector went all the way in the housing. The only part that stuck out the back was the part where the bulb goes in. Ill take a few pics when I get home and look for install pics... Do you have any pics?


The plastic projector housing hits the top of the diamond cut lens where the red arrows are. I could grind on the projector housing but didnt really want to do that. The other picture shows how far I can get the projector in before it hits.


wow bro thats really weird. I remember when I did mine I had to jam it in there. I jammed it so hard the chrome scratched off and I had to repaint it. I ended up blacking out the housing so it was fine. Those look EXACTLY like my projectors so I have no idea why it wont fit. Like I said, I had to jam mine in pretty hard.

Word of advise, When I sealed the rear of the projector to the rear of the diamond cuts, I ran a peice of weather stripping around the back of the projector and pushed it again the rear of the diamond cut housing. You well see a round peice at the back of the projector housing where the bulb goes in. Run a piece of weather stripping around it and hold it down with a ziptie. I then sealed it up with silicone for a nice tight fit. I mounted the projector inside the housing using fully threaded rods.


It will probably go if I push hard, I just didn't want to do that. Im not sure how to line it up so its at least close that it can be adjusted properly with the factory adjusters, im sure it will take some fiddling with.


Did you ever find any of your install pics?

I got my projector in tonight with the solenoid on it :D Its not pretty but the first one is always the one to learn on. :) I cut the hole off center so I had to enlarge it. Did you put your projector in farther than this? I like where it is distance wise now from the front of the lens but not sure how I will seal up the back yet.
As you can see it only sticks out the bottom a tiny bit, I will make a plastic cover to seal it. I hope it fits inside the car as I think there is only 1/2" clearance from what I can feel but I can always make more room by cutting if needed. :)
 

Attachments

  • Img_5264.jpg
    Img_5264.jpg
    24.8 KB · Views: 427


thats how far mine went in. I would suggest painting the housing black to prevent glare

How do you plan on sealing it up with the solenoid sticking out like that?

ALso, on the last pic, I was wrap a peice of weather stripping around that ring and hold it on with a zip tie to seal it up. It all has to be water tight. Looking good so far !! Im interested to see how ur hi/low beams are going to work because if they do I will be jealous !


as for my install pics, did u see the original pics posted in this thread by chance?


I saw them but never saw a picture of the back of your lens, thats why I was wondering if you had yours in farther or not. I plane on making a cover out of some thin plastic for the solenoid.


Do you know what car those shrouds are from that you used? I assume you had to cut the top of them to fit them in there right?


Cue said:
Do you know what car those shrouds are from that you used? I assume you had to cut the top of them to fit them in there right?

Correct, I was told it was out of a Benz...not 100% sure tho. I know hidplanet.com sells the shrouds...cutting them to fit is easy and looks mo betta

My projectors are in my truck an dhave been for a while, I would try to take pics tomarrow if I remember


Afboy143 said:
Correct, I was told it was out of a Benz...not 100% sure tho. I know hidplanet.com sells the shrouds...cutting them to fit is easy and looks mo betta

My projectors are in my truck an dhave been for a while, I would try to take pics tomarrow if I remember


Do you happen to have a link to where HIDplanet sells the shrouds? I cant find that design on their site.


Join the Elite Explorers for $20 each year.
Elite Explorer members see no advertisements, no banner ads, no double underlined links,.
Add an avatar, upload photo attachments, and more!
.


I haven't had much time to work on my retrofit but I did a little tonight. I made the cover for the high/low beam solenoid from some styrene plastic, just heat it up and form it over the solenoid. It sticks out not quite 1/2" and should clear fine.
 

Attachments

  • Img_5392.jpg
    Img_5392.jpg
    37.2 KB · Views: 383
  • Img_5394.jpg
    Img_5394.jpg
    26.8 KB · Views: 401


Back
Top