TowingExplorer
Well-Known Member
- Joined
- May 14, 2009
- Messages
- 408
- Reaction score
- 1
- City, State
- Central MA
- Year, Model & Trim Level
- 2006 Limited V8
This is my first HOW-TO for this site and this is prep work for the Ford inspection required for me to get an ESP. One rear strut was leaking as long as I've owned the Explorer so rather than paying Ford to do it when they discover it during their inspection, I did it myself.
Rough list of tools required...
Jack
Jack Stands
13mm Wrench (ratcheting and flex head is easiest)
15mm deepwall socket
16mm socket
17mm Wrench
8mm Wrench
16mm socket
15/16" Socket
3/4" Socket (for new Napa purchased Strut and OE Lug Nuts)
Adjustable Wrench with minimum 1" jaw span
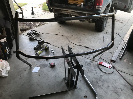
Before

Wheel removed


Remove the swaybar endlink leaving the lower bushing in the control arm as it didn't just fall out.

Remove the three 13mm strut mount nuts. WD-40 or PB help loosen things up here.


Remove the lower 15/16" bolts which hold the bottom of the strut as well as the bottom of the knuckle.

Broke out my bigger 1000 ft/lb impact gun for them...


I found that pulling at an angle of upward and toward the front of the explorer caused the knuckle to pop out of the lower control arm. Then I put my foot on the top of the control arm and pressed it down so the strut could come down through and clear the strut tower above.


Pictures of my removed and slightly leaking strut...


Using an external spring compressor, compress the spring to release the tension between the strut base and strut mount. I used the compressor I bought from the local Harbor Freight. It made me nervous as these springs are tougher than any others I had ever used it on before, but they did the job. I wore safety glasses though just in case it wanted to snap.
CAUTION! If you do not use a spring compressor and just remove the nut on the top of the strut, you will have one of the following things happen. 1) Nothing because the strut is crap and not holding any pressure against the mount. 2) The strut mount will launch, likely at you, and damage you severely. Either way, you will need the spring compressor to get the new strut on the old strut mount, so you will need it regardless of disassembly so just have one to begin with!

Using two wrenches, remove the nut at the end of the strut holding it to the strut mount.

Separating the OE assembly...


Reassemble in reverse order with new strut. As a habit from working on every other vehicle I own (being build years 1995, 1991, and 1980), I put general purpose grease on all threads during reassembly. This will make this job much easier in 5 years when I have to do this job again.


Place back into wheel well...

Strut bottom wasn't aligned perfectly, so while the top mount threads were through the strut tower holes, I used a screw driver to turn the base of the strut to better align it with the lower control arm.


Reinstall lower 15/16" bolts holding the lower strut as well as knuckle in place. First, I inserted the knuckle bolt. Doing this causes the strut to stick down a little further than we want due to the strut always having a positive force on the lower control arm. I used a scissor jack with a piece of wood to compress the strut up the ~1 inch it needed to move so I could slide the bolt through. Then also reinstall the swaybar endlink.


Reinstall the strut tower nuts.

All done...


(yes, I wiped off the wheel so my finished picture would look cleaner!)

The only damage was...

... which amazingly it didn't even break my Nitrile glove! Hurt a little bit though.")
Hope this helps someone out there. In case anyone was wondering why I bought the struts from Napa, it's because AutoZone and Advance don't sell them. MSRP from the dealer was something like $140/each. I found them from a dealer online for $110 plus shipping which ended up being about $260 for the pair shipped. Napa, after a 3% AAA discount, was $100 each with tax and the store had them in 2 days. Lifetime warranty as well. One did get delivered "broken" though with one strut rattling out of the box. They replaced it without hassle though with just another 2 day wait for delivery.
Rough list of tools required...
Jack
Jack Stands
13mm Wrench (ratcheting and flex head is easiest)
15mm deepwall socket
16mm socket
17mm Wrench
8mm Wrench
16mm socket
15/16" Socket
3/4" Socket (for new Napa purchased Strut and OE Lug Nuts)
Adjustable Wrench with minimum 1" jaw span
Before

Wheel removed


Remove the swaybar endlink leaving the lower bushing in the control arm as it didn't just fall out.

Remove the three 13mm strut mount nuts. WD-40 or PB help loosen things up here.


Remove the lower 15/16" bolts which hold the bottom of the strut as well as the bottom of the knuckle.

Broke out my bigger 1000 ft/lb impact gun for them...


I found that pulling at an angle of upward and toward the front of the explorer caused the knuckle to pop out of the lower control arm. Then I put my foot on the top of the control arm and pressed it down so the strut could come down through and clear the strut tower above.


Pictures of my removed and slightly leaking strut...


Using an external spring compressor, compress the spring to release the tension between the strut base and strut mount. I used the compressor I bought from the local Harbor Freight. It made me nervous as these springs are tougher than any others I had ever used it on before, but they did the job. I wore safety glasses though just in case it wanted to snap.
CAUTION! If you do not use a spring compressor and just remove the nut on the top of the strut, you will have one of the following things happen. 1) Nothing because the strut is crap and not holding any pressure against the mount. 2) The strut mount will launch, likely at you, and damage you severely. Either way, you will need the spring compressor to get the new strut on the old strut mount, so you will need it regardless of disassembly so just have one to begin with!

Using two wrenches, remove the nut at the end of the strut holding it to the strut mount.

Separating the OE assembly...


Reassemble in reverse order with new strut. As a habit from working on every other vehicle I own (being build years 1995, 1991, and 1980), I put general purpose grease on all threads during reassembly. This will make this job much easier in 5 years when I have to do this job again.


Place back into wheel well...

Strut bottom wasn't aligned perfectly, so while the top mount threads were through the strut tower holes, I used a screw driver to turn the base of the strut to better align it with the lower control arm.


Reinstall lower 15/16" bolts holding the lower strut as well as knuckle in place. First, I inserted the knuckle bolt. Doing this causes the strut to stick down a little further than we want due to the strut always having a positive force on the lower control arm. I used a scissor jack with a piece of wood to compress the strut up the ~1 inch it needed to move so I could slide the bolt through. Then also reinstall the swaybar endlink.


Reinstall the strut tower nuts.

All done...


(yes, I wiped off the wheel so my finished picture would look cleaner!)

The only damage was...

... which amazingly it didn't even break my Nitrile glove! Hurt a little bit though.
Hope this helps someone out there. In case anyone was wondering why I bought the struts from Napa, it's because AutoZone and Advance don't sell them. MSRP from the dealer was something like $140/each. I found them from a dealer online for $110 plus shipping which ended up being about $260 for the pair shipped. Napa, after a 3% AAA discount, was $100 each with tax and the store had them in 2 days. Lifetime warranty as well. One did get delivered "broken" though with one strut rattling out of the box. They replaced it without hassle though with just another 2 day wait for delivery.