How To: Add Dual Lit Visors and Maplights to a base model. | Ford Explorer Forums - Serious Explorations

  • Register Today It's free!

How To: Add Dual Lit Visors and Maplights to a base model.

Crankcase

Moderator Emeritus
Moderator Emeritus
Joined
September 29, 2001
Messages
9,224
Reaction score
2
City, State
Vancouver B.C, Canada
Year, Model & Trim Level
1992 XL Ex-Police
Ok, this is for First Gen.(91-94) Explorers, but might be very similar info for Second Gens.

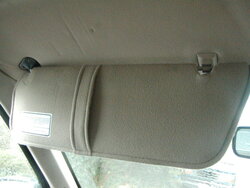
In My 92 XL, I had always hated the fact that I did not have maplights at all, or the special Dual visors that lit up. I noticed some XLT's and Sports had both, but usually had one or the other unless a high end model.

So, one day when browsing the auto wrecker, I found a 93 XLT that had a matching beige interior.

I bought the (among a few other things) Dual visors, and the Dome light that contained the Dual map lights. I knew I would have to do some wiring, but to me that is fun, not trouble.

The important part? I GOT ALL WIRING HARNESS' STILL ATTACHED TO THE PARTS

So, One rainy day, I tackled both together at the same time. It is a good thing I did that, as they are connected in a way(My way ;)).

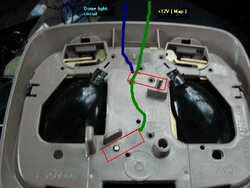
So, first things first, I removed the dome light by taking off the cover and removing thre screws that held it up there. One screw goes into the power wire.

In the bottom (Modified) pic, the 4 stock screw holes are visible.the two outside ones are for my old base model light, and the two middle ones are for the high series light. The weird shaped hole is for the high series harness, and the rectangluar hole is where a pin goes to line up either dome light.
 

Attachments

  • Maplight1a.jpg
    Maplight1a.jpg
    30.1 KB · Views: 1,092
  • Maplight1.jpg
    Maplight1.jpg
    27.4 KB · Views: 1,092


Join the Elite Explorers for $20 each year.
Elite Explorer members see no advertisements, no banner ads, no double underlined links,.
Add an avatar, upload photo attachments, and more!
.


In that last pic, you can see how the harness ends at one wire connector.

On high series models, there is a second, (+12V live all the time) wire.

This is where I would have to do some wiring. Luckily I had the wiring harness with the new light.

Circled is the second (important) wire.
 

Attachments

  • Maplight2.jpg
    Maplight2.jpg
    44.9 KB · Views: 1,098


In this pic, I have made the red box represent my orginal harness. This is the old dome light. Power is supplied to the harness only when the doors are open or the headlight switch is turned.
 

Attachments

  • Maplight3.jpg
    Maplight3.jpg
    36.6 KB · Views: 1,123


Here is the Dome light with maplights.

The red boxes are the two power connectors that will conect once the screws are put in holding up the light.

The green wire is the one base models are missing. It passes through the other connector for some reason, but does not connect in any way.
 

Attachments

  • Maplight4.jpg
    Maplight4.jpg
    43.6 KB · Views: 1,110


Meanwhile, while surveying this, I figured now would be the time to find out if My X had the harnesses for the Power visors. I removed my stock ones:
 

Attachments

  • Pb260411.jpg
    Pb260411.jpg
    60.9 KB · Views: 1,124


To remove them, just unscrew 3 screws in the main base, and one in the clip that holds the other end:
 

Attachments

  • Pb260413.jpg
    Pb260413.jpg
    52.5 KB · Views: 1,076
  • Pb260412.jpg
    Pb260412.jpg
    58.3 KB · Views: 1,082


Since the end clips had nothing to do with the new wiring I would have to do, I changed them over before proceding. Here is a shot of one of the old clips, and the new one with the 2 slots. It is a direct swap.
 

Attachments

  • Pb260406.jpg
    Pb260406.jpg
    59.8 KB · Views: 1,075


Sure enough, I was missing the power wire for the visors. I removed the trim leading up from the doors by removing a few screws. You can see the long crease where it sat.

The curved Nike-like crease was from a wire the Police garage left hanging out of the trim (I would later use this wire....Recycling is fun! LOL)
 

Attachments

  • Pb260408.jpg
    Pb260408.jpg
    58.3 KB · Views: 1,085


I used different colored wires for the different sides....for the ease of tracking later if needed. I spliced a wire from the passenger side harness I had for the visor into a short blue wire, and ran it to the door jam through the hole. In this pic you can see another wire, it is coming from the maplights...(More on that in a sec.)

What you cant see in that pic, is that the blue wire goes to both wires, the passenger harness and the white wire, which is the driver side visor.

In the second pic, I am about to put the blue wire into the crimper.
 

Attachments

  • Pb260420.jpg
    Pb260420.jpg
    58.4 KB · Views: 1,075
  • Pb260419.jpg
    Pb260419.jpg
    58.9 KB · Views: 1,068


I used white wire for the Driver side connection. I spliced into the harness, and ran it across to the passenger side vsior hole.(This would be a complete PITA to manually fish though, but I used an old antenna, and pushed it through to the other side with the wire attached :) )
 

Attachments

  • Pb260414.jpg
    Pb260414.jpg
    62 KB · Views: 1,062
  • Pb260418.jpg
    Pb260418.jpg
    55.8 KB · Views: 1,077


Since I had the antenna out, I fished a Blue wire above the headliner through to the Dome light area from the passenger side visor hole. This was VERY hard, as the dome area is "lowered" from the rest of the roofline, which makes the antenna stop near it.

You need a VERY flexible pushing device.

The alternative to get wire there is to drop the headliner. Yeah right.
 

Attachments

  • Pb260417.jpg
    Pb260417.jpg
    56.6 KB · Views: 1,072


I cut the special second end I needed off of the High series harness, and spliced it into my wire waiting at the dome area.

The special end clips into the weird shaped hole in my roof, and provides the second, inside screw hole for the new, high end maplight power screw.

At least Ford puts the holes for both versions there, along with the elongated line up slot.
 

Attachments

  • Maplight5.jpg
    Maplight5.jpg
    40.2 KB · Views: 1,076


Next, now that My two visors were connected to the same wire, and I had a wire running to the dome light power connector, was the connect the two wires to a wire runnign down through the door frame.

Well, Remember how I mentioned I already had a wire running down there? ;) I connected them to this Brown wire using.....a WIRE NUT!

First time I have used that in automotive wiring. Nice and easy and reversible if needed.

I always tape up all connections anyways, even with wire nuts or crimp connectors.

Here is the three way connection, and a crude diagram of whats connected so far.
 

Attachments

  • Pb260422.jpg
    Pb260422.jpg
    61.9 KB · Views: 1,074
  • Maplight6.jpg
    Maplight6.jpg
    19.1 KB · Views: 1,104


Well, now I needed live +12V.

Normally I am all about running straight to the battery for live power, but wait a sec....Explorers normally have these lights controlled by the courtesy lights fuse.

So I found the nearest courtesy light that has live power.....the glove box. the switch at the glove box controls it, so it is one of the few courtesy lights that has live power. (Underhood and Maplights being the only others normally LOL)

I rarely use "scotchlock" type connectors. In fact, i only have three on my X. Two are on the alternating turn signal mods. This is number 3 :D Due to space and needing a connection that was no0t too ugly, I used on here.

I removed the light assembly, and put one on the green power wire.The Brown wire ran up to my new stuff. I replaced the assembly and closed the box.
 

Attachments

  • Pb260429.jpg
    Pb260429.jpg
    70.3 KB · Views: 1,069
  • Pb260432.jpg
    Pb260432.jpg
    57.9 KB · Views: 1,070


Well..I connected up the harnesses to the visors, and screwed in the maplight. I had some problems with the second visor part of the dual visors...the plastic rod that holds the smaller visor ois vbery frigile. be carful when putting it together.

After all was said and done, I tried my new items: Yay! it feels like an XLT in there!:D
 

Attachments

  • Pb260433.jpg
    Pb260433.jpg
    59.8 KB · Views: 1,054
  • Pb260435.jpg
    Pb260435.jpg
    43 KB · Views: 1,050


Back
Top