How to: - Install Ford 8.8" gears | Page 2 | Ford Explorer Forums - Serious Explorations

  • Register Today It's free!

How to: Install Ford 8.8" gears

Prefix for threads which are instructional.
Creager, would it be ok with you if I save the photos you used in your write up and put them on the explorerforum server so they will always be with the article? Too many times good info is lost due to changes of picture hosts.

Thanks,

Rick


Join the Elite Explorers for $20 each year.
Elite Explorer members see no advertisements, no banner ads, no double underlined links,.
Add an avatar, upload photo attachments, and more!
.


Rick said:
Creager, would it be ok with you if I save the photos you used in your write up and put them on the explorerforum server so they will always be with the article? Too many times good info is lost due to changes of picture hosts.

Thanks,

Rick

Oh no problem man, go right ahead.

if there is a problem, i have these pictures saved somewhere on one of my computers.


Charlie's_93EB said:
creager you helped me with my AC now we are talking about the 8.8. But anyway my LDS wore out and since it seems you know everything. My question it how hard is it to install new friction disks????

thanks charlie

Hey Charlie man, to be honest it’s not very hard at all. It doesn’t require removing the ring gear, unless you are replacing it with a brand new rebuilt unit or so. There is also an alternative method of setting up the fiction plates and clutches so you can make it last longer, and get more grip... it’s described in the link below.

Start by looking here, it has ALL the info you need (almost too much, make sure you skip some of their steps... you dont need to remove the carrier, nor do you need new carrier bearings/races and ring gear bolts)

http://www.redpulsar.us/~coldfusion/tlok.html


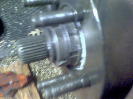
The article seems to be out of order in the installation. The first thing you would do would be to set pinion depth. I use a T&D pinion depth tool (around $230). A beam style torque wrech (0-50 in. lbs.) is used for trial and final assembly. Once depth is set, then you would set carrier pre-load, then backlash and a pattern check. You wouldn't need mutiple crush sleeves as the pinion pre-load (15 in. lbs for used bearings, 30 for new) is replicated regardless of a crush sleeve being in place.

To clarify;

1) Set pinion depth. If depth tool is unavailable, just re-install old shim. As stated, they're a really good starting point. Install pinion into housing w/o crush sleeve and tighten 'til pinion reaches required turning force (measured with the beam style 0-50 in. lbs. torque wrench). The depth will be the same a when you crush the sleeve provided the turning force is the same. If you had a depth tool, you would measure depth, do the math according to the desired depth stamped on the gear and adjust your pinion shim accordingly. If not, then you proceed to carrier pre-load.

2) Carrier pre-load. Written pretty good above. There are tools to measure it, they're just beyond the reach of most of us. So, it becomes a feel thing. If it slips out by hand, it's too loose. It should take a pry bar to get it out. If it takes a 4 foot bar and a lot of strength, it's prolly too tight ;).

3) Ring gear back-lash. This is the final measurement before taking a pattern check. Also stamped on the replacement gears. I shoot for the higher number, i.e. .008-.012 I'll shoot for .012.

If you didn't have the pinion depth checker, this is where you'll see if you need to adjust the shim. Don't settle for close enough here. You'll regret it later. Get a perfect pattern.

But, you don't have to crush a sleeve each time you remove the pinion to change shims. So long as the turning torque is the same as when you crush it, pinion depth will be the same.


sparky2263 said:
But, you don't have to crush a sleeve each time you remove the pinion to change shims. So long as the turning torque is the same as when you crush it, pinion depth will be the same.

Thats a good point, i should find somewhere to add this into the article.

I've never gotten a chance to use one of the pinion depth finders. I'm sure it would save TONS of frustration and time. Haha, your eyes get nice and blurry assembling/reassembling those things over and over trying to get the pinion depth right, but thats not to say its not an incredible learning experience doing it the analytical way :D .

Could you elaborate more on methods used in finding pinion depth? I know there are tons of ways which i didn't mention. Some methods allow you to find the depth using more common tools. Although i do believe you sacrifice accuracy with some of the 'bad' methods, haha.


There are calculations for measuring the pinion height (length of pinion "head") and then calculating from the "published" dimension of the axle in question. As you can imagine, the "previous shim" method works as good or better.

I have a list of the "published" dimensions for most axles at the shop. I can post 'em here with the method for determining the "starting" shim. You are more than welcome to incorporate them in your write-up.

About 1 in 4 set-ups I do have no depth marked on the gear. About 1 in 8 the marked depth comes out with a bad pattern. Then, it's back to the good ol' tried and true method of determining from the pattern how far you need to move, which way and hope you nail it the first "guess". ;)


sparky2263 said:
About 1 in 4 set-ups I do have no depth marked on the gear. About 1 in 8 the marked depth comes out with a bad pattern. Then, it's back to the good ol' tried and true method of determining from the pattern how far you need to move, which way and hope you nail it the first "guess". ;)

Really, the marked depth comes wrong out of the box sometimes? Hah, interesting... I guess they can’t make everything perfect for everyone. That’s probably all it is, the housing might be a tad different then their specifications

My problem is getting it on the first guess, then going back to try and make it better, but then after hours of frustration I find myself putting it back where it was the first time haha.

But yeah, if you would like to post some of those methods, it would be much appreciated.


I've always felt it was a housing issue when the marked depth wasn't correct.

I'll get that info posted up for ya'.


I did my own... It worked out fine and was no real big deal once I got started.

I worried about it for a while before doing it, after reading all the stuff out there about all the intricacies of the install. Time, start to finish was under 3 hours, including a rebuild of the L/S unit.

About pinion depth... I just started with the shims that came off the old unit. That's a good place to start. Adjust as needed to bring the pinion into specs. No high dollar tools needed, just some patience. It also helps to hog out an old pinion bearing so that it drops on and off the pinion shaft to make changing the shims easier. Then adjust the side spacing (again, starting with the factory spacers), and backlash and you are done. Oh, I also did mine without a case spreader. Just take care when you TAP in the shims so that you don't break them. They are made of cast iron and will shatter if hit too hard.

With a good write up like the one above, and the tools to do the job, I say, have at it...


I appreciate the links to my webpages:

http://www.redpulsar.us/~coldfusion/TT.html
http://www.redpulsar.us/~coldfusion/tlok.html

But if you want to use the photographs, tables, or charts, please let me know FIRST and at least host the pics yourself.

If you have any suggestions or comments on the procedures, let me know. BTW it is very easy to remove the carrier and do the clutch/steel swap, and many people chose to just take it out of the pumpkin rather than mess with it in the car. I took out my differential because I was swapping the TrueTrac for a Traction-Lok.

Someone here said it was the "wrong procedure". I'd like to know how you can rebuild and install a T-lok to replace a Truetrac w/o removing the carriers... Perhaps you are using osmosis?


metroplex, i have an 8.8 Truetrac in my rear and from my install i can tell you they look nothing like your old one.

They have 6 bolts and an additional pinion gear, they have made them much more resilient. in fact i couldn't see the pinion gears from looking at the outside of it like you can in yours.


r37ribution said:
metroplex, i have an 8.8 Truetrac in my rear and from my install i can tell you they look nothing like your old one.

They have 6 bolts and an additional pinion gear, they have made them much more resilient. in fact i couldn't see the pinion gears from looking at the outside of it like you can in yours.

They released a revised version a few years ago and Bob Cosby was one of the first people to test it on his Stang.

Stupid me bought a TrueTrac in January of 2003 and never found a large thread on Corner Carvers that chronicled the failure of the 8.8 TrueTrac since 1999 (well known problem apparently). I contacted TracTech and they couldn't do anything about it. They knew about the problem but didn't do anything about it (Sounds like Ford all the time). I have the carrier sitting on my workbench if I ever figure out what to do with it. I bought a used T-Lok and have never been happier. The clutches are easy and cheap to rebuild and the design is quite proven (20+ years on the road in service with police cars, Mustangs, trucks, etc...) I actually bought TWO T-Lok carriers because the firist one seemed to have some unusual wear marks on the part that the bearing slips over. Apparently it wasn't anything serious, so I kept that as well. I have the open diff sitting on the bench as well. You could say I have carriers all over the place...


It's unfortunate you had so much trouble with the ol' TrueTrac. Your LSD must have been out of warranty for TracTech to say they can't do anything. I hear the newer ones are very nice maintenance free rear limited slips. So far so good for me....knock on wood....they almost sound too good to be true - maintenance free rear diffs with the exception of changing the fluid.


TracTech had not recalled their 2 pinion units during the last few years of production when they knew about the problems and had the revised units ready for production. I didn't like how they did that and especially after I spent over $300. I wasn't about to spend another $300-$400 to give their product a try.

Their new 3 pinion units are more durable because there are 6 bolts to spread out the load.

I'll stick with the Traction-Lok. At least you can performance maintenance if required!


boominXplorer said:
What kind of bearing puller do you use for the pinion and carrier bearings? I am in dire need of one and im exploring my options. I want this one but I dont know about the pricetag.
http://completeoffroad.com/wsm/i-61_carrier__pinion_bearing_puller.html

Wow, i have that thing in the pic, but it was almost $150 bucks cheaper when i got it. I bought it through randy's ring and pinion, i had asked the guy a bunch of questions, then asked him about buying the puller. He told me he would cut me a deal on it, i didnt realize i got that good of a deal.

That puller is a freaking life saver. Ive used it maybe 10 times, each time it made short of that work, thats for sure. 5 minutes to pull a bearing, from actually get the puller out, assembling it, poping the bearing off, to putting all the tools back, easy as cake. All i need is a press now.

It works for most any other type of pulling you can think of. I can remember exactly what the hell we were doing, but we even used parts of that thing to make the silicone couplers for my intake fit easier/quicker. Im going to see if it will work on the bearings in the manual tranny, if i ever get down to it. That way ill know i really got my money's worth for it.

metroplex said:
I appreciate the links to my webpages:

http://www.redpulsar.us/~coldfusion/TT.html
http://www.redpulsar.us/~coldfusion/tlok.html

But if you want to use the photographs, tables, or charts, please let me know FIRST and at least host the pics yourself.

Sorry for that. You have been properly cited at the bottom of the write up. The original intent was to host the pictures here, but that never got off the ground.


Join the Elite Explorers for $20 each year.
Elite Explorer members see no advertisements, no banner ads, no double underlined links,.
Add an avatar, upload photo attachments, and more!
.


Back
Top