63falcondude
Active Member
- Joined
- November 27, 2013
- Messages
- 82
- Reaction score
- 1
- City, State
- Toms River, NJ
- Year, Model & Trim Level
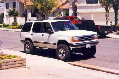
- 2000 Ford Explorer EB
After two days of working on installing the headlights, I finally have them all finished. I wasn't planning on making a how-to so I didn't take pictures.
This is the pair that I did the install on: http://www.spyderauto.com/product.php?id=PRO-YD-FEXP95-HL-1PC-BK
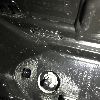
I had to use a dremel and cutting wheel to make clearance for the side bulb connector to push into the hole. Then, used the sanding wheel attachment to remove the plastic chrome on the inside that was stopping the connectors from spinning clockwise (had to do this to both holes on each of the assembly's). I did get some plastic in the headlight so I used a wooden skewer and compressed air to get it out/hidden.
Removed the bulb connectors and changed the bulbs (about $11 for all 4 of the big ones from Advance Auto Parts), then put the connectors into the new assembly's and tightened. Cut the brown and black wires going to the small amber bulb and get rid of the bulb.
Go ahead and remove the plastic cover to gain better access to the headlight area. I kept the grill on.
After following the "instructions" that came from Spyder, I connected the white wires from the assembly to the brown wire that was cut and black to black. I recommend soldering all connections and surrounding them with heat shrink. I tried using quick connects for the LED's and halos but the wire from the truck was too small for the metal to cut through the rubber sleeve.
You want to test to make sure that everything is working. If the LED's and halos seem dull, the battery might be draining a little from testing earlier so that will fix itself when you start the truck. I stuck the converter to the bottom of the headlight area after cleaning with alcohol. The pink wire from one of the halos kept popping out of the connector clip so I put it back and hot glued the back of it in place.
For the driver side, I had to cut the protruding fiberglass thing off with the dremel cutting wheel to make the bulb connector wires fit back there. I did not have to do this on the passenger side.
After that, finishing the install consists of attaching the 2 running light connectors and the blue hi beam/low beam connector, pushing the light in and replacing the 2 top screws, then re-attaching the long plastic cover.
In the end I am very happy with it but it is FAR from "plug and play".
This is the pair that I did the install on: http://www.spyderauto.com/product.php?id=PRO-YD-FEXP95-HL-1PC-BK
I had to use a dremel and cutting wheel to make clearance for the side bulb connector to push into the hole. Then, used the sanding wheel attachment to remove the plastic chrome on the inside that was stopping the connectors from spinning clockwise (had to do this to both holes on each of the assembly's). I did get some plastic in the headlight so I used a wooden skewer and compressed air to get it out/hidden.
Removed the bulb connectors and changed the bulbs (about $11 for all 4 of the big ones from Advance Auto Parts), then put the connectors into the new assembly's and tightened. Cut the brown and black wires going to the small amber bulb and get rid of the bulb.
Go ahead and remove the plastic cover to gain better access to the headlight area. I kept the grill on.
After following the "instructions" that came from Spyder, I connected the white wires from the assembly to the brown wire that was cut and black to black. I recommend soldering all connections and surrounding them with heat shrink. I tried using quick connects for the LED's and halos but the wire from the truck was too small for the metal to cut through the rubber sleeve.
You want to test to make sure that everything is working. If the LED's and halos seem dull, the battery might be draining a little from testing earlier so that will fix itself when you start the truck. I stuck the converter to the bottom of the headlight area after cleaning with alcohol. The pink wire from one of the halos kept popping out of the connector clip so I put it back and hot glued the back of it in place.
For the driver side, I had to cut the protruding fiberglass thing off with the dremel cutting wheel to make the bulb connector wires fit back there. I did not have to do this on the passenger side.
After that, finishing the install consists of attaching the 2 running light connectors and the blue hi beam/low beam connector, pushing the light in and replacing the 2 top screws, then re-attaching the long plastic cover.
In the end I am very happy with it but it is FAR from "plug and play".