- Joined
- November 11, 2005
- Messages
- 56,682
- Reaction score
- 1,186
- City, State
- Brooklyn, NY
- Year, Model & Trim Level
- 88 89 93 95 96 Aerostars
This thread will show you how to replace front brake pads on a 2WD Aerostar van. This was done on my 95, but it's pretty much the same on all of the years. You will need a few basic tools, and a couple of specialty tools to make it easier. It's still possible to do the whole thing with basic tools if specialty tools are not available. You will need a hammer, bungee cord, large C clamp (if a caliper piston tool is not available), and a punch (if the caliper bolt tool is not available). Here are the specialty tools:

You need a good set of front pads if you plan on using this as your daily driver, and do a lot of stop, and go driving. Even highway driving puts stress on pads while slowing down or stopping at hightway speeds. Friction creates heat, and depending upon the quality, and age of the pads, you will know very fast if the front pads are gone. They will smoke, smell, and at one point make the pedal feel like the master cylinder is fading as if fluid is leaking when no fluid is really leaking. Here are some examples of good quality pads:

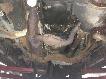
This picture shows what my front brakes were like before they were replaced:

This was actually the side with a little less wear. The opposite side had an overheating problem, and everything was covered with light brown flaking rust. The caliper pin tool has a groove on its shaft to act as a stopper when it slides into the caliper:

The side with the taper compresses the metal tabs on the slide bolt to help it release itself as it's going into the caliper. Once the head is clear, the tool is reversed to allow the narrow part to slide into the caliper to push the pin completely out:

The caliper could be removed once the pins are completely removed:

A bungee cord is holding the caliper while the bolts are removed to prevent stress on the front brake hose:

The caliper piston has to be fully compressed before the new pads could be installed:

The new pads should have anti squeal paste on the back of them to prevent chatter:

The calipers are ready to be installed with the new pads. The pins have to be pressed back into place:

The top pin is in, and the bottom one is next:

You are finished after the bottom pin goes back into place. Sometimes it's necessary to replace the rotors, seals, and wheel bearings, but it wasn't necessary at this time on my vehicle. The setup on the E-4WD rotor is a little different, but the set up for the pads is the same.
You need a good set of front pads if you plan on using this as your daily driver, and do a lot of stop, and go driving. Even highway driving puts stress on pads while slowing down or stopping at hightway speeds. Friction creates heat, and depending upon the quality, and age of the pads, you will know very fast if the front pads are gone. They will smoke, smell, and at one point make the pedal feel like the master cylinder is fading as if fluid is leaking when no fluid is really leaking. Here are some examples of good quality pads:
This picture shows what my front brakes were like before they were replaced:
This was actually the side with a little less wear. The opposite side had an overheating problem, and everything was covered with light brown flaking rust. The caliper pin tool has a groove on its shaft to act as a stopper when it slides into the caliper:
The side with the taper compresses the metal tabs on the slide bolt to help it release itself as it's going into the caliper. Once the head is clear, the tool is reversed to allow the narrow part to slide into the caliper to push the pin completely out:
The caliper could be removed once the pins are completely removed:
A bungee cord is holding the caliper while the bolts are removed to prevent stress on the front brake hose:
The caliper piston has to be fully compressed before the new pads could be installed:
The new pads should have anti squeal paste on the back of them to prevent chatter:
The calipers are ready to be installed with the new pads. The pins have to be pressed back into place:
The top pin is in, and the bottom one is next:
You are finished after the bottom pin goes back into place. Sometimes it's necessary to replace the rotors, seals, and wheel bearings, but it wasn't necessary at this time on my vehicle. The setup on the E-4WD rotor is a little different, but the set up for the pads is the same.