How to: Winch Install on a 2nd Gen - Factory Bumper | Ford Explorer Forums - Serious Explorations

  • Register Today It's free!

How to: Winch Install on a 2nd Gen - Factory Bumper

turboexplorer

Elite Explorer
Joined
August 23, 2008
Messages
1,949
Reaction score
39
City, State
Eagle Mountain, UT
Year, Model & Trim Level
98' XLT 5.0L 4X4
Callsign
Turbo
So this weekend I started on the winch mount. I am super happy with the results so far, but it has also taken a bit more effort than I originally thought as the winch is very tight in there but is a perfect placement. :thumbsup:

Front bumper removed.
View attachment 81970

Got bumper set aside and winch out for fitment.
View attachment 81971

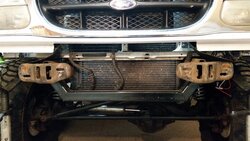
This is what it started as.
View attachment 81972

Quick throw in to see a rough idea on placement. I already knew I would have to move the transmission cooler up some.
View attachment 81973

Holding the winch up higher with 2X4's on the cross memeber and the jack stands on the front. You can see the edges of the frame bumper horns where I had to cut a bit so it will clear easy as the frame horns roll around about 1/2-5/8"
View attachment 81974

Can see how tight the initial fit was to the motor.
View attachment 81975
 

Attachments

  • 20150101_132407.jpg
    20150101_132407.jpg
    69 KB · Views: 893
  • 20150101_132839.jpg
    20150101_132839.jpg
    96.4 KB · Views: 814
  • 20150101_132853.jpg
    20150101_132853.jpg
    106 KB · Views: 947
  • 20150101_135922.jpg
    20150101_135922.jpg
    103.1 KB · Views: 831
  • 20150101_152553.jpg
    20150101_152553.jpg
    97.3 KB · Views: 902
  • 20150101_152603.jpg
    20150101_152603.jpg
    79.2 KB · Views: 848


Join the Elite Explorers for $20 each year.
Elite Explorer members see no advertisements, no banner ads, no double underlined links,.
Add an avatar, upload photo attachments, and more!
.


You can see how tight it was to the lower part of the core support. This is why the motor is so close to the frame horns.
View attachment 81976

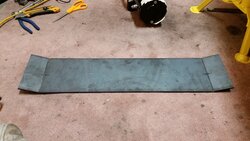
So it was time to make the winch mounting plate so I can really see where everything lines up and what works best for fitment and strenghth. I made the plate 1/2" longer on each side so I would for sure have enough metal for final fitment.
View attachment 81977

Mark the plate out so the winch is dead center and drill the 1/8" holes for now until I am 100% sure that it will fit. I also marked the ends where it needed to be bent to fit both winch and frame.
View attachment 81978

So what I did to bend the steel (1/4" plate) is used my 4 1/2" grinder with a cut off wheel to score the plate. Went about 3/16" deep so to leave only 1/16" left to bend. I did the score on the top of the plate so where it is welded will be hidden and the bottom that you will see will have the nice super clean bend. Then I held it on the floor on a board and hit it with a big dead blow hammer to get it to bend over. The bends allow the which mount part to be 13/16" below the ends where it will be mounted to the frame.
View attachment 81979

Pictures of the bend. And no worries, where it is bent will be ground out so I get full penetration on the weld to strenghth it back up.
View attachment 81980

View attachment 81981
 

Attachments

  • 20150101_183411.jpg
    20150101_183411.jpg
    103.9 KB · Views: 797
  • 20150101_183400.jpg
    20150101_183400.jpg
    99.9 KB · Views: 794
  • 20150101_183351.jpg
    20150101_183351.jpg
    99.8 KB · Views: 775
  • 20150101_170325.jpg
    20150101_170325.jpg
    94 KB · Views: 803
  • 20150101_162713.jpg
    20150101_162713.jpg
    109.4 KB · Views: 819
  • 20150101_152612.jpg
    20150101_152612.jpg
    82.5 KB · Views: 817


So with the plate made and winch sitting on it was time to fit the front bumper and see if there is any issues or not.
View attachment 81983

View attachment 81984

View attachment 81985

Long story short there was issues and the winch and plate needed to go backwards about 7/8" for it to fully clear the front bumper. So options where to cut a bunch of front bumper and make relief cuts in the mounting plate or to cut the core support section and move both back. I used the second one. I spent some time cutting the core support out really well and ground it flush so it looks really clean. It will all be painted and look really good when done. Only removed what was needed and core support remains strong.
View attachment 81986

View attachment 81987

View attachment 81988
 

Attachments

  • 20150101_203635.jpg
    20150101_203635.jpg
    120 KB · Views: 790
  • 20150101_203628.jpg
    20150101_203628.jpg
    118.2 KB · Views: 792
  • 20150101_203609.jpg
    20150101_203609.jpg
    115.9 KB · Views: 782
  • 20150101_193726.jpg
    20150101_193726.jpg
    93.8 KB · Views: 776
  • 20150101_193050.jpg
    20150101_193050.jpg
    86 KB · Views: 785
  • 20150101_193044.jpg
    20150101_193044.jpg
    95.4 KB · Views: 776


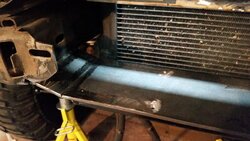
Cutting the core support and refitting shows it is good to go so tacked the plate in place.
View attachment 81989

Happy with fitment I burned in 3 inches on the plate towards the rear on the top to make it permanent.
View attachment 81990

View attachment 81991

The top of the plate ended up on the bottom of the frame. So where the frame is here in this picture needed a small plate to make it even with the main plate for a great fit and really strong mount.
View attachment 81992

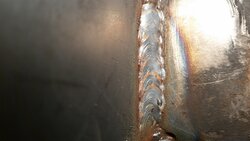
Here is the small 1/4" plates that go on the bottom of the frame rails that make the fit for the main plate really nice, this also ties it heavily onto the frame rails. And in case anybody is wondering about the gap to the main plate (always get asked) this would be considered a butt weld. And for good penetration and to make the weld flatter to the plates the gap is needed. Remember this is 1/4" plate and it takes this gap to get full penetration for a proper weld. Anyways small tip for others fabricating things. :thumbsup: General rule of thumb for butt welds is a gap 1/2 the width of the material you are welding. This is not the case for lap or fillet welds.
View attachment 81993

View attachment 81994
 

Attachments

  • 20150103_164812.jpg
    20150103_164812.jpg
    69.6 KB · Views: 787
  • 20150103_162708.jpg
    20150103_162708.jpg
    87.2 KB · Views: 769
  • 20150103_150753.jpg
    20150103_150753.jpg
    90.5 KB · Views: 785
  • 20150103_150741.jpg
    20150103_150741.jpg
    105.5 KB · Views: 748
  • 20150103_150737.jpg
    20150103_150737.jpg
    102.4 KB · Views: 778
  • 20150103_150731.jpg
    20150103_150731.jpg
    99.9 KB · Views: 799


So was time to fully burn in the plate. Burn in about 3" at a time and let the steel cool in between. Cools quickly as there is the frame rails and my front cross member to soak up the heat. Also when burning it in I put a cardboard piece between the plate and the A/C condenser so stray weld berries didn't find their way burning holes in the condenser.
View attachment 82000

So where I scored the plate to bend it, I then used a 1/8" wide cut off wheel to open it up so again I can get a proper weld and full penetration. This picture is great to show how proper metal fit and prep is every bit as important as knowing how to weld as is essential for proper welds.
View attachment 82001

Fully burned in.
View attachment 82002

Also since the metal warps when welded I welded this small strip of 1/4" to hold the center of the plate down while I welded the seams up. Once fully cooled with all welding done will remove it and plate will still be perfectly flat.
View attachment 82003

Bottom fully burned in. The frame is lapped over itself here where these plates where and you could still see that and it bugged me so I did a few small welds so the whole area is welded with out anyone questioning why it looked like it was fully welded on even though it was on the lower lap section.
View attachment 82004

View attachment 82005
 

Attachments

  • 20150103_195454.jpg
    20150103_195454.jpg
    96.9 KB · Views: 757
  • 20150103_164839.jpg
    20150103_164839.jpg
    109.2 KB · Views: 761
  • 20150103_164900.jpg
    20150103_164900.jpg
    74.3 KB · Views: 754
  • 20150103_195402.jpg
    20150103_195402.jpg
    73.9 KB · Views: 734
  • 20150103_195429.jpg
    20150103_195429.jpg
    80.9 KB · Views: 731
  • 20150103_195443.jpg
    20150103_195443.jpg
    96.6 KB · Views: 733


Looks really good. Aren't you eventually going to build bumpers though? I do like the hidden factory look a lot.


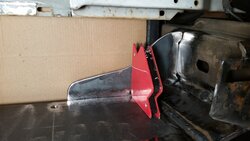
So now onto some supports. Made a CAD template (cardboard aided design) to fit the frame rails. Had to make the ends to fit the crumple zone bulge on each frame rail. BTW everything for this project I just used a 4 1/2" angle grinder, either with cut off wheels, grinding wheel, flap disc or wire wheel. Best tools for the garage what tools are limited. Also both sides turned out identical so pattern was used to make 2 plates. These plates where made with the winch sitting on a flat piece of steel so I knew the shape and placement as to not interfere with the wires that attach to the back of the motor. Also made them curved so it looks much better and has character than a straight triangle piece. :nono: These supports are 1/8" steel.
View attachment 82006

Held in place and ready to be tacked up. Also small side note for fabrication. Remove ALL mill scale off of the steel on both surfaces being welded. Mill scale is full of contaminates and will make for a weld that has less strenghth and looks poor and can make you think the welder is not set up correctly when really its just the crap that wasn't cleaned off of the steel. Mill scale is there from when it is hot formed.
View attachment 82007

First burn in sections on the brace plates.
View attachment 82008

View attachment 82009

View attachment 82010

Then fully welded to the frame.
View attachment 82011
 

Attachments

  • 20150103_203827.jpg
    20150103_203827.jpg
    103.5 KB · Views: 789
  • 20150103_202645.jpg
    20150103_202645.jpg
    128.7 KB · Views: 712
  • 20150103_202631.jpg
    20150103_202631.jpg
    84.7 KB · Views: 750
  • 20150103_202620.jpg
    20150103_202620.jpg
    88.1 KB · Views: 721
  • 20150103_201342.jpg
    20150103_201342.jpg
    84.3 KB · Views: 720
  • 20150103_195516.jpg
    20150103_195516.jpg
    112 KB · Views: 725


Its amazing. Not only to be in and wheel but for pictures, the backgrounds are perfect in every direction you turn.

If you are ever in the mood for a trip let me know and I can come and wheel anytime. Only 300 miles from me.

I do like me some clean welds. Nice work.

That would be a fun run, two white SAS coil over Explorers from the two best gens to modify.


Attachments

  • 20150103_203901.jpg
    20150103_203901.jpg
    71.9 KB · Views: 720
  • 20150103_203917.jpg
    20150103_203917.jpg
    99.6 KB · Views: 707
  • 20150103_205640.jpg
    20150103_205640.jpg
    112.8 KB · Views: 699
  • 20150103_205646.jpg
    20150103_205646.jpg
    94.3 KB · Views: 719
  • 20150103_205657.jpg
    20150103_205657.jpg
    88.4 KB · Views: 762


I got the winch solenoid box mounted. Took a bit to find a spot to remote mount it that it would fit and still be serviceable. I did not want to mount it on top of the winch and restrict any more air flow than is needed. Also I can't get to the solenoid box to plug in the remote with it on top of the winch anyways so it might as well be remote mounted.

I was limited to the right side of the truck though due to the length of all the big gauge wires that I did not want to remake or extend. So instead what I am going to do is pull the remote control plug port and extend the 4 small gauge wires and mount just the remote plug port to an easy access and clean looking spot. That way the big solenoid box is hidden yet still have access to service and do not need to get to it to plug in the remote. So that turned out great and will post pictures of it later.

Also I got the new transmission oil cooler mount made. It ended up 3 1/8" higher than the factory location and still uses all 3 factory mounting spots. Turned out good and still fully functional. Needed to move it up since winch is now where the factory lower mounts where also need room for the cooler lines coming off of the bottom of it. Will post pictures of it later.

Question? Since I have my grill off should I paint match it white instead of it being chrome around the grill section and headlights?


Looking good !

I had the same ordeal with relocating the box. I was going to run it inside the cab, but decided to eventually get a wireless remote installed. So I put it in the grill to the pass side, and can reach it to plug the controller for now. Some food for thought for ya.

I say paint it. :)


O man. I got all wiring done (minus remote, gmanpaint that's what I was thinking of doing) and plumbing done for transmission cooler. And WOW it fits but is very tight. None of it will have any rubbing problems but it is tight. Wires are barely long enough to go from solenoid to winch motor so attaching them is a little bit of a chore. Technically everything is fully serviceable but none of it is a 10 minute job to service.

Now onto the fairlead. Hummmm....... :scratch: would be easy if I could weld it's mount to the winch plate but if I do then I can't remove the winch without cutting it off. So my option is bolt on. This will take a bit more fab work to accomplish. :thumbsup:


Fab up a bracket for the fairlead that is able to be bolted to the winch plate. you'll need more gussets to reinforce it but that's the way I'd go.


Fab up a bracket for the fairlead that is able to be bolted to the winch plate. you'll need more gussets to reinforce it but that's the way I'd go.

Agreed.
My winch is mounted to a bumper, but I have to pull the bumper to remove the winch. If you want them mounted so they are tucked away there are always issues.


You guys hit it dead on what I was planning on doing! :thumbsup: The thought is to make a 1/4" bracket that holds the fairlead and has 4 bolts to the plate. Easy to install / remove if needed and plenty strong. Also won't be attached to the bumper so can always stay with the winch.

I know there is always issues with it tucked so far back in but to me it's totally worth it for the clean look. Figured if winch ever needs to be serviced I would have to pull the bumper from the start of the project. Factory bumper is 4 bolts and fairly light and easy to move with 1 person so no issues. Also can use winch mounting spot if I ever built a bumper as well. Low and tucked away.


Can you fab it so the fairlead plate uses the same mounts as the winch or would that leave too much free space for the plate to bend?
You going to run the fairlead through the bumper, or under, or above?
You mentioned the good part about using the stock bumper; weight. My winch bumper weighs about 85 pounds without the winch. Nearly impossible to remove with one person.
Having the winches tucked up so it requires bumper removal to access makes it unlikely they will be stolen.


Can you fab it so the fairlead plate uses the same mounts as the winch or would that leave too much free space for the plate to bend?
You going to run the fairlead through the bumper, or under, or above?
You mentioned the good part about using the stock bumper; weight.
Having the winches tucked up so it requires bumper removal to access makes it unlikely they will be stolen.

Can't really use the same mounting bolts as the winch. It would have to go under the plate and there is only 1/4" of room between that and center front rock light. And as far as bending it shouldn't have an issue as it only has to stick out roughly 1 3/8" from the plate. So it can't bend 1/4" being that short very easily at all. Look at the plate that gmanpaint posted in the link it looks like its only 1/8" from the picture. The bolting section and the part that the fairlead bolts to will all be 1/4".

The fairlead will be behind the bumper opening so technically it is inside the bumper with the rope coming through the bumper. The opening is big and curved so I can pull at like a 80* to the side of the front of the truck and not even rub the bumper with the rope. Same as far as up and down it would have to be at an extreme angle to rub on the bumper.

And hadn't thought of it being in so far in as a theft deterrent but it makes complete sense. Would take way to long to remove in a hurry. :D Also the other thing I thought it does to help is it is completely covered from being in the sun or normal weather. Of course will get wet when driving in rain but as for parked its fully out of the weather.

http://www.4wheelparts.com/Winches-...px?t_c=18&t_s=124&t_pt=5143&t_pn=PSC45-57-010

I don't recall what line your running but...This plate could be used, and if your going with Syn rope, the Hawse fairlead is smaller and a factor5 prolink end, will tuck away nice and flush to the face of the fairlead. Kinda pricey for all that tho. :D

I am running a synthetic rope so I have the small fairlead. It is 3/4" thick aluminum. Will look really clean next to the bumper. That factor55 link looks really sweet but man that sure is pricey for just a hook. Guess I haven't looked into what hook to run, it of course comes with the large heavy iron hook so will have to look at a good option for replacement. That factor55 is a good idea though would like it pulled tight to the fairlead and not pulled out and hooked else ware. Anyone want to donate to a winch hook fund? ;)

I did get the patterns made and most of the steel cut to make the mount last night. It will end up mounting on the sides of the winch so the mount will be wider than the fairlead. Tonight is date night though so no work on the truck tonight but will get it all finished up tomorrow and get it painted up so I can go back together on Sunday I hope.


Join the Elite Explorers for $20 each year.
Elite Explorer members see no advertisements, no banner ads, no double underlined links,.
Add an avatar, upload photo attachments, and more!
.


Looks really good. Aren't you eventually going to build bumpers though? I do like the hidden factory look a lot.
Sorry I totally missed a few posts. Yes that would be the eventual goal, but for time and things decided to at least get the winch on the truck first. Would love both front and rear bumpers. Really like the ones that [MENTION=3817]BKennedy[/MENTION] is running.

I do like me some clean welds. Nice work.

That would be a fun run, two white SAS coil over Explorers from the two best gens to modify.
Thanks, good welds makes for a cleaner stronger truck. I am not professional by any means but try to do my best.

And a Southern Utah run would be amazing, especially if we could round up a few additional trucks. Pretty sure [MENTION=3964]sirhk100[/MENTION] would come up from Vegas for a run. That's at least 4 trucks. :D

Looking good !

I had the same ordeal with relocating the box. I was going to run it inside the cab, but decided to eventually get a wireless remote installed. So I put it in the grill to the pass side, and can reach it to plug the controller for now. Some food for thought for ya.

I say paint it. :)
I ended up making a small mount on the side of the fairlead mount for the remote plug in port. Will look really good and I didn't end up needing a hole in the grill.

Think I am going to plasti dip the chrome part of the grill white and run it for a bit and see how the white looks and feels and go from there. If I really like it I will buy a blank grill and have it all paint paint matched.

Fab up a bracket for the fairlead that is able to be bolted to the winch plate. you'll need more gussets to reinforce it but that's the way I'd go.
Exactly what I did! Turned out great and is really nice and strong and clean.


Back
Top