X6StringerX
Explorer Addict
- Joined
- June 19, 2006
- Messages
- 1,411
- Reaction score
- 11
- Year, Model & Trim Level
- 2011 Lincoln MKS EcoBoost
With a few common tools, anyone can do this and you'll be saving yourself some cash. Hopefully this write-up will pursuade those of you that are still on the fence about doing your own maintenance into giving it a try. Not only can you save a lot of money by taking care of the simple things on your vehicle, but you will know exactly what work was done and furthermore how it was done.
In this write-up, I'll cover both the front and rear shocks as well as the 5th shock on the rear axle that some of you may have. This install pertains to a 2nd Gen Explorer/Mountaineer without air ride.
FRONT SHOCKS:
Step 1 - Jack one side of the vehicle up... I don't have the luxury of a garage, so I used my front lawn! Also, I had a small floor jack as well as my Explorer's bottle jack just for safety. If you have jackstands, I encourage the use of those as well.
Step 2 - Remove the front wheel of the same side you jacked up... duh, lol.
Step 3 - Remove the inner fender mud guard. It's held in by 5 or 6 plastic push pins. Lay it to the side for now.
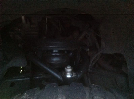
Step 4 (PICTURE) - The top nut on the front shock is usually stubborn... my Explorer was no exception. After spraying it with PB Blaster, it still ended up sheering off after about 6 or 7 complete turns. (this occurred on both front shocks) This is good though... the shock will be discarded anyway and it saved me the time of having to remove the nut the rest of the way. Make sure you remove the old rubber bushings. Your new shocks will have new bushings. Notice that in the picture, I'm using a 19mm wrench to foul the shock and keep it from turning when I turn the nut on the top. The nut on the top is a 15mm.

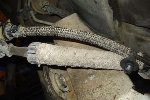
Step 5 (PICTURE) - As seen below, the bottom shock is held in by two fixed bolts and 2 nuts. The nuts are accessed from the bottom. Mine were 13mm. (PLEASE MAKE SURE YOU HAVE SOME EXTRA SUPPORT UNDER YOUR VEHICLE IN CASE THE JACKS GIVE WAY! YOU CAN PLACE THE WHEEL/TIRE UNDER THE FRAME.)


STEP 6 - You should have new hardware with your new shocks. I'm sure some of the sizes vary from each brand/model so make sure you have the correct tools on hand for the reinstall. The reinstall is the reverse procedure of the above.
*NOTE: You shouldn't overtighten the top of the front shock so much that the new rubber bushings are completely squished. Snug the bolt down and then give it an extra turn or two. Stop just as the bushing starts to squish out even with the sides of the metal plates. I plan to go back and apply Loctite. I didn't have any on hand.*
STEP 7 - Reinstall the mud guards.
STEP 8 - Reinstall the wheel.
***THE PROCEDURE IS THE SAME FOR BOTH SIDES***
REAR SHOCKS:
*NOTE: You do not need to jack the rear of the vehicle*
Step 1 (PICTURE) - Locate the bolt pictured below. It's best if you use a 15MM wrench to foul the bolt so it doesn't turn. The nut is an 18mm. I used a 1/2" drive wratchet for removal. You may need to knock the bolt loose with a hammer... just be careful not to mess up the threads. The old hardware is used again for the bottom mounts on the rear shocks.

Step 2 (PICTURE) - Follow the shock to the top mount. The nuts are accessed from the top. They are 13mm.

Step 3 - Reinstall in the reverse order. Your new shocks should have new nuts and bolts included for the top mount. The side pictured above is the driver side and imo, it is slightly harder to access the nuts on that side.
***THE PROCEDURE IS THE SAME FOR BOTH SIDES***
REAR STABILIZER SHOCK:
*Note: I'm a big guy, so I found it easiest to pull the back wheels up onto a wood block for additional room. This shock, imo, is easiest accessed from in front of the rear passenger side tire. Also, my replacement did not include hardware, so the old stuff was used again. There didn't appear to be anything wrong with it, but inspect your hardware to make sure.
Step 1 (PICTURE) - Remove the lower bolt. The nut is facing the rear and in my case it was welded to the mount so it held itself in the place. The bolt size is 15mm.

Step 2 - Remove the upper bolt. Note in the above picture that the upper bolt is facing the opposite direction as the lower bolt. The nut for the upper mount is not welded in place but it does have a flap that hits the frame to prevent it from rotating with the bolt. The bolt is also a 15mm.
Step 3 - Reinstall your new shock in the reverse order.
In this write-up, I'll cover both the front and rear shocks as well as the 5th shock on the rear axle that some of you may have. This install pertains to a 2nd Gen Explorer/Mountaineer without air ride.
FRONT SHOCKS:
Step 1 - Jack one side of the vehicle up... I don't have the luxury of a garage, so I used my front lawn! Also, I had a small floor jack as well as my Explorer's bottle jack just for safety. If you have jackstands, I encourage the use of those as well.
Step 2 - Remove the front wheel of the same side you jacked up... duh, lol.
Step 3 - Remove the inner fender mud guard. It's held in by 5 or 6 plastic push pins. Lay it to the side for now.
Step 4 (PICTURE) - The top nut on the front shock is usually stubborn... my Explorer was no exception. After spraying it with PB Blaster, it still ended up sheering off after about 6 or 7 complete turns. (this occurred on both front shocks) This is good though... the shock will be discarded anyway and it saved me the time of having to remove the nut the rest of the way. Make sure you remove the old rubber bushings. Your new shocks will have new bushings. Notice that in the picture, I'm using a 19mm wrench to foul the shock and keep it from turning when I turn the nut on the top. The nut on the top is a 15mm.
Step 5 (PICTURE) - As seen below, the bottom shock is held in by two fixed bolts and 2 nuts. The nuts are accessed from the bottom. Mine were 13mm. (PLEASE MAKE SURE YOU HAVE SOME EXTRA SUPPORT UNDER YOUR VEHICLE IN CASE THE JACKS GIVE WAY! YOU CAN PLACE THE WHEEL/TIRE UNDER THE FRAME.)
STEP 6 - You should have new hardware with your new shocks. I'm sure some of the sizes vary from each brand/model so make sure you have the correct tools on hand for the reinstall. The reinstall is the reverse procedure of the above.
*NOTE: You shouldn't overtighten the top of the front shock so much that the new rubber bushings are completely squished. Snug the bolt down and then give it an extra turn or two. Stop just as the bushing starts to squish out even with the sides of the metal plates. I plan to go back and apply Loctite. I didn't have any on hand.*
STEP 7 - Reinstall the mud guards.
STEP 8 - Reinstall the wheel.
***THE PROCEDURE IS THE SAME FOR BOTH SIDES***
REAR SHOCKS:
*NOTE: You do not need to jack the rear of the vehicle*
Step 1 (PICTURE) - Locate the bolt pictured below. It's best if you use a 15MM wrench to foul the bolt so it doesn't turn. The nut is an 18mm. I used a 1/2" drive wratchet for removal. You may need to knock the bolt loose with a hammer... just be careful not to mess up the threads. The old hardware is used again for the bottom mounts on the rear shocks.
Step 2 (PICTURE) - Follow the shock to the top mount. The nuts are accessed from the top. They are 13mm.
Step 3 - Reinstall in the reverse order. Your new shocks should have new nuts and bolts included for the top mount. The side pictured above is the driver side and imo, it is slightly harder to access the nuts on that side.
***THE PROCEDURE IS THE SAME FOR BOTH SIDES***
REAR STABILIZER SHOCK:
*Note: I'm a big guy, so I found it easiest to pull the back wheels up onto a wood block for additional room. This shock, imo, is easiest accessed from in front of the rear passenger side tire. Also, my replacement did not include hardware, so the old stuff was used again. There didn't appear to be anything wrong with it, but inspect your hardware to make sure.
Step 1 (PICTURE) - Remove the lower bolt. The nut is facing the rear and in my case it was welded to the mount so it held itself in the place. The bolt size is 15mm.
Step 2 - Remove the upper bolt. Note in the above picture that the upper bolt is facing the opposite direction as the lower bolt. The nut for the upper mount is not welded in place but it does have a flap that hits the frame to prevent it from rotating with the bolt. The bolt is also a 15mm.
Step 3 - Reinstall your new shock in the reverse order.