Is there a trick to installing the rear main seal on a 4.0L? | Ford Explorer Forums - Serious Explorations

  • Register Today It's free!

Is there a trick to installing the rear main seal on a 4.0L?

koda2000

Explorer Addict
Joined
September 2, 2011
Messages
13,874
Reaction score
1,579
Year, Model & Trim Level
x
I know how to get the old seal out and I have a new FelPro rear main seal for my 2001 Job II 4.0L SOHC. I see there's a special tool for installing the new seal w/out ruining it. The tool is around $100 (or more) and is used to press the seal in. I hate to spend $100+ on a tool I'll never use again. Has anyone successfully installed the rear main seal without the special tool?


Join the Elite Explorers for $20 each year.
Elite Explorer members see no advertisements, no banner ads, no double underlined links,.
Add an avatar, upload photo attachments, and more!
.


I've got one of those installers and haven't used it in a while. You basically tighten it down with the flexplate bolts and it pushes the seal in. If you want pay shipping and I can ship it to you. That is as long as you can ship it back in a timely manner.

I have a universal seal remover/installer set I pretty much use for everything.

Let me check with my O'Reiiy's and AutoZone tomorrow to make sure they don't loan the tool (I doubt they do). If they don't I'll PM you tomorrow with my address. I promise I'll return it promptly and I'll pay the shipping both ways. I have my engine on a stand right now, but I can take it off temporarily to change the seal as soon as i get the tool. I appreciate the offer.


I've also got the tool to turn the crank without the balancer on
 

Attachments

  • 1585319330449362046402581003481.jpg
    1585319330449362046402581003481.jpg
    78.8 KB · Views: 158
  • 15853193565874313873634575552292.jpg
    15853193565874313873634575552292.jpg
    73.5 KB · Views: 155
  • 1585319473174890660286707611831.jpg
    1585319473174890660286707611831.jpg
    75.6 KB · Views: 159
  • 15853195402851767836032469967064.jpg
    15853195402851767836032469967064.jpg
    90.7 KB · Views: 247
  • 15853195582837852003889608476290.jpg
    15853195582837852003889608476290.jpg
    113.2 KB · Views: 246
  • 15853195842018947216265112403969.jpg
    15853195842018947216265112403969.jpg
    78.6 KB · Views: 172


I've also got the tool to turn the crank without the balancer on

Yes, that looks like the rear main seal installation tool I need. I don't need the crank turning tool, but thanks.


no special tool needed, i just did this last week. the felpro seal should come with a plastic installation tool. the seal comes pre installed on the plastic tool(lets call it a donut, you slip the plastic donut over the exposed part of the crankshaft and then simply push the seal into position. once its off the plastic piece remove it and push the seal flush with the back side of the same tool.


no special tool needed, i just did this last week. the felpro seal should come with a plastic installation tool. the seal comes pre installed on the plastic tool(lets call it a donut, you slip the plastic donut over the exposed part of the crankshaft and then simply push the seal into position. once its off the plastic piece remove it and push the seal flush with the back side of the same tool.

I just unpacked my Fel Pro full engine gasket set yesterday. The rear main seal is there, but there was no plastic installation tool included. After watching a fordteckmakuloco video on the 4.0L SOHC timing chain replacement (part 4 of 4) I expected there to be a white plastic rear main seal installation piece included, but I did not find one in the box.


I just unpacked my Fel Pro full engine gasket set yesterday. The rear main seal is there, but there was no plastic installation tool included. After watching a fordteckmakuloco video on the 4.0L SOHC timing chain replacement (part 4 of 4) I expected there to be a white plastic rear main seal installation piece included, but I did not find one in the box.

interesting...i wonder if they sell one with and one without. mine was also a felpro
by the way, how awesome are those videos?! i just re timed my entire sohc becasue of them. it was my first time ever taking an engine that far apart.


no special tool needed, i just did this last week. the felpro seal should come with a plastic installation tool. the seal comes pre installed on the plastic tool(lets call it a donut, you slip the plastic donut over the exposed part of the crankshaft and then simply push the seal into position. once its off the plastic piece remove it and push the seal flush with the back side of the same tool.

Only the more expensive brown PDFE seal comes with the plastic installer deal. The complete gasket set comes with the regular orange seal.


CLEAN ALL SURFACES
Lube the end of the crankshaft, lube the inside lip of the seal (I use vaseline)

find something that fits the outer lip of the seal, for me it is a large hub socket I have (OR one of the seal drivers from my harbor freight seal driver kit). It must fit the seal lip perfectly
I put a short extension in the socket, like 4" long 1/2" drive
Use dead blow hammer and tap lightly, just like doing a wheel seal on the back of a rotor, once you get it started in straight it will go. Slowly tap it in until its flush

Also I put Anaerobic sealant on the outside edge of all front and rear main seals (axle shaft seals, pinion seals, etc) very similar to the red/green/blue stuff that is on the seal from Felpro


interesting...i wonder if they sell one with and one without. mine was also a felpro
by the way, how awesome are those videos?! i just re timed my entire sohc becasue of them. it was my first time ever taking an engine that far apart.

fordteckmakuloco's video's are very good. I would not have attempted this job (replacing all my time chain components and an almost full engine rebuild) without having watched his video's multiple times. I don't always agree with all of the methods he uses, but following his advice wont get you into trouble.


fordteckmakuloco's video's are very good. I would not have attempted this job (replacing all my time chain components and an almost full engine rebuild) without having watched his video's multiple times. I don't always agree with all of the methods he uses, but following his advice wont get you into trouble.
i might still have the tool in the garage trash can. if i do ill mail it to you


Only the more expensive brown PDFE seal comes with the plastic installer deal. The complete gasket set comes with the regular orange seal.

Geez, for $302 for a gasket set you'd think they might include the better seal...


Also I put Anaerobic sealant on the outside edge of all front and rear main seals (axle shaft seals, pinion seals, etc) very similar to the red/green/blue stuff that is on the seal from Felpro

+10 to @410Fortune

And hey, just sayin' , in a pinch you can also use a high temp RTV (i.e. Permatex Ultra Copper) around the outside edge of radial style seals.

Same idea - you're basically trying to take up any clearances that could allow the leaking of oil past the seals' outer edge.

Little details like this (and cleanliness / oil-free surface prep) really make a difference between hitting a long term oil free goal and a "weeper" in a few years time.


ain't that the truth
You should also use your fingernail to check for any lip that may have worn into the crank/axle/shaft
If that is the case then you need a sleeve/seal kit OR do not sink the seal as deep (there are ways) :)


Clarification:
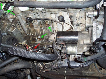
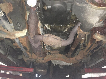
Okay, I got my engine off the engine stand and hoisted it onto the top of my tool cart (rated at 700 lb capacity if I remember correctly). As I'd seen done is several videos, I drilled 2 small holes into the old rear main seal, inserted some screws into the holes and easily pulled the old seal out. It was just a regular appearing seal, with nothing unique about it. It also did not fit particularly tightly.

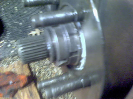
Next I removed my new replacement Fel Pro rear main seal from my full engine gasket set. The seal part is the same (except for color) to the OE one I just removed, however the Fel Pro seal has a removable metal center piece. It appears to be a repair sleeve kind of device that gives the new seal a new surface to run on. I'm not sure I see why you need to use a special tool to install the new seal, but as I have one coming I'll use it. I'll also be lubing up the crankshaft, sleeve and new seal prior to installation. I also like to put a thin film if sealant around the edge of new seals to seal any imperfections in the seal and it's mating surface.

I've heard the replacement oil seal referred to as a "2-piece seal". Is this because of the metal sleeve that the new seal comes with?
As I see it the new seal, with the repair sleeve inserted from flexplate side, is pressed in using the special installation tool. Is my understanding of the installation procedure correct? I don't see any other way to do it.

I can provide pics if that helps.


Get a Motorcraft rear main seal.

I have used a couple different brands on my 4.0L, and done this job 3 times on it. All 3 have failed. I thought I must have been installing it wrong, BUT.. I used the seal tool each time. I searched this problem out here, and found that you really should only replace with a Motorcraft seal. The seal lip is special, and differs then aftermarket brands. Lesson learned, and when I do this for the 4th time, I will use the Ford seal, and the seal tool.


Join the Elite Explorers for $20 each year.
Elite Explorer members see no advertisements, no banner ads, no double underlined links,.
Add an avatar, upload photo attachments, and more!
.


I drilled 2 small holes into the old rear main seal, inserted some screws into the holes and easily pulled the old seal out.

Smart......
they do come right out using a couple of wood screws and some pliers, I love that trick


Back
Top