Military 101/Off Road Adventure Trailer | Ford Explorer Forums - Serious Explorations

  • Register Today It's free!

Military 101/Off Road Adventure Trailer

c97001fd-a99f-4754-af2b-984892919ba2.jpg


Well after a few years of wanting one of those military trailers that you see in the WW2 flics being towed behind a jeep, I finally got one. Not that particular one which is the M416 but one that I like better, the later model M101. It's a little larger, plus it's got a flip down tailgate. A lot of surface rust but structurally sound.
Only on spot that is rusted thru. Nothing I can't fix.

DSC04820.jpg


8' long 5' 5" wide with a Pintal hitch. You know it's tuff when you see the name Rockwell on that large jack in the corner. There's two of them but I'll use some lighter ones. Not going th throw away though.

DSC04819.jpg


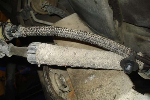
The bed and frame are in great shape. Check out the leaf pack. Trailer rated at 3/4 ton.

DSC04823.jpg


Only makes sense that it has a military wrap leaf spring at ends. Nice safety feature.

DSC04812.jpg


16" rims with military 8 ply tires that are 35" tall :eek: Believe it or not, but there in great shape.
Love the way these trailers sit up so tall when being towed. In fact it may just sit level when hooked up to the Bronco. Of course the trailer will be paint satin black after some major sanding and touching up some spots. Also going to look into one of those Adventure style tents that are made for these Military trailers.

DSC04827.jpg


Removed a lot of unnecessary items. I think once it's done it will really compliment the little B2. Even though I don't have tags for it yet, I'll try to post a pic if it hooked up to Samson. Love to have it done for the AFN and Extreme 4x4 shows up in Carlisle this year, but not enough time.


Join the Elite Explorers for $20 each year.
Elite Explorer members see no advertisements, no banner ads, no double underlined links,.
Add an avatar, upload photo attachments, and more!
.


...Congrats..:biggthump

..Everytime I see an ad out here I wondered if you ever found a trailer...They are still running 800-1000 here (no rust) but curious what you wound up paying...

..and what's with the kitty litter?..:p:


$200 and he even put it on his roll back and brought to my house. So now I can spend a little more for prep and paint without having too much in it...I think.
For the life of me I did not know what you meant, Kitty Litter. Scrolled back and then noticed an old litter bucket that I used to throw a lot of trash that was in the bed lol.


Thanks, that's my sentiments also. Not much I can improve on other then a whole bunch of TLC.

47a262cc-931c-48dd-b52b-247d6e970d6a.jpg


For now I'm just cleaning up old stuff that needs to be trashed, like all these old straps which line each side. I'll leave the tie downs they're attached to for future hold downs.
Removed the old tool box which I thought would have been steel, but found out it was all aluminum. You can see where it was bolted to the left.
All the fasteners are stainless steel bolts and nuts. Not throwing this away for sure.

3041d4dc-a820-46e9-9993-62e30b9d5caa.jpg


The inside of the trailer was loaded with 1/4" aluminum plate and large pieces of cast aluminum. I'll wait until the price of scrap goes back up. Might hold on to one of those huge steel jacks though. Then deduct the price of the scrap from the $220 and I won't have that much in the trailer so far.

598ebc5f-aa09-4495-995e-b82c6caab5a8.jpg


Now that opens up the entire bed for more storage/tent. Going to spend a fair amount of time scraping and sanding. Need to find a spare rim and tire. I'd like to get the same type to be period correct. Found out that there's plenty of sites out there that cater to this kind of stuff.


Great project!

I look forward to watching your restoration of this trailer.


For the life of me I did not know what you meant, Kitty Litter.

...I see things others don't as I am wired differently..:confused:..:D

..You got a steal and I too look forward to your build but, I think I would keep all that plate and aluminum and use it on other projects...You know the only time metals will go up in price is when you really need some for a project..:hammer:


Thanks guys, as far as the aluminum goes, yes I'll keep the flat stuff that I can bend and work with. May even use it to mount the rear lights as the stock mounting brackets on the lights are busted off as you'll see in the below pics.

248e5c75-4868-4d48-8b9d-194d53238405.jpg


Took off both rear lights that were hanging down by their wires. Looks good from the front.

444d5720-1dd1-4e0a-864a-8e7e677976ce.jpg


But the back is a different story. Ouch! But I've worked with busted up lights before as in my Hella light that got busted up when it got knocked by a limb.

0079ff48-2fb4-4c25-a4fc-e529edd1f200.jpg


I'll use a resin and the two types of fiberglass matt that's on the shelf to mend up.

a751c5da-5f91-4b55-b436-b9dc7bd3e5cc.jpg


Here is where the rest of the back of the lights are, still hanging onto the bracket. The two little studs are the ground wire connection points. I could just use two after market standard tailights, but that's no fun lol. I just like the looks of these and would like to keep it somewhat military correct.

bdd6ce5a-2c51-43d9-a2cc-dc08ca5b46a4.jpg


The top two bulbs are what I'll use as the running light and the brake light which is the larger bulb. These are 24v bulbs so I need to use a 12v bulb. It's amazing how these lamps are built. They have a vibrator isolator made out of a very soft rubber compound that keeps hard bumps from busting the filament.

506135b1-d9ca-4868-bfab-a2f54b895e1b.jpg


Hooked up to my auxiliary power source on front on the B2, all bulbs work, just a little dim cause of the 24v requirement.


bf7179f6-8851-43e6-a95c-ce61414753d8.jpg


Going to start repairing the least destroyed one lol. Only found one attaching bolt. It's just sitting in there for now. I'll make up some kind of other fastening device for the other side.
Going to start making a splint out of sheet metal.

72e31eeb-6b94-451c-be1c-140bfc7f7488.jpg


Pop riveted the sheet metal plate to plastic and also ran grounding wire through a grommet. Missing a piece of plastic housing above the mounting bolt hole.

b2924338-4b42-43ba-9dd7-d318b99c84ce.jpg


Screwed the mounting bolt in and then layed 3 layers of glass. After drying I'll decide if it needs another layer.


Your absolutely right about the "Look". I think a short shovel mounted on the side of trailer would also look cool.
Thanks for posting those links.

bd1ebf81-ff9d-4233-b57f-b385771bfbe9.jpg


This one must have been hit by some incoming. When removed the lens it just fell apart.
971f91d8-6133-4992-bfe7-904aab988569.jpg


Put the jig saw puzzle back together and replaced lens. This one has both mounting bolts.

adb83d44-a16c-42cb-955d-c6a287cdcbbd.jpg


The first one is on the right. Could Bondo over and sand but since it's the back, I think not. The one on the left has the resin soaked fiberglass. Waiting to dry.


cd2074b4-d94a-47cc-a9a6-181ec3d3ba41.jpg


Have both taillight housings done other then to paint the other one black. The black one is still wet that's why all the shine. Satin black when dry.
I guess they're strong enough cause I knocked one off the work table and it fell on the concrete floor and bounced around lol.

638e318d-6c5c-48c8-8a2d-dbd7bd76227f.jpg


Just couldn't help myself. Even though I don't have the correct hitch I did tow it a whopping 15'.

e7eabb47-51d4-4555-aa8c-62ba8028e986.jpg


b19c22e0-53dd-4c79-ad57-ef69d617e8c1.jpg

I think it really adds to the Trail theme of the truck sitting up that high and so tuff looking. Can't wait untill it's all black including rims. Then deck it out with all the Trail/Camping goodies. Have not even begun thinking about a tongue mounted tool box yet.

c56aa96a-58ea-4a9e-8ccd-7a631b298a2e.jpg


Need to rig up a way to make this jack secure when lifting the tongue. Also someway to secure for towing. I really need to know just how high this thing does go?

I guess I'll have to bite the bullet and check out the complete parking brake system from hand brakes, cables, drums and all associated parts including wheel bearings. This ought to be good...ya right.


Again, thanks for that link. Just what the Dr ordered.


Does your spare need to be similar to the current tires, something of the same size but different tread, or something just with the same overall height?


Does your spare need to be similar to the current tires, something of the same size but different tread, or something just with the same overall height?

Yes just like the one pictured in the Coker link you posted. Exact replica, that's why I said just what the Dr ordered.


f06e081e-6059-417d-bd24-4c5445c24278.jpg


Started removing all the peeled paint off the bedrails. Eventually the whole trailer will be done. Once done I'll most likely move trailer into garage to keep from further rusting due to all the rain we will be getting. Going to make sure that I add a lot of tie down locations for tarp. I'll also be looking into some kind of tent gizmo that can be put down in bed on top of wheel wells or top of bed rails along with necessary supports. Saw one on an Adventure Trailer site that wanted $5000 :eek: And that was just the tent. Like that will really happen lol. I think there is a ton of options available on this idea.

c07f7c05-a6be-408f-9500-f9615bd11fb9.jpg


This is the worst area as far as rust goes. There was somekind of outer contraption that held some trailer related part that kept all the moisture locked in at this location...No more.
I'll make a new vertical brace and also cut out some of body panels that are eaten through and replace with new. If I can I'll use some of the original aluminum pieces I've removed to make new body panels.
Nothing like that air gun to clean out all the crud between body panels. I'll squeeze some weather sealant between those spaces before painting.
Also about time to look into a new MIG since there is going to be a lot of sheet metal welding. Old one died on me.


3605329905_d71b1655d4_b.jpg

Image courtesy of http:/ /www.flickr.com


Join the Elite Explorers for $20 each year.
Elite Explorer members see no advertisements, no banner ads, no double underlined links,.
Add an avatar, upload photo attachments, and more!
.


Were definitely both in the same ball game on this build. Looks like that's a great place to mount the Hi jack. In fact I was looking at them just yesterday at Tractor Supply.

c07f7c05-a6be-408f-9500-f9615bd11fb9.jpg


Now to put some aluminum in that hole.

8acb700c-1ca5-4b6d-8220-0093fed3b3fd.jpg


The aluminum actually came from stuff I took off trailer. These pieces came off the lid of box that was inside the bed on the front panel. Took some paint remover and cleaned off the old paint. I guess I really did not have to but looks cool. Their laying on the lid that I cut the pieces from. Aluminum from lid is .085".

72663a3e-db98-4468-8010-c29dcced4b43.jpg


Might say I recycled it back into the trailer.


Back
Top