Mutineer
Well-Known Member
- Joined
- August 23, 2005
- Messages
- 534
- Reaction score
- 10
- Location
- Ardmore, AL
- City, State
- Ardmore, AL
- Year, Model & Trim Level
- 1997 Explorer XLT 4X4
- Callsign
- FLOYD
Hey Yall I got the Headers last week and finally got to put them on last night.
Took about 4 hours all-together.
The CD that came with the set did not work, but this aint my first rodeo so I adapted and overcame.
I have a 3 inch Lift kit on the body so it went easier for me than some...check out TECHIEMAN's thread I think he is putting up pics of an install without the lift.
I then replaced all 8 of the plug wires and had to re-route a few of them to keep them from burning. (GET SOME METAL HEAT SHIELDS)
Due to the Lift kit, I had to grind down the bolt and weld-nut on the steering linkage to keep it from hitting the headers and binding up the steering.
Refilled the PS system and worked the air out, and then checked for parts and tools around the truck.
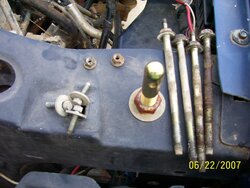
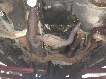
Then I bolted up the exhaust pipes to the new headers, using the supplied bolts and lock-tite, and let them sing.
Ill let the pics show the rest, any questions feel free. (yes, I know My camera's date is off...lol )
)
Took about 4 hours all-together.
The CD that came with the set did not work, but this aint my first rodeo so I adapted and overcame.
I have a 3 inch Lift kit on the body so it went easier for me than some...check out TECHIEMAN's thread I think he is putting up pics of an install without the lift.
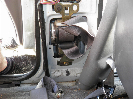
On the Right Side:
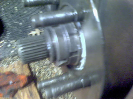
- From underneath: Removed the 2- 9/16" (14MM) nuts on the Motor mount bolt/studs that hold on the starter cables and the Tranny lines
- Removed the 2- 1/2" (13MM) Motor mount bolt/studs from underneath,
- Lifted the engine,
- Removed the old header,
- Cleaned and wire-brushed the mating surfaces on the head and the header,
- Lock-tited the bolts and threw on the left side header from the wheel well.
- Replaced the motor mount bolts, with a mild difficulty getting one of them to line back up, and that side was done.
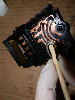
On the Left Side:
- Removed the serpentine belt using the 15MM bolt on the tensioner.
- Took the power steering reservior loose by removing the bottom hose(pressure clip) and drained it
- Removed the 3- 5/16" (8MM) bolts holding it on.
- Removed the 4 bolt/studs for the AC Compressor [2 10mm nuts for hose/cable placement brackets and then 2 1/2' (13MM) bolts and 2 1/2" (13MM) studs for the compressor]
- Moved the compressor forward enough to access the front bolt.
- Removed all the bolts and the nut from the stud for the oil dipstick tube.
- Removed the oil dipstick, then the dipstick tube
- Removed the remaining stud
- Removed the old header and took it out through the top,
- Put in the new Header through the top,
- Lock-tited the bolts and bolted her on.
I then replaced all 8 of the plug wires and had to re-route a few of them to keep them from burning. (GET SOME METAL HEAT SHIELDS)
Due to the Lift kit, I had to grind down the bolt and weld-nut on the steering linkage to keep it from hitting the headers and binding up the steering.
Refilled the PS system and worked the air out, and then checked for parts and tools around the truck.
Then I bolted up the exhaust pipes to the new headers, using the supplied bolts and lock-tite, and let them sing.
Ill let the pics show the rest, any questions feel free. (yes, I know My camera's date is off...lol
)