aaron81006
Active Member
- Joined
- August 15, 2013
- Messages
- 90
- Reaction score
- 4
- City, State
- Pueblo, Colorado
- Year, Model & Trim Level
- 94 explorer XLT
I've been wanting to do an OBA setup on my rig for awhile. I've had two SCBA bottles for about a year and finally decided it was time to start this progect.
I've spent a lot of time researching systems and deciding what type of components I want. My goal is to do a York compressor but I haven't been able to find one with a sepentine clutch at the the PNP. The 83 Mustangs usually have the engine already pulled. I may have to just grab whatever one I can find and get the right clutch later. Here is the best setup I have found. Credit to therangerstation.com.

The goal is something like this:

My bottles are the old style SCBA with the funky gauge. I went to a few stores around town trying to find fitting that will screw right on but had no luck. My next thought was to find a large screw to fit in the bottle that I could tap into. Then I dawned on me. I do already have the right fitting I just need to modify that one. A little cutting, drilling and tapping later, I changed the fitting on the left to the one on the right.

I spent a lot of time trying different fittings. I wanted to use pex quick connect fittings but couldn't get a good seal. I finally ended up with a combo from the barbed hose, pex plumbing and air compressor sections at Home Depot. The pressure test was a success with 132 psi for 24 hrs. I know the pic show 108 but after adjusting my garage compressor, I was able to get to 132 and it held.

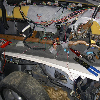
As we all know, the Ex doesn't have a lot of room to mount things. Especially anything of size. I've decided that the best place to mount the bottles is along side the frame rails below the front seats. These bottles are rated at somewhere around 3000# and the bottle wall thickness is over 1/2" so I'm real comfortable with this layout. With some quick measuring, sketching, autocad, about 15 minutes of plasma table time and a huge brake, I ended with these guys.

The mockup with the bracket partially bolted in and the bottle wedged into place with a screwdriver:

I like it.
Brackets welded up and ready for paint:

Pretty blue, ahhh. Lol

The frame rails are some sort of double wall design that wouldn't allow me to get a bolt in from the back side. My plan was to tap the frame steel but it wasn't thick enough to get a tight hold and I stripped some threads. It was strong enough to tighten the bolts and snug up the plates to be welded so that's how it's going to be. I drilled a new hole in the body mount and moved the grommet to get better clearance for the e-brake cable.

Right now I just have the lines capped. I'm going to run the lines from the p.s. to the d.s. along the bottom of the body and over the heat shroud above the exhaust pipe. I think this should give me enough protection so I can use the rubber hose. If I get melting, I can easily copper pipe it through here.
For now I will only be routing the hose to the engine bay and be installing a quick connect there. At least this will get me operational. I will have to refill from a shop compressor but that will have to do until I get more time and cash.
So far the most expensive thing was the stupid tap for the bottle fitting at $25. I plan to Ebay that when I'm done. Right now I'm right only into this (less the tap) for about $25.
More to come shortly.
I've spent a lot of time researching systems and deciding what type of components I want. My goal is to do a York compressor but I haven't been able to find one with a sepentine clutch at the the PNP. The 83 Mustangs usually have the engine already pulled. I may have to just grab whatever one I can find and get the right clutch later. Here is the best setup I have found. Credit to therangerstation.com.
The goal is something like this:
My bottles are the old style SCBA with the funky gauge. I went to a few stores around town trying to find fitting that will screw right on but had no luck. My next thought was to find a large screw to fit in the bottle that I could tap into. Then I dawned on me. I do already have the right fitting I just need to modify that one. A little cutting, drilling and tapping later, I changed the fitting on the left to the one on the right.
I spent a lot of time trying different fittings. I wanted to use pex quick connect fittings but couldn't get a good seal. I finally ended up with a combo from the barbed hose, pex plumbing and air compressor sections at Home Depot. The pressure test was a success with 132 psi for 24 hrs. I know the pic show 108 but after adjusting my garage compressor, I was able to get to 132 and it held.
As we all know, the Ex doesn't have a lot of room to mount things. Especially anything of size. I've decided that the best place to mount the bottles is along side the frame rails below the front seats. These bottles are rated at somewhere around 3000# and the bottle wall thickness is over 1/2" so I'm real comfortable with this layout. With some quick measuring, sketching, autocad, about 15 minutes of plasma table time and a huge brake, I ended with these guys.
The mockup with the bracket partially bolted in and the bottle wedged into place with a screwdriver:
I like it.
Brackets welded up and ready for paint:
Pretty blue, ahhh. Lol
The frame rails are some sort of double wall design that wouldn't allow me to get a bolt in from the back side. My plan was to tap the frame steel but it wasn't thick enough to get a tight hold and I stripped some threads. It was strong enough to tighten the bolts and snug up the plates to be welded so that's how it's going to be. I drilled a new hole in the body mount and moved the grommet to get better clearance for the e-brake cable.
Right now I just have the lines capped. I'm going to run the lines from the p.s. to the d.s. along the bottom of the body and over the heat shroud above the exhaust pipe. I think this should give me enough protection so I can use the rubber hose. If I get melting, I can easily copper pipe it through here.
For now I will only be routing the hose to the engine bay and be installing a quick connect there. At least this will get me operational. I will have to refill from a shop compressor but that will have to do until I get more time and cash.
So far the most expensive thing was the stupid tap for the bottle fitting at $25. I plan to Ebay that when I'm done. Right now I'm right only into this (less the tap) for about $25.
More to come shortly.