Whey Cooler
Active Member
- Joined
- February 24, 2019
- Messages
- 70
- Reaction score
- 16
- Year, Model & Trim Level
- 2018 Explorer XLT
Okay... so here's what I did... ALWAYS test your wires and circuits! The colors and schematics for yours may be different but should be the same/similar!!!View attachment 326422
Be more than happy to post up tomorrow! At work until 2300 today.
I managed to get a new copy of the 2018 wiring schematics for super cheap which made it easier. Basically, I cut the low power lead into the socket and T-ed off of the positive of the side marker LED. The low power filament now operates the way it should.
I'll post up which wires and try to get some pics, I did seal it up in loom and such like the factory but that's problem and will be easy to redo!
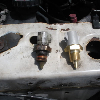
The first pic on the left side is the back of the parking light/turn signal. The middle black wire is the one for low power (+) to the bulbs. I cut this. I stripped back a bit on the end so you can see the wire is black and disconnected. This gets cut on both sides of the car's parking lights. I heat-shrunk the splice to keep the elements out.
The next pic is the harness plug to your headlight bucket. It is located just below your turn signal socket/bulb. You can see the opening above the empty plug. On that plug, you will have a yellow wire with a brown trace on PIN 9 that runs the side marker LED's. You can "T" tap off that...and connect it to the black/middle low power wires on your turn signals. I loomed to the other side off one tap due to the LED's low amp pull. This lead will allow your low power front parking lights to follow your side marker LED's operation. Make sure with a meter that yours is also the same wire.
The last pic is it all back together. I did leave the sealing of the T-tap off so you can see it in context..but I would at least tape that up if I were you.
I'm not a good teacher so let me know if something makes no sense here!
")