jakegator
Well-Known Member
- Joined
- August 1, 2012
- Messages
- 124
- Reaction score
- 3
- City, State
- PA, USA
- Year, Model & Trim Level
- 1998 explorer 4dr ohv
So there may be posts about installing aftermarket seats in our Explorers but I couldn't find one that dealt with adapting a seat from another ford to work in our cars. The reasoning for me at least was simple the left side brace on the bottom portion just snaps over time. Maybe its just me but I blame it on the construction using aluminium while other ford seats are steal. But either way.
For this project you will need the following:
A new seat (mine was $10 from the junkyard out of an 02 Ford Escape)
Your old seat
4 bolts (size isnt that important as long as they are long enough) mine were 2 inches because thats what I had... they were overkill
Drill bits
Drill
Grinder
A welder is you have one, if not ill mention how to do it with out one.
If you dont have a welder, alot of patience.
I wont be going over how to remove or install that seat it self as it is pretty simple and there are several posts on that already.
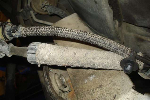
OK so lets start with your stock seat (this is for a 98 explorer with an electric seat). Remove the seat adjustment rack (not sure the exact name). There will be four 10 mm bolts. See the picture below for the piece you are removing.

The top part is what we need as the mounting brackets that secure the seat to the floor are different and the mechanics are wider on the newer escape.
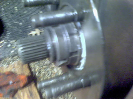
Next remove the seat adjustment mechanism from the Escape seat. Unlike the Explorer this one is riveted on and is much easier to just grind off like below. If you dont have a grinder buy one, there 30 bucks at Walmart. You will also need to remove the seat belt receiver. The 98 explorer have a different arrangement that bolts to the seat adjustment mechanism. Also the escape has a pyrotechnic charge in the seat belt receiver (first image below) that pulls the belt tight in an accident. This is probably not safe to keep on the car with out the proper wiring. To remove it you need a torx head. I dont know what size as I didnt have any so i just used vice grips and it came right off. Be careful when dealing with this.


You will want the metal rails to be as flush as possible.
Test fit the old seat adjustment over the metal rails like below.

If you are using an 02 Escape seat you will notice it fits perfectly in the recesses. Now here is where things will vary if you dont have a welder. If you dont have a welder you will need to drill a hole the diameter of your bolt through the holes on the seat adjuster into the seat support bracket. It would be best to the tap these holes with the correct thread size because there is not much room to get a nut on the other side of the seat. Alternatively you could rivet a nut into the holes. I cant remember the name of the tool but it does exist. Its basically a rivet gun but it rivets a nut into metal. Its fairly thick steel so a tap should do just fine.
If you do have a welder mark where the holes are on the seat adjuster and weld bolts to the steel. then just bolt the seat adjuster down.
Now that takes care of fiting it to the car. Now we need to make the electronics work. Your old seat controls will not fit nicely to the new seat. It could probably be done but i couldnt have been bothered. The new seat controls will work with the old motors but the harness wires are not in the same position.

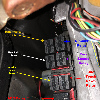
This is the wiring connector that goes to the seat controls. The two holes at the top control the forward and backward motion by switching the motors polarity from positive to negative. We will call those two holes the top. The top of both connectors is the part that has the notch that the other part of the connector clips to. The two holes on the right side are for the tilt control and they operate the same as the top. On the motor wiring harness connector the the two holes on the top are the tilt control wires and the two on the right are the forward and backwards controls. The remaining two holes I left unplug. When i plug these in the tilt motors did not work. You can either cut the connectors are wiring these in with solder and elctrical tape or you can do what I did and cut apart the unused wiring harnesses on the escape seat adjuster and the old seat controls. That will give you something like you see below.

Just a note. Do not leave any wires exposed! The two black wires are your positive and negative. The black with the white stripe is the positive. If you have stock electric seats just wire them into the existing plug. If you dont just ground it to a bolt and run a positive wire.
Hope this helps someone! The escape seat is much more comfortable and closer to a bucket style seat.
For this project you will need the following:
A new seat (mine was $10 from the junkyard out of an 02 Ford Escape)
Your old seat
4 bolts (size isnt that important as long as they are long enough) mine were 2 inches because thats what I had... they were overkill
Drill bits
Drill
Grinder
A welder is you have one, if not ill mention how to do it with out one.
If you dont have a welder, alot of patience.
I wont be going over how to remove or install that seat it self as it is pretty simple and there are several posts on that already.
OK so lets start with your stock seat (this is for a 98 explorer with an electric seat). Remove the seat adjustment rack (not sure the exact name). There will be four 10 mm bolts. See the picture below for the piece you are removing.
The top part is what we need as the mounting brackets that secure the seat to the floor are different and the mechanics are wider on the newer escape.
Next remove the seat adjustment mechanism from the Escape seat. Unlike the Explorer this one is riveted on and is much easier to just grind off like below. If you dont have a grinder buy one, there 30 bucks at Walmart. You will also need to remove the seat belt receiver. The 98 explorer have a different arrangement that bolts to the seat adjustment mechanism. Also the escape has a pyrotechnic charge in the seat belt receiver (first image below) that pulls the belt tight in an accident. This is probably not safe to keep on the car with out the proper wiring. To remove it you need a torx head. I dont know what size as I didnt have any so i just used vice grips and it came right off. Be careful when dealing with this.
You will want the metal rails to be as flush as possible.
Test fit the old seat adjustment over the metal rails like below.
If you are using an 02 Escape seat you will notice it fits perfectly in the recesses. Now here is where things will vary if you dont have a welder. If you dont have a welder you will need to drill a hole the diameter of your bolt through the holes on the seat adjuster into the seat support bracket. It would be best to the tap these holes with the correct thread size because there is not much room to get a nut on the other side of the seat. Alternatively you could rivet a nut into the holes. I cant remember the name of the tool but it does exist. Its basically a rivet gun but it rivets a nut into metal. Its fairly thick steel so a tap should do just fine.
If you do have a welder mark where the holes are on the seat adjuster and weld bolts to the steel. then just bolt the seat adjuster down.
Now that takes care of fiting it to the car. Now we need to make the electronics work. Your old seat controls will not fit nicely to the new seat. It could probably be done but i couldnt have been bothered. The new seat controls will work with the old motors but the harness wires are not in the same position.
This is the wiring connector that goes to the seat controls. The two holes at the top control the forward and backward motion by switching the motors polarity from positive to negative. We will call those two holes the top. The top of both connectors is the part that has the notch that the other part of the connector clips to. The two holes on the right side are for the tilt control and they operate the same as the top. On the motor wiring harness connector the the two holes on the top are the tilt control wires and the two on the right are the forward and backwards controls. The remaining two holes I left unplug. When i plug these in the tilt motors did not work. You can either cut the connectors are wiring these in with solder and elctrical tape or you can do what I did and cut apart the unused wiring harnesses on the escape seat adjuster and the old seat controls. That will give you something like you see below.
Just a note. Do not leave any wires exposed! The two black wires are your positive and negative. The black with the white stripe is the positive. If you have stock electric seats just wire them into the existing plug. If you dont just ground it to a bolt and run a positive wire.
Hope this helps someone! The escape seat is much more comfortable and closer to a bucket style seat.