Paul's '91 Sport | Page 10 | Ford Explorer Forums - Serious Explorations

  • Register Today It's free!

Paul's '91 Sport

Three ashtrays, two doors, one cup holder, and zero Air Bags”

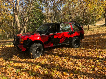
As it sits today. . . (December 2023)
Rig Large (DEC 23).jpg


As it sat last year. . . (2022)
Snow Sport.5 (DEC 21).jpg


Edit: From here on down was the write-up I did for my first Explorer before it was totaled in a commuting accident in March 2017. The write-up for the new (to me) Explorer that was acquired in May 2020 starts on page 2, post #31.

I am the second owner of this vehicle, purchasing it in April 1993. It has been a daily driver, crisscrossed the States multiple times, sat for a few years in storage, and now is dedicated to four-wheeling trips, camping excursions, and hauling the motorcycle to various “track days”. It is not a hard-core rig, but is set up well for the types of four-wheeling I enjoy, and has certainly seen its fair share of difficult trails. It has a number of modifications, with more planned for the future, but is by no means “Done”.

As it used to sit: (2016)
Front Oblique (P).jpg
Rear End.jpg


Here is the run-down of the modifications and when they were installed (or re-worked). . .
- Borla Headers and Cat-Back Exhaust (1995)
- James Duff Pre-Runner Front Bumper (1998)
- Bush Whacker Extend-A-Fender Flares (1998/2016)
- ARB Air Lockers, front and rear (1999/2008/2015)
- 4.10 Gears (1999)
- “SupeRancho” Hybrid Lift, approximately 4” of lift, with SOA (1999)
- 33”x 12.50 Tires (currently Toyo Mud Terrains)
- Con Ferr Roof Rack (1999)
- SuperLift SuperRunner Steering (2000)
- Ramsey REP 8000 winch in Duff Bumper (2002), Warn Synthetic Line (2016)
- Rock Sliders (2002)
- Atlas II Transfer Case (2005)
- ViAir On-Board Air Compressor (2009/2014)
- Modified ¾ Doors (2009)
- Early Bronco fabbed Rear Bumper, “extra modded” to fit the Explorer (2009)
- Rear License Plate Frenched (2009)
- Outback Solutions (ARB) Drawers with fabbed pull-out shelves (2012)
- Corbeau Heated Seats (2013)
- Internal Roll Cage (2013)
- Shelf/Box/Switches (2013-2015)
- Lights – Raptor/Fog/Roof Rack/Rear/Squatch/Interior Hatch/Hood (2013-2016)
- Dual Battery installation (2014)

I'll document most of the projects in subsequent posts with pictures and links to various threads. . .

Paul
'91 Sport


Edit: End of the road in April 2020. . . Read on for the wreck and renovation/restoration/gear swap to new 'Sport'. . .
Fork (APR 20).jpeg


Join the Elite Explorers for $20 each year.
Elite Explorer members see no advertisements, no banner ads, no double underlined links,.
Add an avatar, upload photo attachments, and more!
.


“I’m pacing myself . . .”

Finally finished the power steering cooler project. Spent a good wrenching day at Kevin’s, he was installing his winch, couple of LED lights, Ham radio antenna and skid plates on his ‘21 Bronco.

D505BA34-17F5-4764-83EE-54A5244F1A9F.jpeg

That’s some PEX waterline doing chafe protection.

Barely noticeable…
3F8373EB-04BC-45F7-8BFB-07132FA25E1B.jpeg


Paul


Join the Elite Explorers for $20 each year.
Elite Explorer members see no advertisements, no banner ads, no double underlined links,.
Add an avatar, upload photo attachments, and more!
.


A little bling for the rig - - my Chinesium hook’s gate and spring failed (“You get what you pay for”), so why not upgrade to a quality American component from Factor55?
8A3B4356-32E2-49BA-9732-02274B2B18CB.jpeg


E43A56C9-A0AF-4D9E-83E0-EAEB06019EE4.jpeg


Paul


Did a little "pre-run" up to Lonesome Lake with Kevin and his Bronco prior to a snow run in a few weeks memorializing Phil Fisk who we lost in 2019. Kevin's made some nice upgrades to the Bronco, so it was good to field test them. . . although we didn't need to, not much snow and all the electronic gizmos makes it a challenge for him to lose traction.

Anyway, couple of pics:
Haller.3 (11-6) (2).jpg

First stop, Haller Pass


Lonesome.1 (11-6) (2).jpg

Next stop: Lonesome Lake


Got to field test the small "Fire Pit"
Ignik (11-6).jpg

Pretty nice piece of gear. . .

Lookout for Mount Rainier, not much visible today
Overlook (11-6).jpg


Haller.1 (11-6).jpg

Anyone around on Saturday the 26th, give me a shout if you want to join us.

Happy Trails,

Paul


On the outing last weekend, noted one of the Warn fog lights had a burnt-out bulb, so figured it was a simple replacement. Just a common 55w H3 bulb.

Step 1: Realize there is surface rust on the lights. . .


Warn.1 (NOV 22).jpg

Although the rig lives in the garage, these Warn fog lights sat on the old rig that was parked outside of Kevin's shop for 3+ years. Light sanding on the houses, bezels, metal portion, and what the hell, might as well shoot the lens protectors/guards. . .

Back of the light:
Warn.2 (NOV 22).jpg

(painted portion to the right). . .

Swapped both bulbs, figured only a matter of time until the second one burned out.
Warn.3 (NOV 22) (2).jpg

Step 2: Replace Bulb. . .
0974D02F-4FE8-43E1-9B64-5DD83360AFE7.jpeg


Aaarrgh. . . Tranny woes. . . Not the more common A4LD (assuming "LD" stands for "Light Duty"), but the M5OD (pretty sure the "OD" stands for "Outdated Design"), but either way - - the thing failed right after Thanksgiving when we ran our Memorial Snow Run for Phil Fisk. Have a couple hundred thousand miles on Explorers, so its just part of Explorer lore, or Explorer "chore" . . .

Luckily, I held onto the fairly fresh transmission that I had in the old rig before its demise. . . but since it takes a whole lot of labor to fix any part of the transmission, opted to go "all in" - - new Centerforce clutch, pressure plate, master and slave cylinder, bearings and the housing that had less than 10,000 miles of use.

Gathered the parts and scheduled a weekend at Kevin's (Diff Whack) shop for the effort.

So, after removing way too much stuff - - transfer case skid plate, transmission cross-member, front and rear drive shafts, exhaust "Y" pipe, etc., etc. we finally got to this point:
Old Tranny - Atlas (JAN 23).jpg

Out with the old - - keeping the Atlas, obviously.

Lots of room now. . .
Tranny Hump (JAN 23).jpg

New tranny housing in the bed of the Ranger in the background.

New clutch in place.
New Clutch (JAN 23).jpg


Last part, master cylinder placement - - made easier by removing the inner fender well, Extend-A-Fender fender flare, and wheel. . .
Clutch Master (JAN 23).jpg


In two days went from deconstruction to up-and-running. Still in Kevin's shop as I'm brining the speedo cable to a local speed shop to repair/re-manufacture since it leaks enough to be annoying. . . Rig shifts well, great clutch pressure, will road test once the speedo cable back inserted.

Paul
 
  • Like
Reactions: ~X~


Sweet! I don’t think I have heard of many problems with a m5. You must be talented at destroying them. I am pretty hard on them and they have held together. My current one had 315k on it and I rebuilt just cause it was out and I wanted to add 4 cylinder 1st-3rd gear. Synchros were even working well. Tranny guy who rebuilt it said it looked really good and not even worn out when he rebuilt it.

You tried a center force in my Navajo and it seemed to preform well. I am on my second sohc clutch in my ranger and I really like it. I smoked the first one a couple times and it still stuck in there- just swapped when I rebuilt the tranny and engine because I was there- not because it needed it.


Always looking for more storage - - as it seems a lot of the "nice-to-have" stuff takes up more and more room. The drawer system I've had for years is a nice piece of kit, and although the drawers aren't that deep, I've found a way to use most of the void space behind the rear seat and along the sides to stash gear for the trail.

Had an opportunity to grab a "headache" guard and thought it'd be a good place to hang some of the more commonly used items (with the added benefit of keeping anything in the cargo area from impacting the nugget in a crash/trail mishap). . . Since the deck top of the drawer system is wood covered with carpet, it was a pretty simple install.
Cargo Area (MAR 23).JPG

Hooked to the rack is an axe, first aid kit, and kinetic rope with soft shackles.

The bracket support for the rack, coupled with the track O-rings provides stability for a NATO plastic ammo box I've been lugging around for the last 30 years. . . Great place to store extra fluids in a totally self-contained box, without concerns about leakage, spillage, etc.
Fluids Box (MAR 23).jpg


Minor stuff, I'll admit - - but getting excited for Moab (45 days!) 2023.

Paul


Always looking for more storage - - as it seems a lot of the "nice-to-have" stuff takes up more and more room. The drawer system I've had for years is a nice piece of kit, and although the drawers aren't that deep, I've found a way to use most of the void space behind the rear seat and along the sides to stash gear for the trail.

Had an opportunity to grab a "headache" guard and thought it'd be a good place to hang some of the more commonly used items (with the added benefit of keeping anything in the cargo area from impacting the nugget in a crash/trail mishap). . . Since the deck top of the drawer system is wood covered with carpet, it was a pretty simple install.
View attachment 440460
Hooked to the rack is an axe, first aid kit, and kinetic rope with soft shackles.

The bracket support for the rack, coupled with the track O-rings provides stability for a NATO plastic ammo box I've been lugging around for the last 30 years. . . Great place to store extra fluids in a totally self-contained box, without concerns about leakage, spillage, etc.
View attachment 440461

Minor stuff, I'll admit - - but getting excited for Moab (45 days!) 2023.

Paul


Back when the Pumpkin was practically new I got pulled over for crossing a lightly flowing wash. The officer had the same rig and I saw that he had a partition. I asked if he could look to see who made it. He gave me the company name, and a ticket. 🤣 I found the partition, but at the time it was too expensive for me.


Sohc clutch is the way to go!!!

Moab rules!! sport is awesome as always! Love this truck!!


Getting the base camp trailer prepped for the trip. . . 10 days and counting.
IMG_1395.jpeg


Grill option:
IMG_1394.jpeg

Propane lashed down to trailer . . .

Getting excited for Moab ! ! !


That really is a slick setup. Nice job Paul.


Too long since last post. . . Hung all the decent pics from Moab on the Moab thread back in May and the rig has sat up at work since early June. Brought the rig back home as we get into winter for snow runs here in the Cascades.

Tomorrow's the anniversary (fourth) of Phil's passing, and we've generally made runs memorializing him over the last few years. No snow yet at elevation so far this year, but Kevin and I ran a familiar trail that usually is pretty challenging once the snow hits the ground - - today: not so much . . .
Bronco and Rig (NOV 23).jpg


Phil was known for a secret recipe of what he called "Mountain Burgers", which unfortunately was lost with him. Pretty sure it included marinating the beef for a day or two, and anyone who knows me knows I can't wait that long. . .

We did the best we could with some gourmet burgers - - think Phil would have approved. . .
Burgers (NOV 23).jpg


After airing up. . .
Rig.2 (NOV 23).jpg


Some real projects on the schedule in the next few weeks, stay tuned. . .

Paul


Okay, one of the projects: Hard-wiring a mobile Ham radio into the rig - - obtained my Ham License two years ago, but settled for a Handie-Talkie since then, which is less than optimal for on trail communications. Part of the reason for the delay was the fact that I wrestled with the mounting location for the radio (or head unit) in the rig. I'm pretty well sorted in the interior, but never enough room - - all switches overhead, CB mounted under the ashtray, etc., but where to put another radio?
Overhead:
1700715775718.png

Under dash:
1700715951440.png


All in all, still haven't decided the final mount location, so at the minimum, least I can do is mount up the antenna. . .

Through the firewall:
Wire Hole (NOV 23).jpg

(Large diameter hole due to the cable connector).

Chafe protection - - rubber hose with grommet/zip tie to protect the antenna wire.
Wire Chafe (NOV 23).jpg


. . . and hood mounted antenna:
Ham Ant.2 (NOV 23).jpg


More to follow. . .

Paul


Stack it with the CB. Rock Ranger made the dual mic dash mount.
Like the mic bracket @RockRanger, would like to see a close up of that - - was considering magnets for the hand mics.

Today's effort (before the tryptophan kicked in). . . Main unit tucked into the void behind the Outback Solutions (ARB) storage drawers and behind the rear seats near the ViAir- - attempted to fit it under the passenger seat, but just not enough room. Also considered on the back side of the center console, but as weird as it sounds, don't like drilling into the plastics if I can help it.
Unit.1 (NOV 23).jpg


Will need the Cat 5 cable and a remote speaker, but overall happy with the location.
Unit.2 (NOV 23).jpg


Paul


Okay, buttoning this project up. . . Inexpensive external speaker to aid "those hearing impaired..." wedged under the rear passenger seats:
Ham Speaker.1 (NOV 23).jpg

Snugs in well behind the High-Lift . . .
Ham Speaker.2 (NOV 23).jpg


Here's the end result of the head unit in the ****pit (aka driver's area):
Ham In.1 (NOV 23).jpg


Wide view:
Ham In.2 (NOV 23).jpg


Glad to finally get this project done - - and be able to communicate on the trail.

Paul


I’m guessing you can’t fold flat your back seats anymore? I did similar mods and then eventually just removed the back seat… then had a kid and raising grandkids in law so I snagged a Suzuki samurai fold n tumble back seat and installed that. Now my son is 5’-8” at 14 years old and they no longer fit back there so I’m goi g back to no back seat lol. More room for stuff!!!


Like the mic bracket @RockRanger, would like to see a close up of that - - was considering magnets for the hand mics.

I like heavy duty velcro for my microphones. It holds very well.


I’m guessing you can’t fold flat your back seats anymore? I did similar mods and then eventually just removed the back seat… then had a kid and raising grandkids in law so I snagged a Suzuki samurai fold n tumble back seat and installed that. Now my son is 5’-8” at 14 years old and they no longer fit back there so I’m goi g back to no back seat lol. More room for stuff!!!
Like most things, a compromise. . .

Can I fold the seats down ? Sure, just pop out the Hi-Lift. Not that it matters much, the drawer system and headache rack eliminate the ability to haul most large things anyway - - that’s why I have the Ranger. . . Want the Hi-Lift for four wheeling, don’t want to add the Con-Ferr roof rack just to tote it (center of gravity and windage), so attached to rear seats it is.

The rig is a “toy”, got other vehicles for other purposes, so really doesn’t need to do ten things at once; for me and the Mrs. for local four wheeling, day trips with my buddies, and Moab pilgrimages.

Now, if I had a new 2-door Bronco, I’d definitely pop out those rear seats as there is zero cargo space behind them. . .

Paul


Join the Elite Explorers for $20 each year.
Elite Explorer members see no advertisements, no banner ads, no double underlined links,.
Add an avatar, upload photo attachments, and more!
.


That’s what I was saying! Just remove that sob, more space for stuff!! If people want to ride back there then they can sit on the jack lol

Rig is beautiful
I hate roof racks, they hardly ever get used and they are such a pita to clear snow off the roof


Back
Top