strikefast
Member
- Joined
- May 18, 2006
- Messages
- 14
- Reaction score
- 0
- City, State
- Raleigh, NC
- Year, Model & Trim Level
- '92 XL
I've been getting CM code 172 on my early 92 XL Thanks to this board, I realized that it might not necessarily be the O2 sensor that was "causing" the lean running condition. Under my hood I found that the purge canister solenoid valve had a broken white vacuum tee. One side of the tee had broken off inside the vacuum line that runs to the intake manifold. A vacuum leak is definitely a possible cause for the lean condition.
I figured no big deal. I'll just order a new purge valve (which I did from RockAuto) and replace it, extracting the broken piece of plastic from the vacuum line when I get ready to do the repair. In the meantime, I just taped it together as best I could.
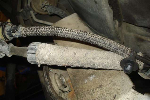
The valve arrived, but I'm having a devil of a time getting it installed. The issue is the tubing. Inside the outer rubber vacuum tubing that runs from the purge canister to the valve to the intake manifold is a hard, black plastic inner tube. I assume the purpose is to keep the vacuum line from collapsing. However, I'm not sure how to deal with it. It flexes a little, but not very much--it is more hard than soft.
I disconnected the vacuum line between the canister and the old valve, and pulled the outer rubber hose off. The black plastic that remains seems to have a death grip on the side of the white tee from the purge valve. I'm just not sure how to get it off.
Is it some kind of heat-shrink tubing? It seems harder than other heat-shrink tubing I've seen... Whatever it is, it would seem I need to save it to use with the new valve.
On the side of the purge valve that runs to the intake manifold, I now understand why I also had trouble getting the broken piece of the white tee valve out (I can feel firmness in the line that runs to the intake, so I assume this hard black plastic runs the full length of that hose as well. So that one seems even harder to get out.
Do I have to replace all the hoses, too? Is there a way to intelligently extract my purge valve from one side and the broken piece of white tee from the other side?
I figured no big deal. I'll just order a new purge valve (which I did from RockAuto) and replace it, extracting the broken piece of plastic from the vacuum line when I get ready to do the repair. In the meantime, I just taped it together as best I could.
The valve arrived, but I'm having a devil of a time getting it installed. The issue is the tubing. Inside the outer rubber vacuum tubing that runs from the purge canister to the valve to the intake manifold is a hard, black plastic inner tube. I assume the purpose is to keep the vacuum line from collapsing. However, I'm not sure how to deal with it. It flexes a little, but not very much--it is more hard than soft.
I disconnected the vacuum line between the canister and the old valve, and pulled the outer rubber hose off. The black plastic that remains seems to have a death grip on the side of the white tee from the purge valve. I'm just not sure how to get it off.
Is it some kind of heat-shrink tubing? It seems harder than other heat-shrink tubing I've seen... Whatever it is, it would seem I need to save it to use with the new valve.
On the side of the purge valve that runs to the intake manifold, I now understand why I also had trouble getting the broken piece of the white tee valve out (I can feel firmness in the line that runs to the intake, so I assume this hard black plastic runs the full length of that hose as well. So that one seems even harder to get out.
Do I have to replace all the hoses, too? Is there a way to intelligently extract my purge valve from one side and the broken piece of white tee from the other side?
")