Solved - Rack and pinion bushings | Ford Explorer Forums - Serious Explorations

  • Register Today It's free!

Solved Rack and pinion bushings

Post number 9 has been selected as best answered.

Prefix for threads that contain problems that have been resolved, and there is an answer within the thread.

donalds

Elite Explorer
Joined
July 12, 2015
Messages
6,494
Reaction score
4,586
Location
Stem
City, State
Nc
Year, Model & Trim Level
1999 ford explorer sohc
Has anybody replaced their rack and pinion bushings in the truck ?
I would like to NOT pull the rack and pinion any ideas
If I do Remove the rack is there any O. rings I need to put everything back together

thanks


Join the Elite Explorers for $20 each year.
Elite Explorer members see no advertisements, no banner ads, no double underlined links,.
Add an avatar, upload photo attachments, and more!
.


Haven’t done that, only swapped the rack.

I don’t recall any o-rings, I believe the connections are all flare style?

Should have enough room to change the bushings with it still in the truck methinks, especially with the 🧦


Has anybody replaced their rack and pinion bushings in the truck ?
I would like to NOT pull the rack and pinion any ideas
If I do Remove the rack is there any O. rings I need to put everything back together

thanks
There is a Teflon washer on one hard line. Also take note of the check valve.


Is there any possible way you can help me find a part number or any 1 help me
AutoZone sell them, just do a seach for Teflon washer power steering line. It comes as a two pack one large and one small. Dorman 82540. This for my 95. You should put your year in . just did a seach for 99 SOHC v6 engine, its the same part number $5.


pushing those bushings in and out is do able, maybe not in the truck
Removing the rack takes about an hour
Have you considered a new rack? usually if the rack is moving alot around the bushings you may have some binding going on forcing it to walk on the bushings before turning the wheels

I have done 3 rack and pinions this summer......everything is always in 3's
Avoid the CHEAPO reman or NEW units. I had a brand new rack and pinion FAIL in 3 days, skipping teeth inside...... warranty will not refund my $$$, only provide me with another POS..... I ate the $350 and bought a new Toyota part for $700.........all is good now. WHAT A PITA!!!!!!!!!


The rack is the original ford part there is no leaks at all
I rebuilt the rack myself With new seals and or rings ect..
I think I bought a kit
Same with the power steering pumpI bought a kit

you considered a new rack? usually if the rack is moving alot around the bushings you may have some binding going on forcing it to walk on the bushings before turning the wheels
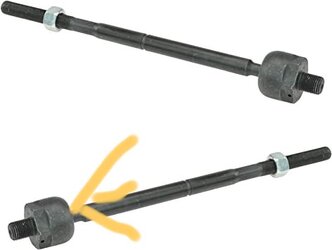
I didn't consider a new rack just because mine is not leaking I plan on removing the inner tie rods with the outer tie rods still connected to togather as units
I will remove them while the rack is still bolted into the truck
I'm going to re lube The inner and outer tie rod emds off the truck
I take them off in 1 pc so that I don't ruin my alignment
The reason I am replacing these bushings is because I'm chasing a popping sound that occasionally happens when she backs out of the parking spot
It's not any of the other suspension components believe me
So I'm just gonna pull the rack and pinion and replace the bushings clean Re grease put it back on the truck
I ordered some Teflon O. rings and AC delco bushings and pins kit


Today I went at this rack
I first loosened the pinch bolt in the steering shaft lower
I then locked the wheel straight then removed the shaft
I removed the tie rods as a assembly ...inner outer with the boot ...
Now I pushed the rack gear in the rack and pinion all the way to the passenger side
I removed the cooler put it aside and drained the system
Now the low pressure line can be removed from the cooler and left on the rack all together
Removed the Rack mounting bolts
I tilted the whole unit back and removed the high pressure line
I hear lots of story s about how hard it is to remove the unit but its easy
My thinking was if its hard to get out of the front then ill try the back
I removed the rack in 2 minutes. mint
Cleaned the rack installed the new bushings old ones were a little beat up normal
Installed the steering rack being sure to put it back in the exact same spot
Regressed the rack gear both sides lots of moly assembly lube ...rack rebuilder
Told me what to use and where to use it :) just a phone call


Now the tie rod assembly s were done one at a time
I put about a half a tube of grease through each outer tie rod ends to flush them out Boy they are tight hard to move by hand the inner ones to
The inners were flushed out and refilled with silicone grease
Re installed them with a drop of lock tight on the inners
Installed the outer ends to the steering knuckles
I installed the steering shaft the way I removed it
I unlocked the wheel ...pay attention to have everything lined up or you will damage the clock spring assembly
Filled the system I turn the pump by hand and have her turn the wheel
Big bubbles are easier to get out than little ones:)
Test drive went great
I almost forgot the Teflon o ring edit no leaks;)
I just put a string through it and worked it on no problem
Be sure to have a 19mm line wrench ready :)


Today I went at this rack
I first loosened the pinch bolt in the steering shaft lower
I then locked the wheel straight then removed the shaft
I removed the tie rods as a assembly ...inner outer with the boot ...
Now I pushed the rack gear in the rack and pinion all the way to the passenger side
I removed the cooler put it aside and drained the system
Now the low pressure line can be removed from the cooler and left on the rack all together
Removed the Rack mounting bolts
I tilted the whole unit back and removed the high pressure line
I hear lots of story s about how hard it is to remove the unit but its easy
My thinking was if its hard to get out of the front then ill try the back
I removed the rack in 2 minutes. mint
Cleaned the rack installed the new bushings old ones were a little beat up normal
Installed the steering rack being sure to put it back in the exact same spot
Regressed the rack gear both sides lots of moly assembly lube ...rack rebuilder
Told me what to use and where to use it :) just a phone call


Now the tie rod assembly s were done one at a time
I put about a half a tube of grease through each outer tie rod ends to flush them out Boy they are tight hard to move by hand the inner ones to
The inners were flushed out and refilled with silicone grease
Re installed them with a drop of lock tight on the inners
Installed the outer ends to the steering knuckles
Filled the system I turn the pump by hand and have her turn the wheel
Big bubbles are easier to get out than little ones:)
Now for a test drive
Wow that's awesome to hear I've got to replace my rack soon since its leaking


4.0 rack isn’t bad.

5.0 rack sucks a bit more. Less room to work, and you have to unbolt the engine from the mounts and lift it up an inch or so to get the rack out


4.0 rack isn’t bad.

5.0 rack sucks a bit more. Less room to work, and you have to unbolt the engine from the mounts and lift it up an inch or so to get the rack out

7ae9022a40328de7907060acf3375d8f.jpg


Today I went at this rack
I first loosened the pinch bolt in the steering shaft lower
I then locked the wheel straight then removed the shaft
I removed the tie rods as a assembly ...inner outer with the boot ...
Now I pushed the rack gear in the rack and pinion all the way to the passenger side
I removed the cooler put it aside and drained the system
Now the low pressure line can be removed from the cooler and left on the rack all together
Removed the Rack mounting bolts
I tilted the whole unit back and removed the high pressure line
I hear lots of story s about how hard it is to remove the unit but its easy
My thinking was if its hard to get out of the front then ill try the back
I removed the rack in 2 minutes. mint
Cleaned the rack installed the new bushings old ones were a little beat up normal
Installed the steering rack being sure to put it back in the exact same spot
Regressed the rack gear both sides lots of moly assembly lube ...rack rebuilder
Told me what to use and where to use it :) just a phone call


Now the tie rod assembly s were done one at a time
I put about a half a tube of grease through each outer tie rod ends to flush them out Boy they are tight hard to move by hand the inner ones to
The inners were flushed out and refilled with silicone grease
Re installed them with a drop of lock tight on the inners
Installed the outer ends to the steering knuckles
Filled the system I turn the pump by hand and have her turn the wheel
Big bubbles are easier to get out than little ones:)
Test drive went great
I almost forgot the Teflon o ring
I just put a string through it and worked it on no problem
Nice description.
I a few question

"Regressed the rack gear both sides lots of moly assembly lube"
1. I don't know what you talking about. Please explain?
"The inners were flushed out and refilled with silicone grease"
2.. I don't know what you talking about. Please explain.
Why I ask is, I just screw in the Inners, attached the outer ends and install them, then grease them. So I only uses the only on the outers and don't know where you are using the silicone.


Regressed the rack gear both sides lots of moly assembly lube"
1. I don't know what you talking about. Please explain
Inside the rack and pinion steering gear
There is a rack ....imagine A gear but flat instead of round
And a pinion gear to drive the rack back and forth

The part the inner tierod screws into
Grease both sides

"The inners were flushed out and refilled with silicone grease"
2.. I don't know what you talking about. Please explain
The inner tie rod Ball and socket under the boot grease it with proper grease

61loYjiu7mL._AC_SY355__kindlephoto-14200320.jpg d7dec0b221efa83035d5a60bf4050865_kindlephoto-14041840.jpg


Nicely done!!

Check rear driveshaft slip yoke for the noise you hear when first backing up


Nicely done!!

Check rear driveshaft slip yoke for the noise you hear when first backing up
The only slip yoke is on the back of the trans and It ....looks ok....
I did initially think that it was u joints or something drive shaft related
But it's not
However the pop noise is gone


Solved. Awesome.


Today I went at this rack
I first loosened the pinch bolt in the steering shaft lower
I then locked the wheel straight then removed the shaft
I removed the tie rods as a assembly ...inner outer with the boot ...
Now I pushed the rack gear in the rack and pinion all the way to the passenger side
I removed the cooler put it aside and drained the system
Now the low pressure line can be removed from the cooler and left on the rack all together
Removed the Rack mounting bolts
I tilted the whole unit back and removed the high pressure line
I hear lots of story s about how hard it is to remove the unit but its easy
My thinking was if its hard to get out of the front then ill try the back
I removed the rack in 2 minutes. mint
Cleaned the rack installed the new bushings old ones were a little beat up normal
Installed the steering rack being sure to put it back in the exact same spot
Regressed the rack gear both sides lots of moly assembly lube ...rack rebuilder
Told me what to use and where to use it :) just a phone call


Now the tie rod assembly s were done one at a time
I put about a half a tube of grease through each outer tie rod ends to flush them out Boy they are tight hard to move by hand the inner ones to
The inners were flushed out and refilled with silicone grease
Re installed them with a drop of lock tight on the inners
Installed the outer ends to the steering knuckles
I installed the steering shaft the way I removed it
I unlocked the wheel ...pay attention to have everything lined up or you will damage the clock spring assembly
Filled the system I turn the pump by hand and have her turn the wheel
Big bubbles are easier to get out than little ones:)
Test drive went great
I almost forgot the Teflon o ring edit no leaks;)
I just put a string through it and worked it on no problem
Be sure to have a 19mm line wrench ready :)
1. How did you remove the Inners tie rod ends ( do have a tool or load a tool?)
2. What did you uses for power steering fluid?
3. How did you flushed out inners and refilled with silicone grease( by hand or a gun)?


1. How did you remove the Inners tie rod ends ( do have a tool or load a tool?)
2. What did you uses for power steering fluid?
3. How did you flushed out inners and refilled with silicone grease( by hand or a gun)?
Pipe wrench works for inner tie rod


Join the Elite Explorers for $20 each year.
Elite Explorer members see no advertisements, no banner ads, no double underlined links,.
Add an avatar, upload photo attachments, and more!
.


1. How did you remove the Inners tie rod ends ( do have a tool or load a tool?)
2. What did you uses for power steering fluid?
3. How did you flushed out inners and refilled with silicone grease( by hand or a gun)?
#1 pipe wrench
#2 Mercon V
#3 break clean and by hand took a hour;)

I can post the ford service manual instructions if you need me to


Back
Top